Become a Patron!

Made in USA Box MODs coming to Absolute-Wood

Absolute-Wood

VU Vendor
VU Vendor
VU Donator
Bronze Contributor
Member For 4 Years
ECF Refugee
Hi everyone-

My name is Rick, and I run Absolute-Wood. We've made vape stands since late 2011. I've been a Mechanical Designer for over 20 years and have designed a great array of products over the years. Please visit our forum here to learn more about us.

With Deeming, I finally decided to give in and design some mods-

Well, been busy designing at my 3D Workstation-

27988122285_259f11c6d8_c.jpg

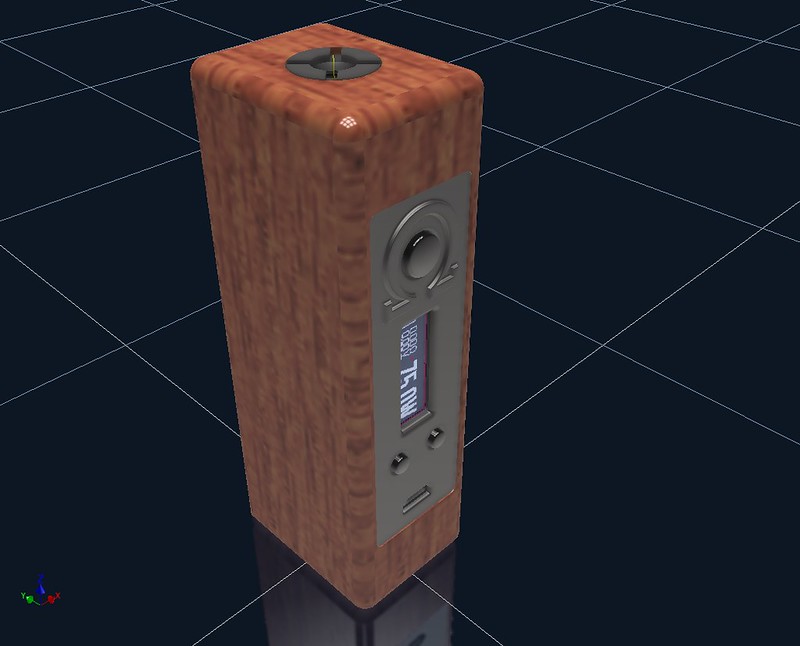
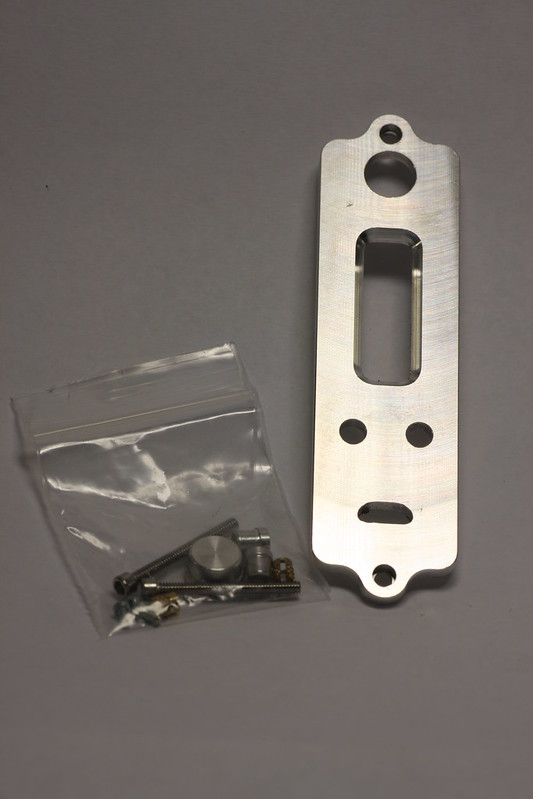
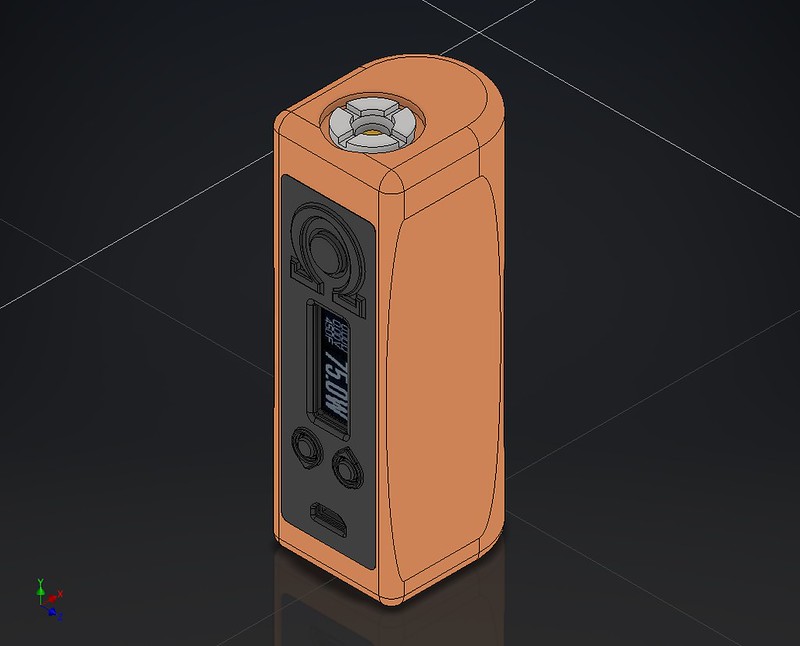
Stainless Steel Faceplate & Buttons shown.
27948759286_4ea9233dd0_o.jpg

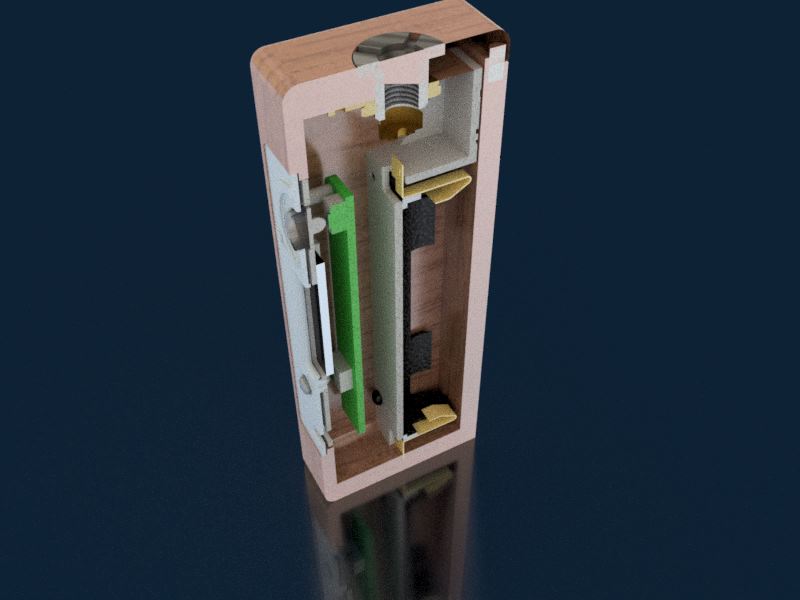
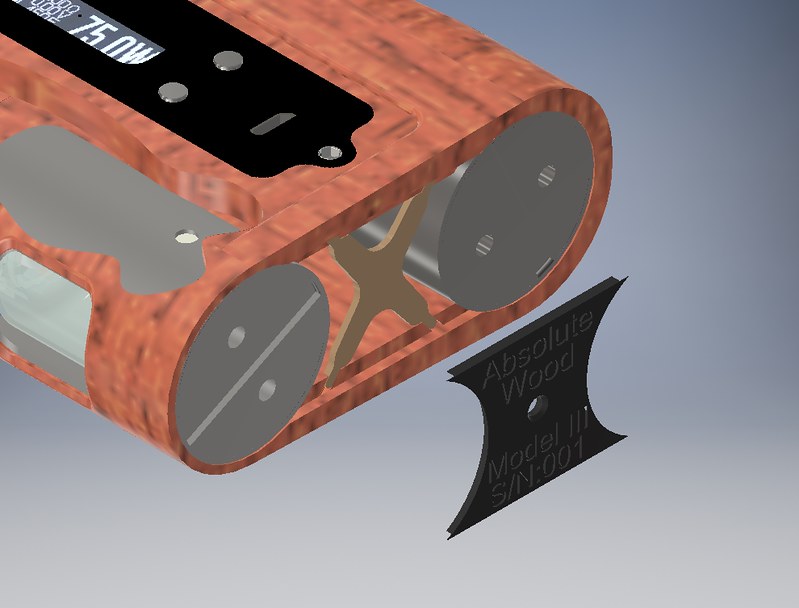
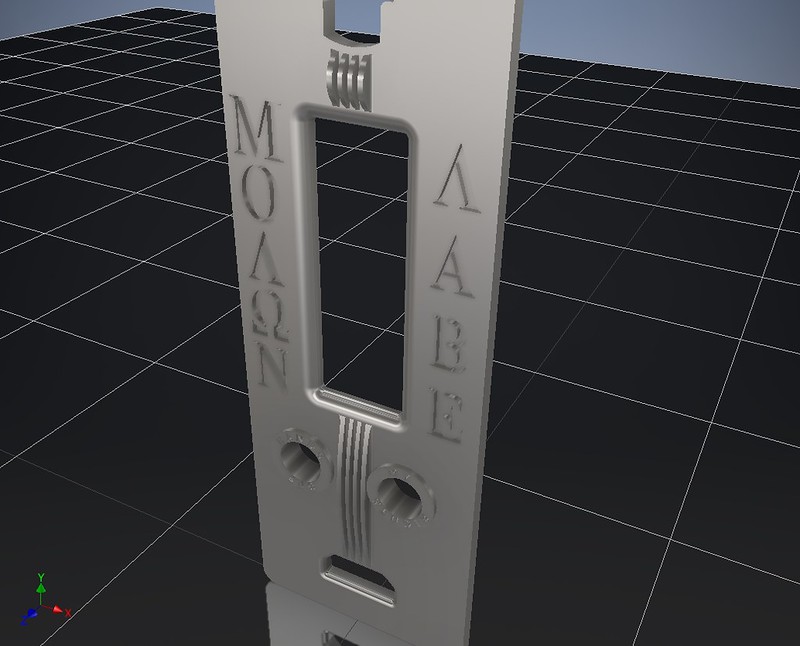
View of the PV "chopped" in half, exposing the inner structures.

Modeled in a single block of Oak for the moment. All USA parts, US designed and manufactured.

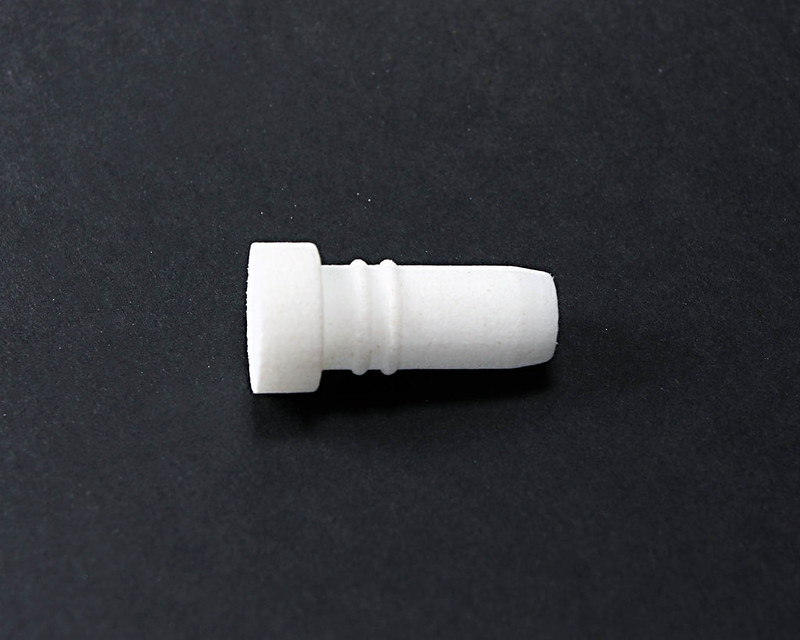
The parts used include the Evolv DNA75 chipset with temp control & much more, a Fat Daddy's 510 Woody connector and a Keystone battery sled.

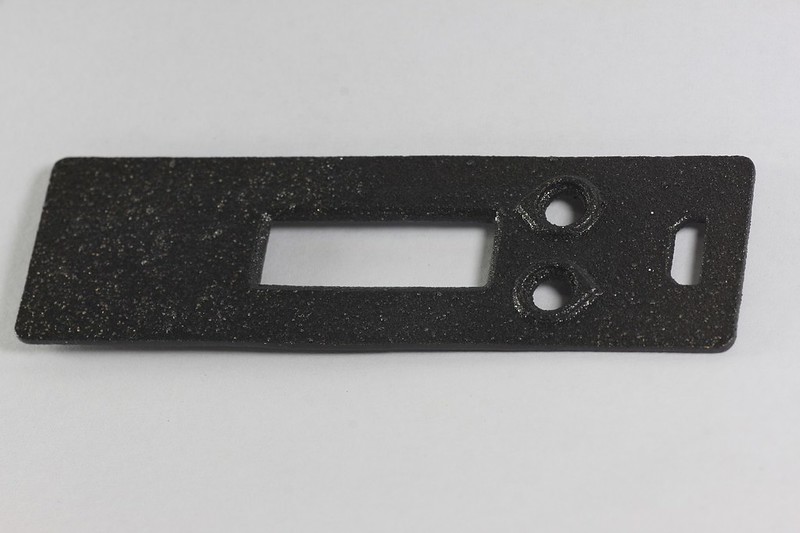
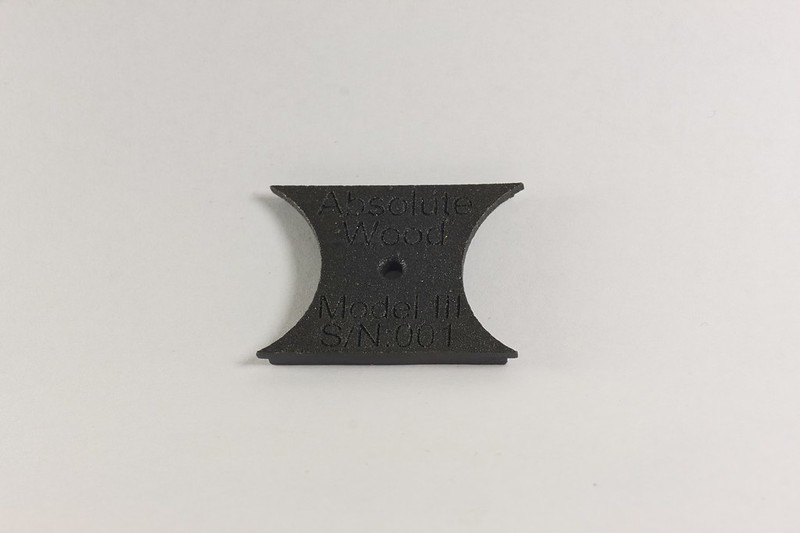
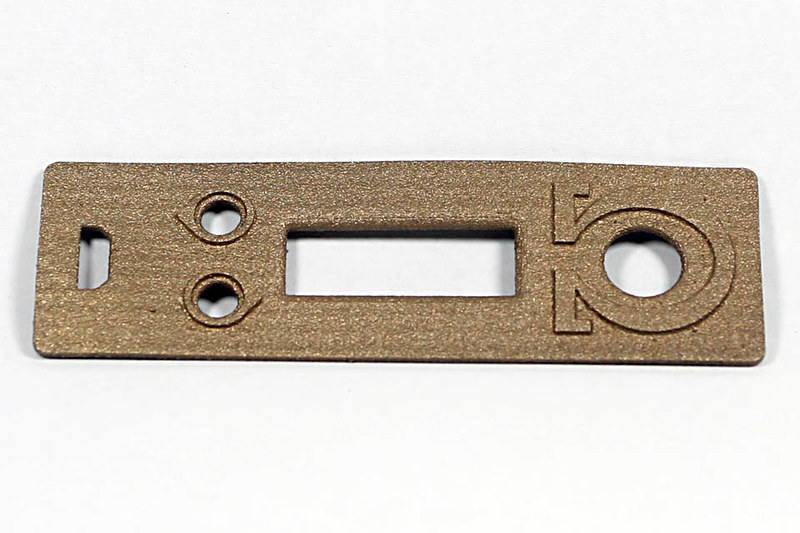
Part of the design includes a handful of 3D Printed parts including the chipset mount/button pusher; the battery sled holder & the Faceplate.

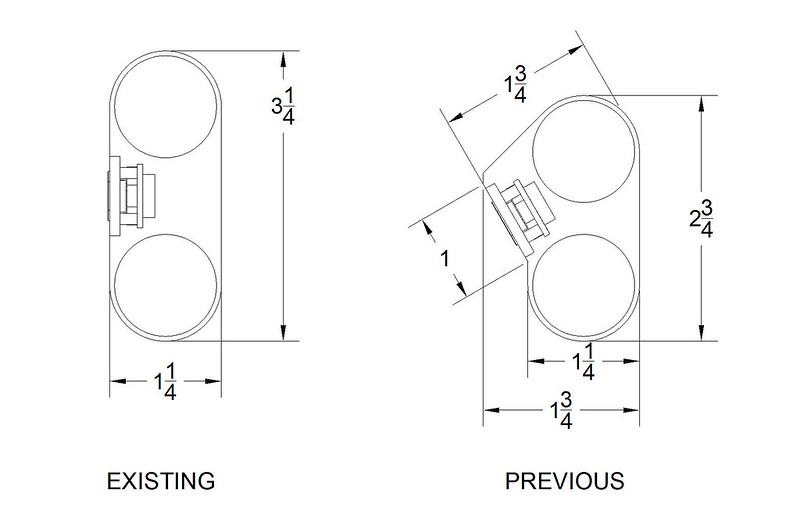
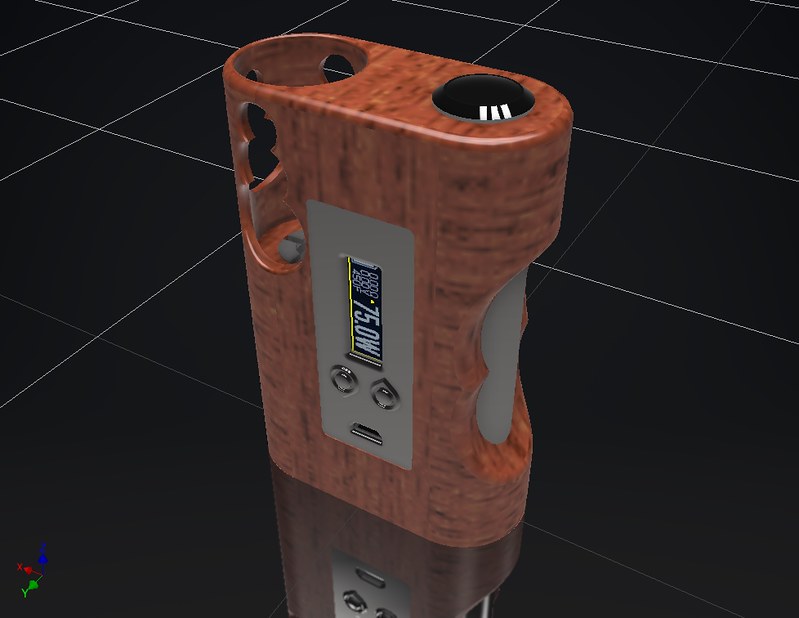
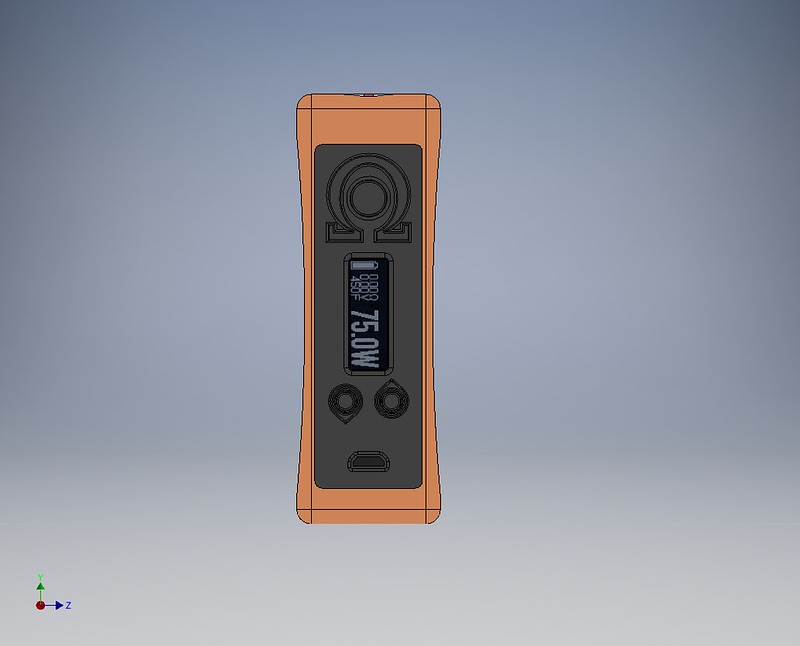
So far, I've created three different Faceplates. A flat, featureless basic Face; a flat version "Ohm" Faceplate (shown above), and a Faceplate with a contoured surface that provides a buildup around the buttons to prevent accidental firing:
27704081290_476fbfe74b_c.jpg

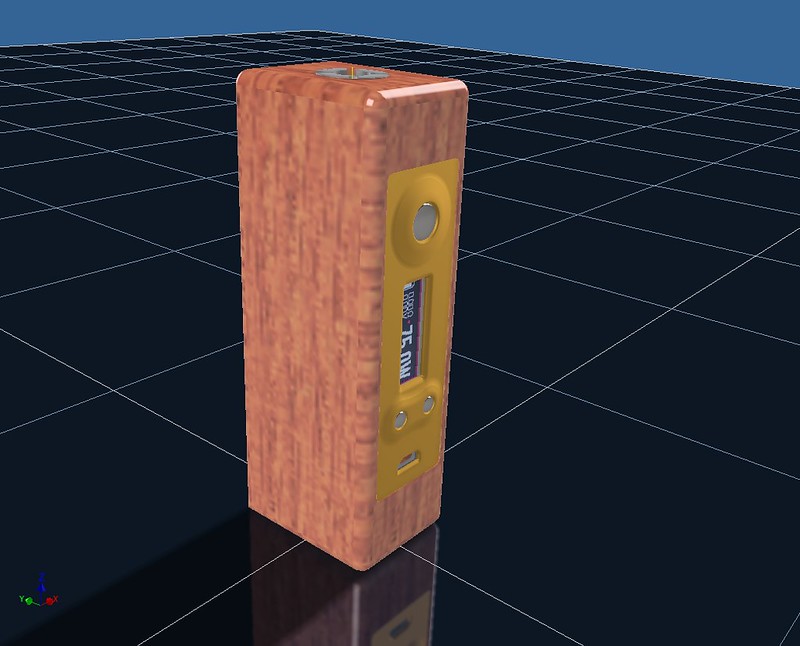
The Faceplates (and buttons) will be available in Plastic, Stainless Steel & Brass (shown above).


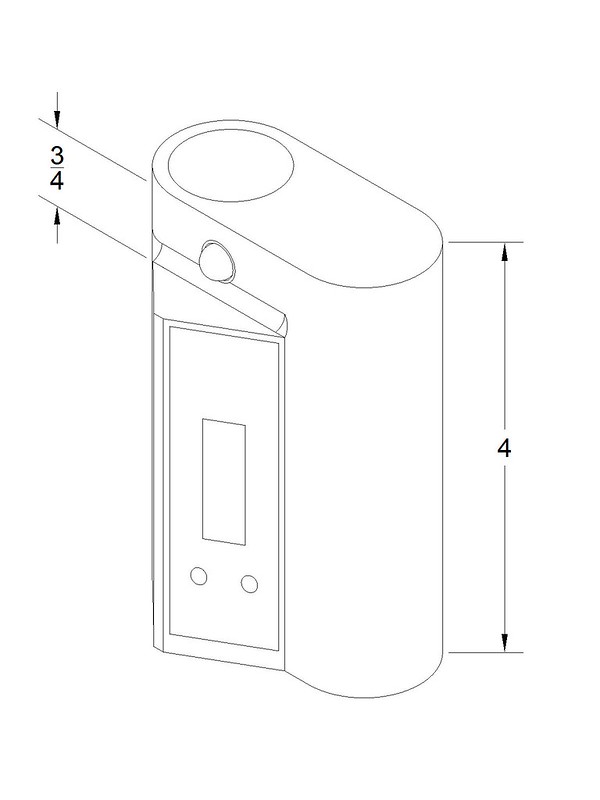
This MOD is the first design - a single 18650 DNA75 made as reasonably small as possible:
1-1/4"w x 1-5/8"d x 4-3/8"h. The battery access door is on the edge opposite the Faceplate, slides open and closed, and uses magnets to hold the closed position.

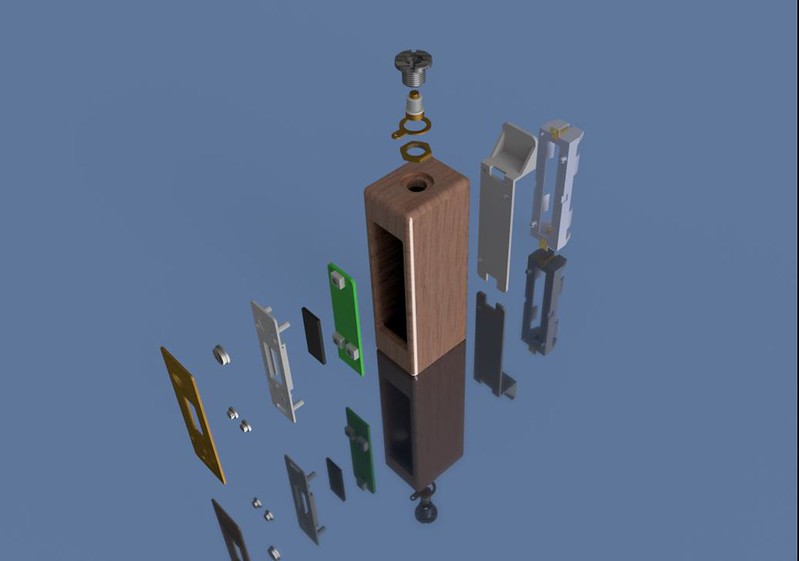
I made a simple animation of the complete PV coming apart & it shows the door sliding out. I was able to copy it from Facebook-

An raytraced frame from the animation:
27988089385_ce25b6920d_c.jpg

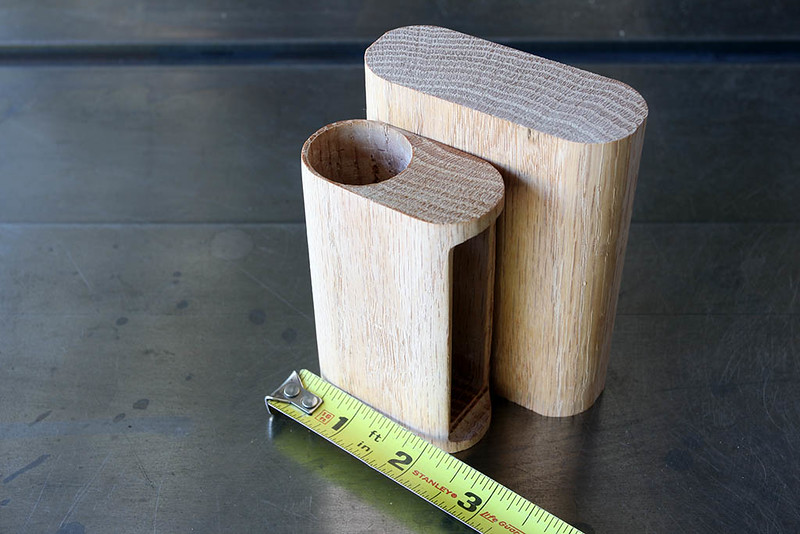
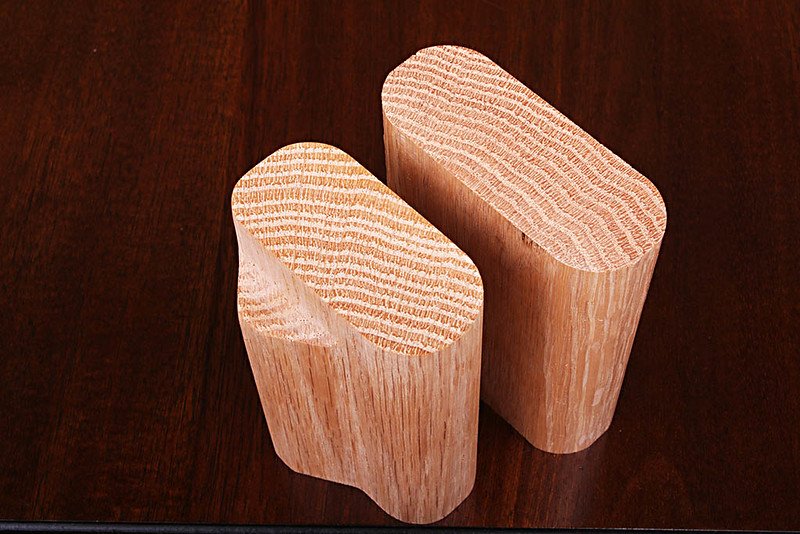
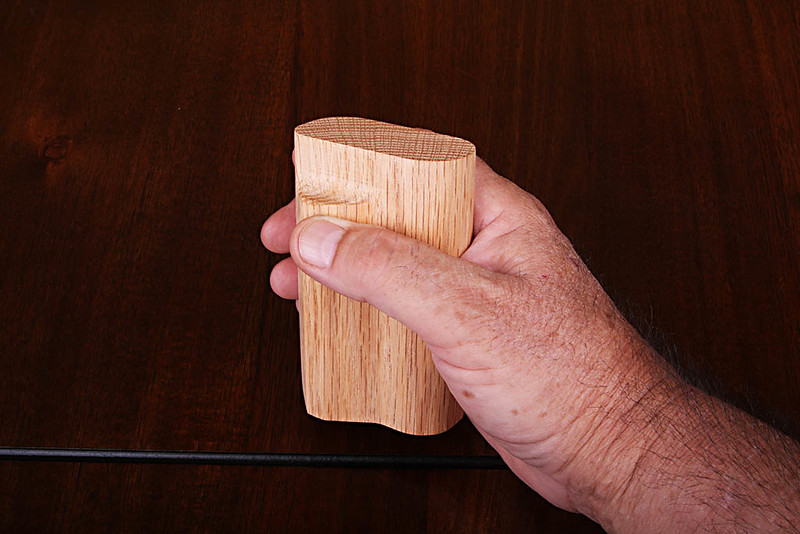
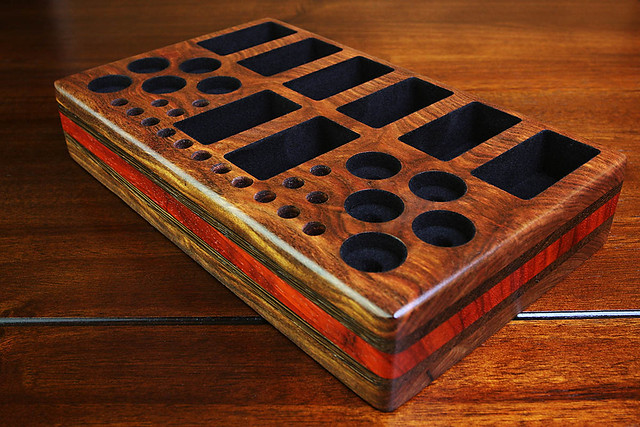
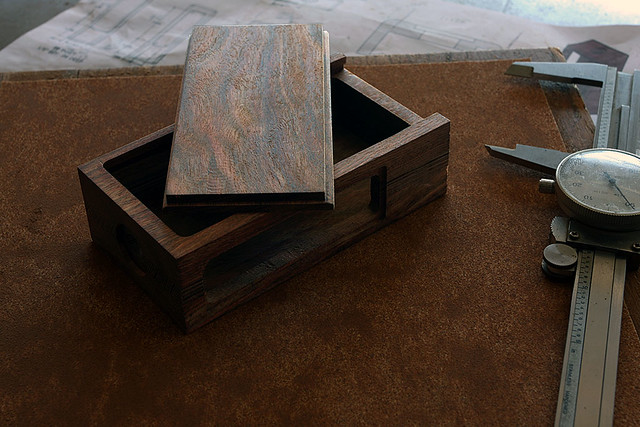
The doors are cut from the block early in the production process, so they will match the grain when in place. Three different versions of the bodies will be produced - single species solid block; multi-layered, multi species laminated blocks (like our vape stands); and stabilized wood/resin blocks similar to:


31247180706_bfd1851913_z.jpg


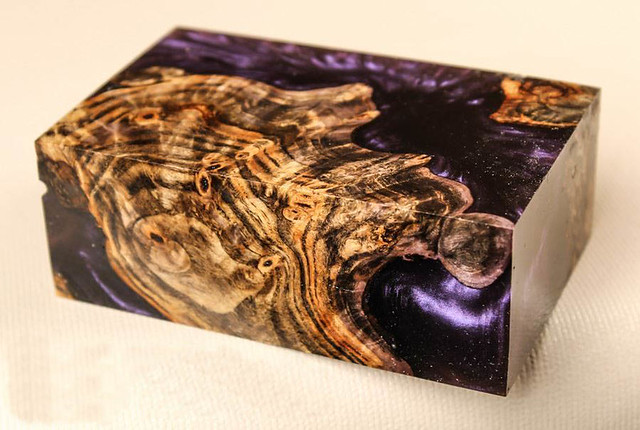
This is from one of my favorite sellers on FleaBay.

As said, this single 18650 version is the first design. A very similar dual 18650 version with the sliding door on the side is currently on the drawing board. A third, Side by Side style is also in my head and waiting to be designed after the dual battery MOD is designed next.

Also considering looking into 26650 possibilities too. Well, whatever I can finalize designs on and have available for order by August 8th...

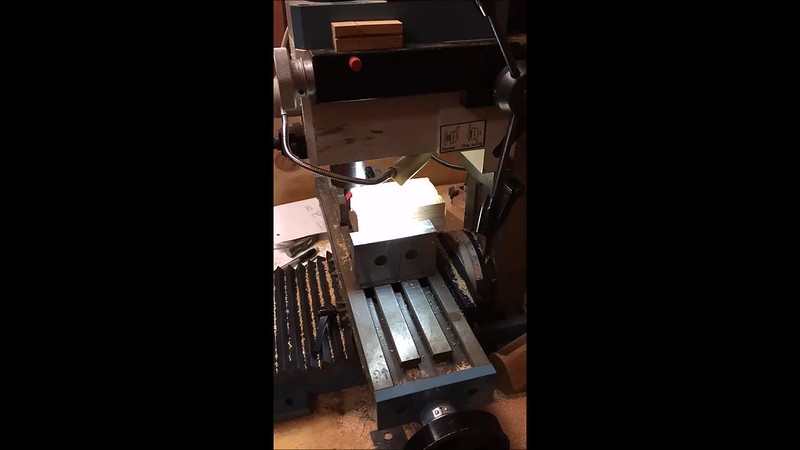
I still have to order some 3D printed parts to test out sizing and looks before we can build the initial test units. Need to test machining methods and work out proper order of operations, etc...

They will actually be two DNA40's from dis-assembled new PV's (bought for this) and one with a new DNA75 chipset. Probably one in single species with a plastic faceplate, multi lamination version, and I have a pretty cool purple, blue, slate and orange piece of stabilized maple burl I will probably utilize for one of them.

Sorry, but the three test units already have been assigned for local evaluation.

Pricing has not been determined yet, but should start out under $200, possibly less - for a DNA75 MOD that is 100% US made, parts and labor ;)


I've even been playing around modeling some custom fire buttons, too...
27704080980_f78979b46d_c.jpg


More updates as they happen-

Rick
 
Last edited:

Absolute-Wood

VU Vendor
VU Vendor
VU Donator
Bronze Contributor
Member For 4 Years
ECF Refugee
Hey everyone,

Here's the animation of the 2 x 18650 device - the Model II. It took many minor adjustments (read: start over because of stupid oversight), but I finally got the full animation of the Model II device completed. This unit also features all American parts - Evolv DNA chipset, Keystone battery holder, Fat Daddy or Varitube 510 connector and 3D Printed parts.

This particular model features a laminated body - Wenge center strip with Caribbean Rosewood on the sides. Unfortunately, my CAD program doesn't do justice to exotic woods - pics will be better when they come.


Absolute-Wood

VU Vendor
VU Vendor
VU Donator
Bronze Contributor
Member For 4 Years
ECF Refugee
Hey everyone,

Been busy designing again -
27916035833_0210ba4c8f_c.jpg

This 18650 device will be christened the Model IV or MOD IV. The MOD III is still "on the drawing board", but imagine this MOD with a larger diameter on one end for a 26650 battery and the same sized diameter as this one on the tank end, a bit of a wedge shape. More to come...

Modeled in "Oak" for the moment, but will probably be produced in stab wood or laminated exotic species (actually, whatever you want). It features a Side by Side design; 18650 SS Fat Daddy's battery tube; shorter side mounted faceplate with display and control buttons; top mounted 16mm Bulgari fire button (looking for a US button of same quality). Dims are 2-3/4"w x 4"h x 1-1/4" thick. Stainless steel bottom that will be embossed with the serial number, and can even have your name or other text embossed in it at no additional charge.

There are a few new 3D printed parts I am prepping, and will prepare an exploded animation of this device as well.

In other news, I've almost finished machining a Walnut body for our MOD I device, and have prepped an awesome Caribbean Rosewood & African Wenge laminated block to be the body of our MOD II design. I'm still waiting on a shipment of 3D printed parts to begin assembling our first two designs!

When we've prepped the website for sales, there will be a configurator that will allow you to select several options with all the mods. Wood choices, SS, Brass or plastic hardware such as faceplates, buttons and connectors. Every MOD will be hand made for each customer, and carry a six month warranty.

Thanks,

Rick
 

Absolute-Wood

VU Vendor
VU Vendor
VU Donator
Bronze Contributor
Member For 4 Years
ECF Refugee
Here's a quick video (2-1/2 min) of the items making up a Faceplate assembly being put together in the computer; this is for the Side by Side designs -

If you're at work - watch your sound, there's music

Enjoy,

Rick


Absolute-Wood

VU Vendor
VU Vendor
VU Donator
Bronze Contributor
Member For 4 Years
ECF Refugee
It took some doing, but we finally have the Box MOD section inserted into the Absolute website - we have pull down menus to choose practically every option we have - there are some kinks to work out I'm sure - but it's fully operational! And, before 8.8
US Made Box MODs
Hand made in US box mods with many options
ABSOLUTE-WOOD.COM

Whew! Finally!

Rick ;)
 
Last edited:

Absolute-Wood

VU Vendor
VU Vendor
VU Donator
Bronze Contributor
Member For 4 Years
ECF Refugee
Very interesting ... looking forward to seeing the actual prototypes.
Thanks, The first proto is a Mod I in solid American Black Walnut. Here's a look at the body and door after oil, but before clear coat and wet sanding:

The pieces are finished now, and in the hands of Jim. He is going to make shrink wrapped wiring harnesses for each model as we go. He is "Mr. Detail" with this stuff and very excited to be a part of these.

Right now, I'm machining the blank for the second proto, a Model II. The blank is a sandwich of two exotic woods - a 1/4" strip of African Wenge in the center, sandwiched between 1/2" Caribbean Rosewood slabs. This rosewood is very rare, I usually buy a board (about $170, 6" x 8') when it's available. I'll get some pics of the blank up after machining. This is a past holder, main wood is Caribbean Rosewood:

Caribbean Rosewood-Wenge-Padauk


Rick
 

Absolute-Wood

VU Vendor
VU Vendor
VU Donator
Bronze Contributor
Member For 4 Years
ECF Refugee
Hey Everybody-

Machining for the second Proto, a Model II in Caribbean Rosewood & Wenge:

Cutting the body cavity - you can see the cutter is cutting through the Wenge, leaving Rosewood under and to the left of the bit. It almost hurts to turn so much Rosewood into wood chips...

The purpose of prototypes are to see and learn from what you forgot, missed, screwed up on, etc... I learned I need to cut the full door detail on the body before I cut the body cavity out. When clamping the body after the cavity is there, the top edges actually bend over somewhat unevenly and caused the match between the door and the opening to gap at the top of the door - lesson learned. Same with the door, it's only 1/4" thick and can't be clamped too tightly or it bows up in the center causing issues trying to make it flat and of even thickness across.

The set, ready to be sanded-

MOD II PROTO MACHINED


Going to work on one more MOD to try and get on the website before Monday. Probably won't make it - but that just means I can't sell it online, I can still make it ;) Going to be a single 18650 with a battery tube, and more curved and shapely than the boxes or the Side by Sides - trying to get it as small as possible.

Cheers,

Rick
 

Mattp169

Platinum Contributor
Vape Media
Member For 5 Years
rick will you be offering anything that is simplistic
like a basic PWM chip with a potentiometer 2x18650 and either simple volt meter led or the modmeter display by modmaker uk
 

Absolute-Wood

VU Vendor
VU Vendor
VU Donator
Bronze Contributor
Member For 4 Years
ECF Refugee
I love watching this thread, I am enjoying seeing the process so much!!
When you get them on the market, I DEF want one of your creations
Thanks -

Technically, they are on the market now (the webpage is live) as they have to be there on Monday to stay for the next two years. The first two proto bodies were machined to the exact numbers on the prints, and all seems good - no changes needed. After test fitting all the printed parts for the first proto, I feel it will go together without an issue - Jim says there's lots of room to work. Lets see how the second one goes - already a machining order issue revealed.

The more complicated Side by Sides are next, and as the others, will be first created for ourselves - we'll give plenty of reports and posts on their condition as they get hours on them. We would have to sell one if ordered, but I trust everyone will wait to see how the story unfolds. I'm pretty telling when talking about things, I think it's important to be. I think it helps to show the challenges of developing and making an enclosure and Faceplate assembly like this. Even better we have great American parts to go inside!

I may need a partner to make a PV (I'm dangerous with a soldering iron), but if you can solder, you can make a killer MOD yourself from many sources of something to put the parts into. Other than the enclosure and faceplate stuff, we're just assembling existing parts. You can do it too.

:idea:
I've actually taken stuff to the local hobby store and had the radio control guys solder stuff I was afraid to wreck, they're pretty good -

Rick
 

Absolute-Wood

VU Vendor
VU Vendor
VU Donator
Bronze Contributor
Member For 4 Years
ECF Refugee
rick will you be offering anything that is simplistic
like a basic PWM chip with a potentiometer 2x18650 and either simple volt meter led or the modmeter display by modmaker uk
OK, now I'm hungry...

Rearranged:
We offer the option of building these as a Mosfet protected Mechanical, parallel or series where applicable, with the option of a volt or MOD meter. I didn't have time to research and source an American made PWM and pot.

Probably would have, but I was worried we would run out of time as it's a lot to get done, then I had a slight table saw "mishap" just over two weeks ago - first ever, been doing this forever. It impacted my ability to build the protos for a while and even typing a bit. Much better now. I got lucky and the "bite" was on the last joint of my left thumb, and not bad considering what was biting... When I got back from the hospital, I finished the cut - mainly because the pain killer was still working!

Rick
 
Last edited:

Mattp169

Platinum Contributor
Vape Media
Member For 5 Years
rick
check out big al's mods on FB hes got the parts for what im talking about
the modmeter can be had direct from modmaker uk or form fatdaddyvapes
 

Absolute-Wood

VU Vendor
VU Vendor
VU Donator
Bronze Contributor
Member For 4 Years
ECF Refugee
Thanks @Mattp169 for the Big Al hookup- excellent

I'm going to add an option to choose a Big Als's PWM board with Pot. Will work the details shortly. Really like the battery sled with the board on top - time saver!

Just got the PWM option added to the text on the page - need to edit the pulldowns.

Already have the volt meter and MOD meter available with the Mech Fet option - I'll add PWM to it.

Thanks a lot bro-
 
Last edited:

Mattp169

Platinum Contributor
Vape Media
Member For 5 Years
Thanks @Mattp169 for the Big Al hookup- excellent

I'm going to add an option to choose a Big Als's PWM board with Pot. Will work the details shortly. Really like the battery sled with the board on top - time saver!

Just got the PWM option added to the text on the page - need to edit the pulldowns.

Already have the volt meter and MOD meter available with the Mech Fet option - I'll add PWM to it.

Thanks a lot bro-
he also has the okl 120 board as an option
 

Absolute-Wood

VU Vendor
VU Vendor
VU Donator
Bronze Contributor
Member For 4 Years
ECF Refugee
he also has the okl 120 board as an option

Thanks Matt - saw the OKL boards. Didn't know much about the difference, so did some Googling - saw you out there, finally called and spoke to an Electrical Engineer friend of mine about it, came to the conclusion that the OKL boards might present a warranty issue compared to a PWM setup.

I've used PWM (Pulse Width Modulation) setups in many industrial applications from smaller motors (<20hp), to large air separation devices with 6000hp electric motors. It's the go to in industry for reliability and accurate throttling. Saw a few posts saying most people couldn't tell the difference when vaping.

In "Just Under the Wire" news... Yesterday, we had four mods. Today, we have six! I was hoping to finish one more, but managed to create two new bodies that use battery tubes:


TECHNICAL-MOD-05
by Rick Hageman, on Flickr

TECHNICAL-MOD-05b
by Rick Hageman, on Flickr

Both utilize a Fat Daddy's SS Battery tube (18650 shown). The 26650 version will have a slightly larger body. On all models, this allows the choice of an exposed tube, or not - up to the owner.


TECHNICAL-MOD-06
by Rick Hageman, on Flickr

TECHNICAL-MOD-06b
by Rick Hageman, on Flickr

These two MODs differ from the others in that they employ extensive "large drum" sanding - gives them an "hourglass" shape. I'll get more pics up shortly, but have to spend most of today revising the MOD page-

Light 'em Up!
 
Last edited:

VapinVegas01

Member For 4 Years
Very nice work! Love seeing your progress and the set up on your website. While I understand your time constraints, your side by side mod looks like it could be fairly easily converted to a bottom feed or squonk mod. I would def be interested in one of those!

I think it would also open you to a new group of customers that tend to be very experienced and also loyal.

Regardless, very nice job and keep up the great work.
 

Absolute-Wood

VU Vendor
VU Vendor
VU Donator
Bronze Contributor
Member For 4 Years
ECF Refugee
Very nice work! Love seeing your progress and the set up on your website. While I understand your time constraints, your side by side mod looks like it could be fairly easily converted to a bottom feed or squonk mod. I would def be interested in one of those!

I think it would also open you to a new group of customers that tend to be very experienced and also loyal.

Regardless, very nice job and keep up the great work.

Thanks, very kind words my friend-

Thought about it, I have a couple Kanger Squonkers and like the process. I could add it and worry about the actual design later! Fat Daddy's has the goods... On both, the body of the SBS is "hollowed out" so there is maximum room. Wouldn't take much more than routing the window(s). Only conflicts I can think of is the option of having the fire button below the tank on the "grip" area - might get in the way of the bottle. Fixable. The 3s LiPo option for the DNA200 would take up most of the room in the body cavity.

Thanks, good idea. I'm working on all the option pulldowns for the two new mods now. If I add it to the text section of available options, it's "available".

I think the most responsible thing to do next is grab a drink, sit in the pool for a while and arrange priorities... :vino:

Rick
 

Absolute-Wood

VU Vendor
VU Vendor
VU Donator
Bronze Contributor
Member For 4 Years
ECF Refugee
Good Morning All,

Well, we have many, many options added to the MOD page. I still have a ton of minor design chores to work out the finer details of some of the options.

I'm in neutral at the moment - friggin virus! A viral "bug" swept through my house - first my wife got it; Poor girl, hit her pretty hard. Then my daughter also got sick - now I'm holding the bag. The only one left is my son - afraid you're next Bud!

On Proto news, Jim is waiting on some small assembly tools to get going this weekend. Should have a working proto next week! Because of being under the weather, I haven't gotten any farther on the second proto. Soon.

I have to admit, the timing of events recently have been almost eerie... I had a table saw incident that made me tend to concentrate on design work, causing the business to have six mods with many options. The plan was four with some options. I remained healthy in a house of sick people. I finished the last update to the MOD page at 11:55pm 8.8.2016 and went to bed. I woke up sick as a dog the next morning... Thank You to the Vape Gods!

Rick
 

Absolute-Wood

VU Vendor
VU Vendor
VU Donator
Bronze Contributor
Member For 4 Years
ECF Refugee
For our Second Amendment Fans, the "Skull" Faceplate

SKULL FACEPLATE DNA75 ASSY
Still need to order plastic first run parts to check fit, finish and resolution (3D Printed).

Not much luck working in the shop the last few days - H O T - 106 today, 104 yesterday...

Ready to clear coat the Rosewood Mod II Proto. Hope to take it with me on Wednesday when Jim & I will assemble the first proto - a Mod I. Might get started on the second one too.

More news and pics as they happen!

Rick
 

Absolute-Wood

VU Vendor
VU Vendor
VU Donator
Bronze Contributor
Member For 4 Years
ECF Refugee
Well... Crap -

Short story is my soldering partner, Jim, hurt his hand and arm at work Tuesday. A little beat up, a little bloody... Jim is a previous SWAT & K9 cop - "retired" but works in a more covert vein of enforcement now. Talked to him today, and he seems to be "back".

So, no assembly party - I'm bummed. I'll have a second body ready for assembly when we get together on Wednesday.

I'm going to start on the third proto body in the next few days, a Mod IV 26650 Squonker. I'm ordering some 3D printed parts to test fit, and should be moving forward shortly with it.

I did a little editing to the Box Mod's page - added some renderings of the different faceplate styles available. Plus the "b" version of the Skull Faceplate:


"Come and Take Them" seems appropriate for our situation. The text around the control buttons is different too:


I'm waiting on samples now to see if the resolution is good enough to render the text around the control buttons - hope so. If not, may get it without the text and see about having a jeweler engrave it.

I have a US maker of aluminum faceplates and SS buttons, and I have a couple samples. I'll get them photographed and placed on the Mod page shortly.

Rick
 

Absolute-Wood

VU Vendor
VU Vendor
VU Donator
Bronze Contributor
Member For 4 Years
ECF Refugee
Ok- Having some issues with the 3D printing. Having to get second run parts on a few items - some are stainless. The orientation of the object when printed is important to how it looks when finished. I had to ask for some parts to be reoriented and printed again. Stainless steel parts take a little over two weeks.

This means I have at least a two week waiting period before I can get moving on the proto units again. Jim is still having some issue with his hand - we'll pick up again in a bit.

But, a silver lining for me - I have three new display stand orders to work on!

I'll update as needed here as new things develop-

Rick
 

Absolute-Wood

VU Vendor
VU Vendor
VU Donator
Bronze Contributor
Member For 4 Years
ECF Refugee
Hey everyone,

Still waiting on the 3D Printer items. Been working on a few Display Stands in the mean time.

I have managed to put together a short animation showing the insides of the Squonk version of our Model III (26650) Side by Side:

The tankwell depth has been reduced to 1" to accomodate a 10ml bottle. The decorative air holes in the sides of the tankwell have been reconfigured as smaller to fit the shorter depth for drippers.

In the video you will first see a SS tube surrounding the bottle - this is a modified Fat Daddy's 26650 SS Battery Tube. It creates an isolated area for the 10ml oval bottle and the connections in case of a failure and/or juice spill. There is a flexable rubbery plastic bottle holder that allows proper orientation of the bottle (it can be turned 90 degrees).

The connector will be a VariTube VT 510 Bottom Feed connector designed specifically for this use. A length of SS tubing extends from the center tube of the connector and into the bottle. A 3D Printed plastic Bottle Retainer sits around the connector tube and seals the bottle when pushed up over the retainer. Very similar to the Kanger design.

This is the next Prototype I will be constructing -

Jim & I will be working today to possibly finish assembling the first Proto or two.

I would love to be able to take a few good photos - we'll see!

Rick
 
Last edited:

VapinVegas01

Member For 4 Years
Hey everyone,

Still waiting on the 3D Printer items. Been working on a few Display Stands in the mean time.

I have managed to put together a short animation showing the insides of the Squonk version of our Model III (26650) Side by Side:

The tankwell depth has been reduced to 1" to accomodate a 10ml bottle. The decorative air holes in the sides of the tankwell have been reconfigured as smaller to fit the shorter depth for drippers.

In the video you will first see a SS tube surrounding the bottle - this is a modified Fat Daddy's 26650 SS Battery Tube. It creates an isolated area for the 10ml oval bottle and the connections in case of a failure and/or juice spill. There is a flexable rubbery plastic bottle holder that allows proper orientation of the bottle (it can be turned 90 degrees).

The connector is a Fat Daddy's V4 (long) Bottom Feed connector designed specifically for this use. A length of 2mm tubing fits inside the center tube of the connector and extends into the bottle. A 3D Printed plastic Bottle Retainer sits around the connector tube and seals the bottle when inserted.

This is the next Prototype I will be constructing -

Jim & I will be working today to possibly finish assembling the first Proto or two.

I would love to be able to take a few good photos - we'll see!

Rick

Nice work so far.

Can I ask why you recessed the 510 into the mod? This could create some real issues with atty's.

I have always wondered why someone hasn't built a hybrid squonk mod. Build the atty into the top of the box, and eliminate all the parts and labor of building the 510 .
 

Absolute-Wood

VU Vendor
VU Vendor
VU Donator
Bronze Contributor
Member For 4 Years
ECF Refugee
Nice work so far.

Can I ask why you recessed the 510 into the mod? This could create some real issues with atty's.

I have always wondered why someone hasn't built a hybrid squonk mod. Build the atty into the top of the box, and eliminate all the parts and labor of building the 510 .

Thanks - The recess for the atty or dripper is just the style, a Side by Side. I've not seen any SBS devices made of wood - they're all metal or plastic/metal. The three decorative cutouts around the recess are for airflow as well as giving a place to rotate the atty or an adjustment band from the base. The recess is 1" in diameter, so it can fit 25mm attys.

There are no AIO Squonkers? Well, hybrids I mean. Too bad we're stuck with what's out there. As of 8.8 - nothing new; or almost worse, flaws cannot be fixed through a product revision. Bad if it's a safety flaw...

Rick
 

Absolute-Wood

VU Vendor
VU Vendor
VU Donator
Bronze Contributor
Member For 4 Years
ECF Refugee
OK- Got a few messages that the FDV BF connectors have problems with leaking. After some advice and some research - Decided to go with the 22mm VariTube VT510 bottom feed. Haven't updated the model yet - or the animation. Soon!

Surprise - vapemail from VariTube just showed up with the connectors in it!

Just for S&G's - here's a quick drawing that will be used for assembly:


It's for the standard Faceplate assembly used in most the Mods.

Hope to have some more news soon!

Rick
 

inspects

Squonkamaniac
Senior Moderator
VU Donator
Diamond Contributor
Member For 5 Years
Hey everyone,

Still waiting on the 3D Printer items. Been working on a few Display Stands in the mean time.

I have managed to put together a short animation showing the insides of the Squonk version of our Model III (26650) Side by Side:

The tankwell depth has been reduced to 1" to accomodate a 10ml bottle. The decorative air holes in the sides of the tankwell have been reconfigured as smaller to fit the shorter depth for drippers.

In the video you will first see a SS tube surrounding the bottle - this is a modified Fat Daddy's 26650 SS Battery Tube. It creates an isolated area for the 10ml oval bottle and the connections in case of a failure and/or juice spill. There is a flexable rubbery plastic bottle holder that allows proper orientation of the bottle (it can be turned 90 degrees).

The connector will be a VariTube VT 510 Bottom Feed connector designed specifically for this use. A length of SS tubing extends from the center tube of the connector and into the bottle. A 3D Printed plastic Bottle Retainer sits around the connector tube and seals the bottle when pushed up over the retainer. Very similar to the Kanger design.

This is the next Prototype I will be constructing -

Jim & I will be working today to possibly finish assembling the first Proto or two.

I would love to be able to take a few good photos - we'll see!

Rick
I'd jump all over that baby......:wave:
 

Ms. Trixy

VU Donator
Platinum Contributor
ECF Refugee
Member For 5 Years
Reddit Exile
VU Patreon
Your build process and progress is amazing! It truly is amazing watching you work. I am VERY interested.
And, I am in love with your Caribbean Rosewood Sandwich vape stand. That is an absolutely beautiful piece of wood working. When you are ready to sell, please post here again. We're all watching...and waiting.
:wave:
 

Absolute-Wood

VU Vendor
VU Vendor
VU Donator
Bronze Contributor
Member For 4 Years
ECF Refugee
Your build process and progress is amazing! It truly is amazing watching you work. I am VERY interested.
And, I am in love with your Caribbean Rosewood Sandwich vape stand. That is an absolutely beautiful piece of wood working. When you are ready to sell, please post here again. We're all watching...and waiting.
:wave:
Thanks for the kind words - I really enjoy the process; & that stand was a favorite - great wood that time around. :D
I've got a Model II MOD body that has Caribbean Rosewood, but came out much darker. Different plank, and I used a different oil on it.

For those that don't know - we have a photography thread in our forum - here. You'll find lots of pics of vape stands, including the Rosewood one.

We have two bodies completed - awaiting proper assembly and wiring. I'm writing the assembly procedures as we speak - I want the ability to recruit another solderer/assembler if needed. Having detailed "how to" documentation is vital.

I plan on building two more bodies for prototypes - a Mod III Squonker next out of Oak, and a Model VI out of a block of stabilized Buckeye Burl I have (side 1 & side 2 / edge):


Talk soon,

Rick
 
Last edited:

Absolute-Wood

VU Vendor
VU Vendor
VU Donator
Bronze Contributor
Member For 4 Years
ECF Refugee
Hey all,

Man, it's been a week already. My partner Jim is having some availability issues because of his job - he unexpectedly left for over a week and couldn't say anything... and is leaving this week to Tennessee for several days - that's all I know :huh:. Sorry for this, but we're still having some issues with vendors, and I'm looking into a new vendor to Cerakote the Faceplates and other exposed metals.

I want to share some pics of a shipment of 3D Printed parts. Several came in for the Squonk proto. I'm actually waiting on a special cutter to bore the 29mm holes for the 26650 battery tubes. Whoo hoo! Mail just came, and the cutter was there! Nice...

First though, here are a couple pics of the aluminum faceplates that are available, right now in machined:

Anodized Black:

Also available in brushed finish (not shown).

The 3D Printed SS is a very unusual alloy - it's roughly 60% SS, and 40% Bronze. The model is printed as a stainless "sponge" that has about 40% air space. It is then placed in a mold and hot molten bronze is poured in. This takes up all the air space with bronze, and makes the model solid. The amount of bronze at the surface varies somewhat each time:

The prints have a sandy, pebbled surface as printed. If coated, it has a very tactile surface that feels like "smoothed sandpaper":


It can also be given a brushed finish after printing:

This is the upper plate from the pic above of the two faceplates.

Here we have the first test print of the squonk bottle topseal that is attached to the underside of the 510 connector. I placed fake "o-rings" in the model for planning purposes and forgot to turn them off before printing! Where you see what appear to be o-rings will be grooves for o-ring(s) instead:


Also received a print of the flexible bottle holder:


It's very flexible, but firm. The bottle fits tightly in it. Seems a go! Speaking of the squonk bottle, here it is:

Holds 10ml, made from very flexible LDPE.

Here's a view looking at the bottom of the Mod III Squonker. You can see the X shaped bottom support in the body. This piece is epoxied in place, and strengthens the body and accepts the bottom plate (in black).


And here's a look at the real parts:

Above is the side of the support that faces out.

Above we see a view of the bottom side; notice the reinforcing ribs and the buildup around where the support will be threaded to accept the bottom.

Here we have the bottom of the Mod.

One last thing - I got a print of the Skull Faceplate in black plastic, and the skull fire button in black SS:

Some of the details are too small to render properly - the text around the control buttons is too small and will not print correctly - it will be removed.

There is a new, higher definition plastic material that I am going to try a few sample prints to see how that looks.

Finally, I wanted to let everyone know that I was just asked to bid on a large juice bar holder for a vape shop chain. The holders are large and hold 150 taste tester tanks. The job is for a dozen stands. If I get the job, it's going to dominate my production for 6-8 weeks. I'll keep working away at the Mod's, but I seem to be getting several holder jobs lately... when it rains, it pours, LOL

Rick
 

Absolute-Wood

VU Vendor
VU Vendor
VU Donator
Bronze Contributor
Member For 4 Years
ECF Refugee
Hello! I found my way out from under the piles of wood chips... Sorry for the absence; wood to molest, and vendors to grind...;)

My last post I was excited that a drill bit for the battery tubes had arrived and I could get going again on the Squonk Proto. When peeling the plastic off the cutter, it looked horrible - discolored like it was sharpened and got way too hot, had a small chip, and not accurately made.

This is a German made bit, the manufacturer is well known for high quality. Not what I expected when paying almost $70 for a single drill bit... It's on it's way back for a replacement now.

I mentioned my partner Jim was swept away by his work to Tennessee somewhere - still gone, 10 days later. I know he doesn't have much choice when ordered somewhere. Spoke with his wife and she says he should wrap up in a few more days if "things don't get out of control". Can't wait for the story...

I'm still waiting on some new SS 3D printed Faceplates to send off for Cerakote test. Also in the same shipment is a new print of the Skull Faceplate pieces in a new, high definition black plastic.

I've really been busy in the shop with other projects. Thought I'd share the process of filling small anomalies in wood with epoxy. This is often done with figured wood and dyed stabilized wood. My instance is with some beautiful highly figured American Black Walnut. I'm saving some of this unique wood for Mod bodies in the future.

Often, the center of small knots are soft and crumbly. These need to be made solid, and have to look good when done if exposed. A dentist pick works great to tediously clean out all the loose material:

If the void goes all the way through the board, the other side gets the same treatment, then the bottom side is covered with tape to close the hole.

I gather together the clear epoxy, pigment (black this time), a small container and some toothpicks:


Mixing a small batch, I first coat the inside of the hole by dipping a toothpick and "painting" the inside of the hole. Then I carefully pour so it runs down one side of the crack. This lets it run to the bottom and fill from the bottom up.


Letting the epoxy "brim" on the crack a little bit, I use the toothpick to coax the epoxy into all the legs of the crack.


Let it dry undisturbed for at least two full days. It gets dull looking when sanding, but regains it's glossy look when finished.

Here's the finished repair. It will be sanded down flush during the assembly process. You can see a couple really small spots that also need repair.

I'm itchin' to get back on the Proto's. I'll post another update when I have some new goodies to photograph!

Rick
 

Absolute-Wood

VU Vendor
VU Vendor
VU Donator
Bronze Contributor
Member For 4 Years
ECF Refugee
Hey Gang,

I've not updated lately - apologies - If you've read the Production Progress page on the website, you'll see I've been ill and not done much in the shop the last couple weeks.


I have a busy production schedule with more than five holders - two of them are large and require several laminations.

I did get another shipment of 3D Printed parts to share with you.

This is a SS print of our Ohm Faceplate. The bronze infusion process leaves an excess of bronze at the surface. If brought to a brushed or polished surface, the granulated appearance disappears, and it looks like SS with a tinge of brass color in it.

This is a previous SS print that has been given a brushed appearance.

I am sending several SS Faceplates (including the above) to a local shop that does CeraKote. Both granulated finish and the brushed appearance items will be coated, and I'll share pics after I get them back.

A couple other items that were in the shipment was a plain SS print of the Squonk Bottom-

No CeraKote here, I'm going to fill the lettering in with black epoxy, and then bring the surface to a brushed finish. Should look pretty cool.

Another item set that came in was the Skull Faceplate in Hi-Def Plastic:

Much better rendering of small details, the "fins" on the Faceplate are well defined. Remember, we're looking at an enlarged view of an item that is the size of a small bandaid. There is some variation in the surface in the lower left corner. I might look at making a Faceplate out of dark smoked acrylic.

Even smaller is the Skull Fire Button - the high definition plastic does well here:

I have some very fine Red glow in the dark powder meant to be mixed with epoxy. I'm going to fill the eyes with it. It absorbs light, then can glow for hours. Should look pretty interesting. Guess I could do the same with the lettering on the Faceplate - overkill? :blech:


I'm going to head out to the shop and see how it goes - still a little sore. I roughed the body for the Model III Squonker (sized rectangle now), and just got the replacement bit for the 26650 battery tube hole. I'll try and video the machining on it as much as possible from this point -

Toots!

Rick
 
Last edited:

Absolute-Wood

VU Vendor
VU Vendor
VU Donator
Bronze Contributor
Member For 4 Years
ECF Refugee
Hey guys-

Have an update - but more of a question...

I've ran into what I consider a major bump with the Side by Sides (Model III & IV). They're too big. I've seen large Mods used and being sold, but - I don't know. I'm a reasonable size guy - 6'1", lean 210 lbs, and it feels big to me.

I milled the blank to rectangular size and noticed it was bigger than anything I owned. I thought it would look smaller when I made the bullnose along the front and back, and started drilling holes. It's got the bullnose, but it's big:

This is the largest Mod I have - the sized blank is 3-1/4" wide, the X-Cube is 2-1/4". Admittedly, it's not a squonker, 2x18650 instead of ours with a single 26650. But I consider the X-Cube to be a larg"ish" Mod. The blank is 4-1/4" tall because of it being for a squonker - need the height. The standard Models III &IV will be at 4" height or a little shorter.

This is comparing a body I was test machining earlier that is about the size of our Model V or VI. 26650 tube hole bored in a 1-1/4" thick body.

Early on during the sketching part of creating designs, I had thought these might be too wide. The Faceplate/board needs almost 1" in width. I had seen some custom Mods with the Faceplate "turned" or rotated so the Mod was thicker at the Faceplate, and didn't need to be as wide. I had made an alternate shape for the bodies of the Model III & IV:

On the left is the current configuration, you can see the amount of width needed for the Faceplate assembly (on the left of the unit). With the double 26650 battery tubes (represented by the circles), the total width needs to be 3-1/4". At this 3-1/4" width, it may be hard to get stabilized wood hybrid blocks - most are a little smaller.

On the right of the image is the earlier design for reducing the width. By rotating the Faceplate/board assembly and making the Mod thicker there, we could lose 1/2" of width. The design would still work as a squonker in 26650 trim. I never developed the shape past the accurately sized 2D sketch shown above, but as a previously finalized profile, I could change the shape of the Side by Side Models III & IV.

Here is a quick pictorial view I scribbled up:


So - make the change to reduce the width, or leave them alone?

Rick


Last edited:

Pancho_Brown

Silver Contributor
Member For 4 Years
Member For 3 Years
Would the button still be on the faceplate for the mod with the angled face plate?
 

Absolute-Wood

VU Vendor
VU Vendor
VU Donator
Bronze Contributor
Member For 4 Years
ECF Refugee
Would the button still be on the faceplate for the mod with the angled face plate?
Well, it could. I forgot to add a simple pictorial view - it's there now.

Also forgot to mention that in the drawing, the circles in the top of the views are where the tank or dripper would be. The lower holes are where the actual battery tube with battery would be. This drawing assumes it is being built as a squonker. The non-squonk version would be similar, just one battery tube.

I envisioned holding it with my left thumb on the faceplate button and the palm of my hand and fingers would be wrapped around the part that has the 1-3/4" dimension on it. My fingers would be wrapped around the hole for the atty or dripper in this scenario.

If held in the right hand, the faceplate would be facing away from the user if held similarly. I suppose we could make "handed" versions - one as shown and one that is a mirror image. This version in the right hand would have the squonk hole hidden in the palm of your right hand. Left hand holding would have the squonk hole beneath your fingers when gripping the mod.

If height permits - we could have a top button over the battery tube. In the pic, I would think that you would grip the mod with your right hand, your palm against the part that has the 2-3/4" dimension. Also looking into the capability to put the fire button above the squonk hole, just below the tankwell.

Rick
 

Pancho_Brown

Silver Contributor
Member For 4 Years
Member For 3 Years
What if you did something similar to the ystick by mini-ecig. Move the angled faceplate down so the thickest part sits in the palm of your hand and your fingers rest in around the narrow side. It would be a side thumb switch, or you could shave it down on the top to make a top thumb switch.
 

Absolute-Wood

VU Vendor
VU Vendor
VU Donator
Bronze Contributor
Member For 4 Years
ECF Refugee
What if you did something similar to the ystick by mini-ecig. Move the angled faceplate down so the thickest part sits in the palm of your hand and your fingers rest in around the narrow side. It would be a side thumb switch, or you could shave it down on the top to make a top thumb switch.

Ahhh, Mini E-Cig... Xvo Stick, Inside Out Atty, Y-Stick... I'm drooling :p

Chels is my hero - That dude is a magician with CNC machining. I want a Xvo Pro... I'll have to look through what designs I have to see if there is anything I can do that doesn't require a new design - unlikely, but I don't want to mess with a Federal agency... it had to exist before 8.8.16. I like the idea of the Faceplate area not going to the top, like the Y-Stick. That might be doable.

Chels can do much more with the machinery he has and that he's machining aluminum. The problem lies on the inside of the body - sometimes it's difficult or impossible to machine a flat surface on the inside to tighten a nut against - with my simple little mill. I'll look at what I might be able to do.

After all this, I sure don't want to abandon these two models.
 

Pancho_Brown

Silver Contributor
Member For 4 Years
Member For 3 Years
I here you man! Those things are beauties. I had a mini cig and I regret letting it go lol.
If you decide to switch it up I'll pick one up no doubt.
 

Absolute-Wood

VU Vendor
VU Vendor
VU Donator
Bronze Contributor
Member For 4 Years
ECF Refugee
Like this?

The only thing changed was moving the top of the Faceplate "bubble" down 3/4" and adding the fire button in the space created. The top view would still look almost the same but with the new fire button placement.

Rick
 
Last edited:

Pancho_Brown

Silver Contributor
Member For 4 Years
Member For 3 Years
That's what I was thinking, as long as there is enough room to do so with the DNA board installed.
 

Absolute-Wood

VU Vendor
VU Vendor
VU Donator
Bronze Contributor
Member For 4 Years
ECF Refugee
That's what I was thinking, as long as there is enough room to do so with the DNA board installed.
Should be - In the drawing, I just erased the fire button on the FP as we have one without the hole for a remote button. I moved the FP and the top of the protrusion down 3/4" and it looks like it still fits.

I need to work the details, but the board screws to the FP assembly and usually if I can fit the FP on the Mod, it will work because everything is smaller than the FP. Only need to verify for the depth - but we're already good there. I think the only part(s) I'll need to change is going to be the bottom piece that goes between the two tubes, and maybe the X brace in the bottom.

I'll model the body shortly so I can place it in the 3D Model. I'm also working on several vape holders and need to start work on the last proto - a Mod VI in stabilized wood.

Thanks for the idea ;)

Rick
 

Absolute-Wood

VU Vendor
VU Vendor
VU Donator
Bronze Contributor
Member For 4 Years
ECF Refugee
I modeled the angled Mod III body - basic, still needs detail work:
I still need to add details. This will have the squonk detail added, the battery tube expose, rounding of edges, etc...

I have some tooling coming today to help machine this body. Also I'm just starting to build up some stock of Hybrid Stabilized Blanks - I have 5 coming to get started.

Talk soon,

Rick
 

Absolute-Wood

VU Vendor
VU Vendor
VU Donator
Bronze Contributor
Member For 4 Years
ECF Refugee
Hey -

Finished up a few custom stands, and quickly cut a blank to the shape of the wider Mod III & IV:

Please excuse the video format - last time I shoot iPhone video in portrait orientation :rolleyes: Time lapse, about a minute, 15 seconds.

After, I ran it through the tablesaw to put the other angle on it. Just a little sanding after that.


Here, next to the wider design (still shown on the website - need to fix that)


Machining to this level is good to see how it would feel to hold it -


The thumb in the above pic is resting where the fire button would be if it were on the faceplate - we can still place it near the top, vertically like in the drawing a post or two up in the thread. It could even go on the other side.

I'll continue to machine this as the squonk proto and post when I have stuff to show -

I have a couple large display stands I need to get finished as well - figured Walnut; should be awesome, I'll post pics.

Rick
 

Absolute-Wood

VU Vendor
VU Vendor
VU Donator
Bronze Contributor
Member For 4 Years
ECF Refugee
Hey everyone-

I wanted to wish everyone a Happy Thanksgiving (and a great holiday season) -

I continue to machine on the Mod III blank shown just above. A little break is coming...

We're going up to NorCal for the week - we have a new Granddaughter, can't wait to see her!

Have a great one all!

Rick
 

Absolute-Wood

VU Vendor
VU Vendor
VU Donator
Bronze Contributor
Member For 4 Years
ECF Refugee
These are stunning.

Sent from my SAMSUNG-SM-G935A using Tapatalk

Thanks - appreciate it!

Can't wait to make one with a stab/hybrid block:

This is one of five blocks I have in stock for some of the Mods (the Side by Sides need a bigger block), I'm working with the manufacturer to get larger blocks for Models III & IV. I hope to get them photographed properly and available on the website soon.

Just got back from our trip to Northern California - beautiful!

Talk soon-

Rick
 

forza

Gold Contributor
Member For 4 Years
I want it, Rick. That is a gorgeous blank. I'm such a sucker for these wood mods. I'll be watching as the creation comes together.

Sent from my SAMSUNG-SM-G935A using Tapatalk
 

VU Sponsors

Top