Become a Patron!

Asvape Michael Review by KingPin! (Devils Night Edition)

KingPin!

In my defence, I was left unsupervised ^^
VU Donator
Platinum Contributor
Member For 4 Years
VU Challenge Team
Reviewer
Hi Folks,

I won the Michael almost a month ago now from HeavenGifts and wanted to share my usual, perhaps overly thorough thoughts on the product. I don’t like to make recommendations so everything you read is my personal experience using it, including anything I can think you might find helpful!

Available From: https://www.heavengifts.com/product/Asvape-Michael-TC-Box-Mod.html
Price: $110 (at the time of this review)
Variants: Devils Nights / Walking Dead / Stab-wood (available elsewhere)

What’s included in the Box?
  • 1 x Michael
  • 1 x Warranty Card
  • 1 Micro USB lead
  • 1 x Instruction Manual
B7DA7CAA-F8D5-4416-88F4-5EF2C8EC54A5.jpeg
Asvape have produced another fine example of how to package and present their product. I have to say even opening this was a positive experience. Normally it’s just a “oh yeah it’s another box with a half assed design on the front” affair, combined with difficult to remove items wedged inside. But that’s not the case with this! Remove the sleeve, remove the seal and flip the magnetic lid then you are presented with the Michael sitting there in all its manga style glory…this is how to do it!

The manual provided is very well written so I won’t bother writing anything else I’ve found for user control although I will go over the firmware update process after my review.

Looks, Build Quality & Impressions

The first thing to go over is the name “Michael” what’s this all about then? Asvape released another mod in their line around the same time the “Lucifer” so I’m assuming here their naming choice is down to the biblical good vs evil, quite what the artwork has to do with Michael though your guess is good as mine.

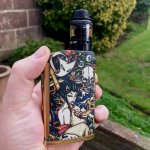
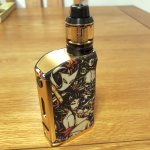
Onto the tattoo artwork itself, this is going to be one of those things you either like or don’t. It’s different, stands out and is definitely a talking point. The finish is rubberised and has been perfectly adhered to the casing. There are no lose fittings and the print quality is excellent. The image isn’t actually flat either, if you run your fingers over the images, all of the outlines are very slightly embossed. It has a silky feel to it, even spilling juice on it doesn’t seem to be an issue with grip.

D5E803E4-48CA-481B-981C-74EEA5D8DB88.jpeg E23063A9-5F27-4CAB-A2CF-9F473B5AB6D7.jpeg

Whilst on the subject of grip, ergonomically the mod is comfortable to hold. Down the length of spine you have two curved indents making it suitable to hold in either a finger or thumb firing position. The only down side to the ergonomics is the depth of the mod (looking sideways), which considering this is a dual 18650 mod is on the larger side. I personally haven’t had a problem with it but for those who like a smaller mod in the hand, you might have an issue with it as its fairly bulky in size and weight more so than it looks in the pictures.

In terms of the paintwork elsewhere, it’s finished with gold satin plating providing it with a certain bling factor. I would have preferred an option to choose the colour of the plating to something like matt black, because whilst I really appreciate the artwork, I feel it’s lost slightly against the gold. Time will tell whether the paintwork or the wrap stand up to the daily wear and tear of use but so far after a month I can’t see any obvious sign of degradation.

The spring loaded 510 pin itself feels a little soft when compressing it. This could be problematic if you have a shorter 510 thread on the atomiser and ensuring it provides a solid connection. I haven’t had a “Check Atomizer” message appear or had problem with resistance jumping when in use, but it’s something I wanted to highlight in case you use any atomisers with shorter threading.

E81C54C5-3B10-404F-BB3A-2E65B3D5DEBB.jpeg

I would say 24mm is the perfect Atomiser size for this mod as it sits flush and inside of the rubberized wrap. Whilst it can accommodate up to 28mm without a true overhang the base will be sitting on top of the wrap and you run the risk of denting it or having an atomiser that won’t sit flush.

Asvape decided to go with the VO200 chipset used in the Michael. VO Tech is American based and their chipsets were also used in the CKS Icon, Asvape Strider and some of the older BMI line. Users of those devices know what it’s all about. This is my first time using this chip and I’ll go into how I got on with it later. But for now the menu interface is really intuitive, the screen is nice and bright even in daylight, there is next to no lag when clicking buttons.

I recorded a low of 3.09V cut off for the batteries whilst in use, so the manufactures spec of 3v +/- 0.1 is spot on.

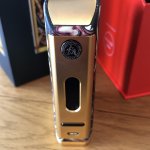
The buttons are metal not plastic. The fire button itself is engraved with the message “Aequitas” So I’m guessing they mean here ….wait for it …. “Equally, in Asvape we trust” You have got to give it to them, they always use something on their products that takes it a bit close to the mark providing us all with endless amounts of ammunition to poke fun (must resist). Anyway back on topic the buttons don’t rattle on mine, have a nice tactile feel and I haven’t had any sticking issues. If I was to nit-pick I’d say the fire button could have been made a little larger in size.
897124EC-F8EF-4488-AAB6-077D35793002.jpeg

I do find it a little too easy to over click the firing button which instead of locking the screen activates the menu system. This means I have to scroll through to exit each time which is a minor annoyance. But I’m going to put this down to user error.

So far so good for the Michael, what’s left oh yeah the battery cover!

There are 2 main bones of contention here;

1. It’s difficult to get back on until you get the knack of applying pressure evenly.

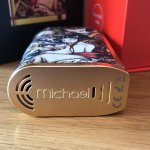
2. The cover is missing literally 0.5mm at the front (thick part). So when the cover is in place the batteries push down, there is now this small spring like pivot which the magnets aren’t strong enough to keep it in check. Seriously when I’m driving in my car with the vibration of the road it’s like a set of bloody clackers going off

7276110C-5804-45DD-A89E-0B6AFA1E5388.jpeg

Having said this the door doesn’t rattle or come loose otherwise and it has ample venting.
41837EFF-F097-40DC-A289-201C3F019B76.jpeg
AEB1B44B-70E4-427C-8D42-36AED4360911.jpeg
 
Last edited:

KingPin!

In my defence, I was left unsupervised ^^
VU Donator
Platinum Contributor
Member For 4 Years
VU Challenge Team
Reviewer
Wattage Mode

I found the VO200 chip works excellently in wattage mode, one of the decent ones out there for sure. I always try to aim my own coil builds between 0.15-0.2 ohms for dual battery regulated mods as this tends to be in the sweet spot of a mods performance. I would say the Michael hits pretty much in line with my Yhi Q mini (which has quite the punch) this is through both the low to mid wattage ranges up to 120W. Yes it can reach higher than the 120w and continue to pack a punch all the way to max, however apart from briefly trying it I rarely vape this high under normal conditions.

There is a very minor delay to the firing of the mod, but it’s less than a few milliseconds barely noticeable.

I didn’t notice the batteries or the mod itself get too hot when in my normal sub 120W use.

The chip reads the coils resistance accurately and live. I haven’t noticed any untoward resistance jumping with the soft 510 pin I mentioned earlier in my review, although this point comes with a caveat; only once I fully screwed my atomisers down flush. If I left them a little loose I found it wasn’t picking up resistance properly, so I come back to 24mm is the best atomiser size to use on this mod.

The interface is really easy to get on with, and increasing or decreasing power occurs pretty quickly.

The remaining battery voltage is live on screen and notice a significant drop off in performance towards the final quarter of the battery.

Bypass Mode

Same as a Voltage mode except it hits with whatever voltage it can based on available battery level left, there is no control here. As I said before the wattage mode is rather good on the Michael and bypass hits well although it’s not a mode I use on a regular basis.

Note: Bypass mode is supposed to represent a mechanical device. All safety features are still active in the background and it works exactly the same as regulated device with max current drain at low battery cut off. It’s just simulating a mechanical mod vape like experience which to me is a bit gimmicky so haven’t really used it.

Temp Control

There a few things to note for temp control on the Michael.
  1. There is no manual TCR
  2. You cannot adjust wattage for coil heating
  3. You can adjust temperature manually in NC mode (.C or .F)
  4. You relinquish all control altogether in AC mode other than select the metal
  5. The chip supports Stainless Steel (SS316), Titanium (TI), Nickel (NI200)
This is a different approach to other mods I’ve used and places the VO200 chip firmly in the driving seat. As with all of the functions on the Michael, Temp control employs the same simplistic interface, meaning it’s a good choice for those wanting to dip their toe in the water to see what TC is all about.

In fact for new users you can treat it much like wattage mode, but instead of wattage adjust the temperature to a level you’re comfortable with assuming you run the right coils for it. Make no mistake though if you are looking for a bells and whistles TC mod, this is not for you.

The question is though, is this simplistic approach any good?

Automatic Control (AC) is just a miss it did not work at all well as a plug and play feature. This is meant for the pre made coils (using the compatible metal types i.e. not kanthal) it’s supposed to do everything with you just hitting the fire button. Most of the time it supplied such a puny amount of wattage it would not pass go, so I’d say avoid this sub mode altogether.

Novice Control? (NC) whatever the N stands for this is the manual temperature setting mode and is really the Michaels primary TC mode. My observations using it for SS wire were;
  • Resistance reading is live. Make sure to press the (+) and (-) buttons at the same time in TC mode to set the starting resistance of the coil before you start using it – I love live resistance readings!
  • I could not get the “DRY Coil” message to appear when I vaped to empty.
  • It did not burn the cotton when I ran out of liquid and wattage decreased significantly.
  • Ramp up (heating) was actually pretty good unless I was using a chunky coil build
  • Temperature seemed “fairly” accurate within 20.F, but a bit on the low side.
  • Battery life increases (as it the case using TC on most mods as less power required)
  • It did not kick me out of TC when using Kanthal coils
  • When the chip detects temperature has been reached (monitoring coil resistance change) the maintenance level is a slow and steady pulse modulation.

Continuing from my last point above I noticed this slow pulse effect at certain temperatures more than others. There did seem to be a sweet spot between 420-460.F where this pulse was almost non-existent, however outside of this it was really noticeable. This is in contrast to my Yihi chip where it’s a high frequency pulse and much less noticeable.

I wouldn’t say the VO200 chip is the best out there for TC, in fact for me its middle of the pack. If you don’t build a large coil and stick to the sweet spot temps I mentioned it’s actually a nice mode to use especially for a no frills crack on approach, however this is also its downfall as it still requires certain things before you get the best from it.

Variable Power Control

Much along the lines of wattage mode except you can choose one of the 5 memory settings. Once selected use the “edit” sub menu to adjust the wattage in 1 second intervals (see my controls notes).

This mode is perfect if you like a longer draw but want a quick or slow ramp up avoiding the hot vape you get in the straight wattage mode. Adjust the curve to your liking and you are away.

In all honesty I would have preferred half second intervals as it gives a smoother profile after you go through the pain of setting it up. But being I really like wattage mode this was a pleasure to use.

I can confirm it did detect and follow the power curves for as long as I was able to draw, you just notice the transition a little more than the half second chips.


Recharging the Battery

The USB cable provided with the Michael is pretty thin. 0.5A charging is what’s on offer here. Whilst you can use any common USB lead to charge it I warn you don’t lose this lead you’ll need it if you ever want to do a firmware update. For some reason it’s the only one that works.

When the charging cycle terminates it stops lower than it would on my external charger. I recorded 4.12V and 4.09V at the end of the charge cycle so it’s balanced “ish” and took 4hours 10 minutes from 3.1V low cut off to charge show complete.

As with most mods it’s ok to use in a pinch but always best you use and external charger in my opinion.

Things I feel could be Improved
  • Battery Cover isnt completely flush
  • The firmware update process is a pain (see post review process)
  • Fairly Bulky (subjective)
  • Soft compression on the 510 pin
  • Lack of paint options for the metal areas (subjective)
  • Temp Control has room for improvement in future chip releases (see section review notes)
  • Power Curve should include half second intervals
Things I feel it did well
  • Feel (nice rubberized finish and comfortable shape)
  • Great artwork, something different
  • Simplistic menu system
  • Performs very well in Wattage / Bypass / VPC mode
  • Very little fire delay
  • Live Resistance and Voltage readings
  • Solid Metal Construction
  • Good venting on the battery door
  • Screen is nice and bright
  • Good feedback from the buttons

Final Conclusion

The price of the Michael puts it in the premium bracket as such there is a certain standard expected, so I think the best way to frame my feelings on the Michael would be;

If this was the first and only mod I owned, I would be disappointed the chip didn’t cover all bases in comparison to other mods out there at a similar price, however if I was adding this to my collection which already included a decent TC mod (the bracket I’m in), or I didn’t really care about temperature control then then this would be right up my street.

I do really like the way the chip handles the 3 different Wattage modes and I really can’t fault Asvape for the Michaels presentation, finish and the overall build quality; they have done a bang up job in those areas it’s one of the more interesting mods out there for sure.

026B6A2E-C66A-4A1A-B03E-D688A157103C.jpeg
A8B662B2-D8DD-4F97-9447-A12B027351AE.jpeg

Thank you for reading or rather putting up with my ramblings until next time KingPin!
 
Last edited:

KingPin!

In my defence, I was left unsupervised ^^
VU Donator
Platinum Contributor
Member For 4 Years
VU Challenge Team
Reviewer
Additional Info and helpful stuff outside of the manual

Manufacturer Specs I’ve managed to find
  • Chipset: VO Ttech 200 chip (VO200)
  • Wattage Range: 5 – 200W
  • Temperature Control Range: 212 – 572 (.F) / 100 -300 (.C)
  • Output Voltage: Minimum 3.7V, Maximum 9.5V
  • Max Output Current: 40.0A
  • Standby Current: less than 250 µA
  • Charging Port: 0.5A (Micro USB)
  • Resistance ranges: (Bypass) 0.2 – 3 Ohm, (Power) 0.08 – 3 Ohm, (Temp) 0.03 – 3 Ohm, (VPC) 0.08 – 3 Ohm
  • Modes: Wattage, Variable Power Control (VPC), Temperature Control (AC & NC) and Bypass
  • Temp Control Support: NI200, TI, SS (316)
  • Batteries: 2 x 18650 batteries (not included )
  • Firmware: upgradeable
  • Material: zinc alloy
  • Thread: 510
  • Product weight: 282g (with 2 batteries loaded)
  • Product Size (Height x Width x Depth) 95 x 27 x 95mm
  • Anti-Dry Burning Technology
  • Short Protection
  • Overheat Protection
  • Reverse Polarity Protection
  • Low Resistance Protection
  • Auto Shut Off
  • Low Battery Voltage Protection (6.0V ± 0.1V or 3v per battery cut off)

Protection Display Features:

1. Low Voltage: During operation, a “LOW BATTERY” message appears when battery voltage dips below 6.0V(3V per battery) ± 0.1V

2. Auto Shut-off: To prevent damage to the machine and atomizer, the device cannot power an atomizer for more than 10 seconds. After 10 seconds of continuous operation the atomizer will stop receiving power until the fire button is released.

3. Overheat Protection: Under continuous and prolonged use, the PCB may reach an unacceptable temperature. Under this circumstance, a “CAUTION TOO HOT” message will appear on screen. Once the PCB cools to acceptable levels, operation is restored.

4. Short Protection: When device is activated and a short is detected, a “SHORT CIRCUIT!” Message will appear on screen until fire button is released.

5. Atomizer Error: When the atomizer is not detected, improperly installed, or damaged, a “CHECK ATOMIZER” message will appear until fire button is released.

6. Low Resistance Protection: If the resistance of the atomiser is beyond supported specifications, a LOW RES message will appear on screen until the fire button is released.

7. Dry Burn Protection: If wick is not saturated enough, a DRY COIL NO LIQUID message will appear on screen. Make sure your wick is saturated with liquid to avoid damage to your atomizer or device.

Firmware Update

The firmware upgrade process was a complete pain in the ass!!!! As mentioned in my review the only lead that works is the one that comes with it so best not to lose it.

The approach that worked for me (use at your own discretion):

The latest firmware on Asvapes website is in a rar file not a normal zip ...which is a crap unless you have additional software like winrar. The best place to do the update is ignore the instruction booklet because it’s naff

Go to (no idea if this is ok for Mac as well so be careful)
http://vochipset.com/downloads/
(Edit: 24/08/18 noticed firmware support is no longer available sorry folks I don’t know of an alternative)

1. Download VO editor (in the blue options)
2. This will give you the files to install the editor (go ahead and install it) you will have a new logo on the desktop
3. Download latest firmware for the Michael (in the grey options) it will be in a Zip file ...extract that file to somewhere you can find it later (it will end in .bin)
4. Restart the pc
5. Right click the VO editor as select run as administrator
6. The Michael should be switched off at this point but have batteries loaded
7. Find the usb cable in the box (other cables do not work it has to be that one so don’t lose it!)
8. With the editor open plug the usb into the PC and the device
9. On the Michael it will give you two options charge or update (choose update) you have 10s to do this otherwise charge is auto selected...if you missed it unplug USB and try again
10. The Editor “should” list the firmware now (mine was 1_2......if it doesn’t do it unplug usb come out of editor and retry lots and lots of times because it’s hit and miss
11. Ok assuming it’s listed the firmware in VO editor select “open” and find that .bin file from earlier and select it
12. Click on update (left side) ignore the logo side on the right
13. A progress bar should start here....one of 3 things are going to happen

A) it might fail in which case yep you guess it rinse and repeat above from step 5!
B) get to the end and the mod will give you the option to click update again.... do this to see if it worked ...if not disconnect reboot editor and re-connect it might now be right, if not rinse and repeat above from step 5!
C) it does actually work after you select update on the mod!

After all was said and done I was able to get to xxxxxx2_2

Logo Update

For the logo if you have a DNA device it’s already at the right size for logos you used there

1. Right click the image and select Open in paint
2. Now go to options and select save as monochrome bitmap somewhere separate
3. It must be 128x32 @1bit NOTE: if you haven’t got it sized like this abort this process now as it could create a display problem.
4. Open VOeditor as admin like before
5. Connect the Michael via supplied USB again and select “update” (turned off and batteries loaded like before)
6. Ok on the picture side select “open logo” and load the picture you saved earlier
7. Now click on update logo (again make sure it’s the right size here and monochrome bitmap)
8. Now click on update on the right hand side and wait, again same things might happen as before (a,b,c)
9. Once done it should now have you image on there instead of Asvape
 
Last edited:

KingPin!

In my defence, I was left unsupervised ^^
VU Donator
Platinum Contributor
Member For 4 Years
VU Challenge Team
Reviewer

KingPin!

In my defence, I was left unsupervised ^^
VU Donator
Platinum Contributor
Member For 4 Years
VU Challenge Team
Reviewer
Awesome review KP!

Many thanks Hellcat it really is appreciated :)

I always have battle with myself whether or not I crap on for to long trying to cover everything possible or whether I should cut everything down to one page bullet point style

What do you reckon?

Chronical or short story
 

PaulS

Gold Contributor
Member For 5 Years
Everyone has their own style. I keep mine short but I try and hit most relevant points
 

hellcatrydr

Gold Contributor
Member For 4 Years
Many thanks Hellcat it really is appreciated :)

I always have battle with myself whether or not I crap on for to long trying to cover everything possible or whether I should cut everything down to one page bullet point style

What do you reckon?

Chronical or short story

I like it as is. I appreciate the info on the chip.
 

KingPin!

In my defence, I was left unsupervised ^^
VU Donator
Platinum Contributor
Member For 4 Years
VU Challenge Team
Reviewer
Thanks both :) difficult to please everyone I’ll stick to my guns for the time being then
 

Raymcconn

Silver Contributor
Member For 3 Years
Member For 2 Years
Nice, your not the only one that has mentioned the TC with this mod. I thought the VO chip was going in the right direction. Wonder what changed... Nice read.
 

SkoldVape

Gold Contributor
Member For 4 Years
Nice, your not the only one that has mentioned the TC with this mod. I thought the VO chip was going in the right direction. Wonder what changed... Nice read.
It's really hard to find a decent TC mod isn't it. There is a couple like the speeder an archon but really your going DNA or YiHi if you want decent TC
 

KingPin!

In my defence, I was left unsupervised ^^
VU Donator
Platinum Contributor
Member For 4 Years
VU Challenge Team
Reviewer
Nice, your not the only one that has mentioned the TC with this mod. I thought the VO chip was going in the right direction. Wonder what changed... Nice read.

Many thanks Raymcconn

In truth it wouldn’t surprise me if the spring loaded pin has something to do with it as it’s a little soft and might be throwing the TC out although wattage mode seems to work really well. Perhaps it has more to do with the frequency they are using combined with a lack of manual TCR or wattage preheats to dial the experience in. When using simple builds whilst in the sweet spot it seems to do pretty well, but when you compare it to say the DNA its no comparison

I do reckon in time the VO Tech chipsets could be a real competitor in the market they just need to expand on the TC side and fine tune the chip for it
 

KingPin!

In my defence, I was left unsupervised ^^
VU Donator
Platinum Contributor
Member For 4 Years
VU Challenge Team
Reviewer
It's really hard to find a decent TC mod isn't it. There is a couple like the speeder an archon but really your going DNA or YiHi if you want decent TC

Or FSK which reminds me I really do need to get hold of the Hohmwrecker! Last one of the big three I’m missing

Yeah I agree Aspire did a great job on the speeder all round for the price it’s hard to beat although the Michael does wattage mode better than the speeder in my humble opinion
 

SkoldVape

Gold Contributor
Member For 4 Years
Or FSK which reminds me I really do need to get hold of the Hohmwrecker! Last one of the big three I’m missing

Yeah I agree Aspire did a great job on the speeder all round for the price it’s hard to beat although the Michael does wattage mode better than the speeder in my humble opinion
I've heard vapor cube might have a G2 cos I wanna pick up another.
I'll let you know if they delivery to UK.

I honestly think my minikin does better wattage than the speeder but the speeder wipes floor with minikin for TC which kinda sucks cos the minikin wasn't that cheap compared to my other mods.
I mean my therion wasn't much more!
 

KingPin!

In my defence, I was left unsupervised ^^
VU Donator
Platinum Contributor
Member For 4 Years
VU Challenge Team
Reviewer
I've heard vapor cube might have a G2 cos I wanna pick up another.
I'll let you know if they delivery to UK.

I honestly think my minikin does better wattage than the speeder but the speeder wipes floor with minikin for TC which kinda sucks cos the minikin wasn't that cheap compared to my other mods.
I mean my therion wasn't much more!

Want to try out the lucifer as well skold see how that goes wattage on this is really nice ...also saw they have the Gabriel out now single battery though both look sweet with the stabwood
Variants
 

SkoldVape

Gold Contributor
Member For 4 Years
Want to try out the lucifer as well skold see how that goes wattage on this is really nice ...also saw they have the Gabriel out now single battery though both look sweet with the stabwood
Variants
I need to look into the Lucifer. Not even watched reviews yet!
 

VU Sponsors

Top