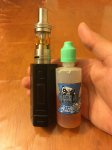
so i have been rebuilding uwell crown v1 stock coils for a while now. Getting pretty good at it and thought id share a new coil style.
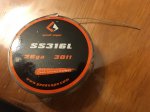
watch any video on youtube about stock coil rebuilding and its the same process. Instead i have used a twisted SS316L wire. Two 26ga wires simply twisted together. I put both wires in a drill and let the wife hold the drill and i held both wires. I spun a whole spool of geekvape 26ga SS316L. just bend the whole wire in half and put the bend in the drill. Because its such a stiff wire it stays together if you twist it tight.
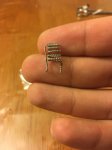
so 5 and a half wraps got me a .45ohm build which doesnt sound that low but damn the flavour im getting is like im in a dream and theyre letting me try the new uwell crown v4. some of the greatest vaping flavour ive ever had. I used a coilmaster coil jig with the 4mm bit and when you wrap the coil its tight but when you let it go it goes a little looser but thats what you want. It retains the original crown coil diameter (approx 5.5mm?)
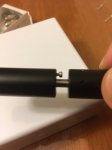
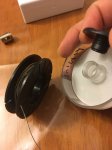
use the full length of the cotton pad, width just a bit wider than the coil and something cool about geekvape coil wire spools is that you can unscrew the center to take all the wire out and then respool your twisted wire (pic below) not sure about other brands
This is how im doing my coils from now on. Unbelievable flavour. All other vids ive seen and followed give you a rebuilt coil but lack the crown quality. You wont be sorry with this one.
reply or pm for any questions!
watch any video on youtube about stock coil rebuilding and its the same process. Instead i have used a twisted SS316L wire. Two 26ga wires simply twisted together. I put both wires in a drill and let the wife hold the drill and i held both wires. I spun a whole spool of geekvape 26ga SS316L. just bend the whole wire in half and put the bend in the drill. Because its such a stiff wire it stays together if you twist it tight.
so 5 and a half wraps got me a .45ohm build which doesnt sound that low but damn the flavour im getting is like im in a dream and theyre letting me try the new uwell crown v4. some of the greatest vaping flavour ive ever had. I used a coilmaster coil jig with the 4mm bit and when you wrap the coil its tight but when you let it go it goes a little looser but thats what you want. It retains the original crown coil diameter (approx 5.5mm?)
use the full length of the cotton pad, width just a bit wider than the coil and something cool about geekvape coil wire spools is that you can unscrew the center to take all the wire out and then respool your twisted wire (pic below) not sure about other brands
This is how im doing my coils from now on. Unbelievable flavour. All other vids ive seen and followed give you a rebuilt coil but lack the crown quality. You wont be sorry with this one.
reply or pm for any questions!
Attachments
Last edited: