KingPin!
In my defence, I was left unsupervised ^^
VU Donator
Platinum Contributor
Member For 4 Years
VU Challenge Team
Reviewer
Hi Folks,
I received the Turbo-L RDTA directly from Vaptio. This is available to buy now. I will convey my thoughts and do my very best to provide you with enough information so you can reach your own conclusion on the product, so no recommendations from me, just a final conclusion of my personal experience with it. Please ask questions in the below if I've missed anything you want to know
Product Overview
Available Colours;
Stainless Steel, Black, Rose Gold
What's included in the Box?
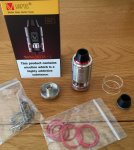
Presentation wise Vaptio has chosen a good quality box to use which adds that touch of class and attention to detail I like to see. Scratch and sniff is on the side of the box. Unfortunately you do get that stupid massive cigarette style “this product contains nicotine message on the front it” I find it sad vape companies feel forced they have to cover all bases like this now it’s ridiculous and actually offensive to me as an ex-smoker.
Looks & Initial Impressions
Overall I like the styling of the Turbo, it’s simple and stylish. Its form reminds me a lot of the IJoy Combo/Limitless with subtle differences around the top cap and base.
The parts have a brushed finish and thankfully it’s not covered with heavy branding. You have just the Turbo badge laser etched into the housing in an otherwise featureless mid-section. I would like to have seen this emblem etched a little deeper, heat treated or some other method to make it stand out a little more, as its stands the badge is difficult to see on the stainless steel version.
Unfortunately there is a proprietary derlin drip tip on this RDTA that is wider at the base than any other drip tips I’ve used so I’ve had no choice but to use it. The box does include a spare just in case I ever lose it. Personally it’s a little short for my liking but it’s comfy to use.
In RDTA mode it’s a little tall on top of the mod standing at 61mm, it’s got the “tomahawk” look on top of some of my mods, this is the price you pay for having that decent 5ml capacity tank with a tall pharaoh dripper type chamber.
The RDTA breaks into 9 parts for cleaning and maintenance.

When in RDA mode it has a lower 50mm profile and looks much sleeker in my opinion. Perhaps they could have reduced the height of the chamber although this may well interfere with the airflow and flavour.
The RDA breaks into 8 parts (I know it’s 7 in the picture but the positive pin pushes out of the base)
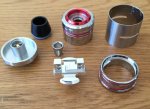
It’s not really an RDA by the way, it’s a 2ml Medusa style RDTA without a glass tank. I actually think they missed a trick on this. They could have used a bottom feeding pin, put a hole in the post that secures the deck allowing the user to “squonk”. Maybe a new base will be released at some point or have this feature included on a future product. Others like Geekvape seem to be ahead of the game in this area so Vaptio need to keep up! For now I’ll give them a pass on this since it’s their first venture into the RDTA world.
To draw this section to a close I can see they have taken queues and features from a few different manufactures here and combined them into their product, so it doesn’t push the boundaries in terms of innovation but they do put those features to good use.
Build Quality
I’m going to have to pull out quite a few things here;
I experienced pretty scratchy threads on the connector ring. There also seems to be a lack of a stop point. You can literally thread this ring the whole way over the deck, so care has to be made to ensure you have it at the right height. To be honest this might be a moot point because the deck screws into the base first so there is only far it can be screwed down, but I wanted to mention it anyway.
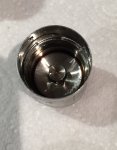
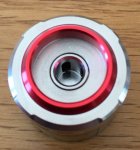
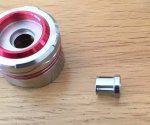
The positive pins for both the RBA base and RDTA base are too short on the product I received. If I screw them all the way in as far as they go they are almost in line with the threads, this is not good and even dangerous!
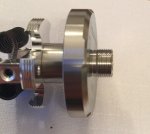
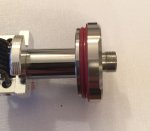
I unscrewed the pin a little to ensure it sat proud on both bases. Unscrewing them hasn’t produced any sort of connection problems between the RDTA and the Mod when firing.
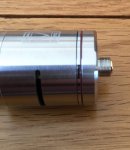
My O-rings aren’t tight enough. They need to offer more resistance (except for the one on the drip tip). I tried both the stock ones and the spares, both end up being too lose especially when juice gets on them.
I feel the machining inside the housing (they call it the atomiser tube others call it the AFC ring) could been have left with a better finish, also the same is true of my deck; one of the posts had a scratch on top out of the box and I noticed a weld mark line inside my housing.
I would like to have seen thicker metal used in the housing and the top cap pieces especially with the price point of this RDTA they feel a little too thin to me.
The post screws need to be a little bit bigger and better quality. On the one hand you have large post holes to accommodate large coils on here; the downside is those big coils have wider legs so the screws and post threads need to take that into consideration as this is a major stress point.
On a positive note the outside of the Turbo has a great finish. I can’t see a single blemish anywhere, The tolerances are great and all parts are aligned when assembled, so no QC issues with everything on the outside!
They also placed the refill hole in between two of the wicks hanging down so I never had to worry about juice running back out as the wicks held the juice back. The Turbo accommodates my refill bottles except from the widest of nozzles, unfortunately the base of the deck blocks a tiny bit of space at the top of the refill entry point.
Building and Wicking
After the last section it’s time for the Turbo to start redeeming itself.
This is a velocity style deck (two posts, each with two post holes for alternating leg positions) and is huge for a 25 mm RDTA!
Measuring from the insides of both post holes you have approximately 13mm width to use. To put this into perspective the Merlin RDTA (the widest RDTA build deck I’ve yet used in the 25mm class) has a width of 15mm when mounting centrally. I like making my own coils so I was like a kid in a sweetshop thinking of the builds I’m going to get in here.
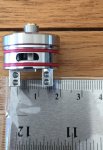
When I review an RDTA I don’t like using the same build for every product just because it’s fair, who cares about that! As far as I’m concerned you measure up what the product was designed for and build accordingly straight out of the gate! On this bad boy it wants big coils not some puny 2 mm micro something or other that you always run in every single review. Forget about those stock Clapton’s that come with it’s time to get this one going!
For the turbo I felt the 3mm Framed Staple Staggered Fused Clapton’s would suit it great (I know these coil names are ridiculous), but in they went!
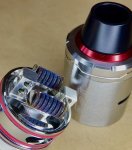
You’ll get in 4.5 mm coils on this deck no joke, but I like the 3mm coils in here a lot. As mentioned before the grub screws could have been a little bigger in all honesty, although my leads were held securely but I couldn’t wrench them down like I do on other decks for fear of stripping the threads.
There are channels on the deck which you can use as a guide as to how far out to place your coils which worked perfectly for me.
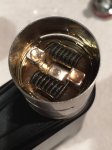
Then it’s just a case of ensuring the coils are high enough against the airflow opening for air to get under the coil (I usually sit mine with the bottom half showing when looking through the airflow slot)
Wicking is a breeze I’ve found it easiest to assemble it all first. I always use Cotton Bacon v2 for my wicking using the “Scottish Roll” wicking method (google this one for the guy who created it). Straight cut the wicks to a length where they will just sit inside the juice well by about 5mm. Fluff the ends up
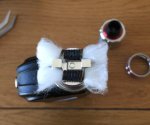
Then poke the wicks down the holes before applying juice. I found if I try to do it with the connection ring off the cotton gets snagged into the threads when you screw the ring back on (whether I left them dry or pre primed them) leaving gaps which will always end badly on an RDTA!
I received the Turbo-L RDTA directly from Vaptio. This is available to buy now. I will convey my thoughts and do my very best to provide you with enough information so you can reach your own conclusion on the product, so no recommendations from me, just a final conclusion of my personal experience with it. Please ask questions in the below if I've missed anything you want to know
Product Overview
- Side Filling and Side Airflow Design
- 5ml Tank size (or 2ml in RDA mode)
- Height: 61mm or 50mm in RDA mode
- Diameter: 25mm
- Patented Shield Tech Technology (anti spit guard)
- RDA, RDTA modes
Available Colours;
Stainless Steel, Black, Rose Gold
What's included in the Box?

- The RDTA (Rebuildable Dripping Tank Atomizer) fully assembled
- Base for RDA mode
- Bag of O-rings
- Spare delrin drip tip
- Bag of spare hex grub screws, 4 Pre made Clapton’s, Allen key
- Spare glass section
- Instruction manual
Presentation wise Vaptio has chosen a good quality box to use which adds that touch of class and attention to detail I like to see. Scratch and sniff is on the side of the box. Unfortunately you do get that stupid massive cigarette style “this product contains nicotine message on the front it” I find it sad vape companies feel forced they have to cover all bases like this now it’s ridiculous and actually offensive to me as an ex-smoker.
Looks & Initial Impressions
Overall I like the styling of the Turbo, it’s simple and stylish. Its form reminds me a lot of the IJoy Combo/Limitless with subtle differences around the top cap and base.
The parts have a brushed finish and thankfully it’s not covered with heavy branding. You have just the Turbo badge laser etched into the housing in an otherwise featureless mid-section. I would like to have seen this emblem etched a little deeper, heat treated or some other method to make it stand out a little more, as its stands the badge is difficult to see on the stainless steel version.
Unfortunately there is a proprietary derlin drip tip on this RDTA that is wider at the base than any other drip tips I’ve used so I’ve had no choice but to use it. The box does include a spare just in case I ever lose it. Personally it’s a little short for my liking but it’s comfy to use.
In RDTA mode it’s a little tall on top of the mod standing at 61mm, it’s got the “tomahawk” look on top of some of my mods, this is the price you pay for having that decent 5ml capacity tank with a tall pharaoh dripper type chamber.
The RDTA breaks into 9 parts for cleaning and maintenance.

When in RDA mode it has a lower 50mm profile and looks much sleeker in my opinion. Perhaps they could have reduced the height of the chamber although this may well interfere with the airflow and flavour.
The RDA breaks into 8 parts (I know it’s 7 in the picture but the positive pin pushes out of the base)

It’s not really an RDA by the way, it’s a 2ml Medusa style RDTA without a glass tank. I actually think they missed a trick on this. They could have used a bottom feeding pin, put a hole in the post that secures the deck allowing the user to “squonk”. Maybe a new base will be released at some point or have this feature included on a future product. Others like Geekvape seem to be ahead of the game in this area so Vaptio need to keep up! For now I’ll give them a pass on this since it’s their first venture into the RDTA world.
To draw this section to a close I can see they have taken queues and features from a few different manufactures here and combined them into their product, so it doesn’t push the boundaries in terms of innovation but they do put those features to good use.
Build Quality
I’m going to have to pull out quite a few things here;
I experienced pretty scratchy threads on the connector ring. There also seems to be a lack of a stop point. You can literally thread this ring the whole way over the deck, so care has to be made to ensure you have it at the right height. To be honest this might be a moot point because the deck screws into the base first so there is only far it can be screwed down, but I wanted to mention it anyway.
The positive pins for both the RBA base and RDTA base are too short on the product I received. If I screw them all the way in as far as they go they are almost in line with the threads, this is not good and even dangerous!


I unscrewed the pin a little to ensure it sat proud on both bases. Unscrewing them hasn’t produced any sort of connection problems between the RDTA and the Mod when firing.

My O-rings aren’t tight enough. They need to offer more resistance (except for the one on the drip tip). I tried both the stock ones and the spares, both end up being too lose especially when juice gets on them.
I feel the machining inside the housing (they call it the atomiser tube others call it the AFC ring) could been have left with a better finish, also the same is true of my deck; one of the posts had a scratch on top out of the box and I noticed a weld mark line inside my housing.
I would like to have seen thicker metal used in the housing and the top cap pieces especially with the price point of this RDTA they feel a little too thin to me.
The post screws need to be a little bit bigger and better quality. On the one hand you have large post holes to accommodate large coils on here; the downside is those big coils have wider legs so the screws and post threads need to take that into consideration as this is a major stress point.
On a positive note the outside of the Turbo has a great finish. I can’t see a single blemish anywhere, The tolerances are great and all parts are aligned when assembled, so no QC issues with everything on the outside!
They also placed the refill hole in between two of the wicks hanging down so I never had to worry about juice running back out as the wicks held the juice back. The Turbo accommodates my refill bottles except from the widest of nozzles, unfortunately the base of the deck blocks a tiny bit of space at the top of the refill entry point.
Building and Wicking
After the last section it’s time for the Turbo to start redeeming itself.
This is a velocity style deck (two posts, each with two post holes for alternating leg positions) and is huge for a 25 mm RDTA!
Measuring from the insides of both post holes you have approximately 13mm width to use. To put this into perspective the Merlin RDTA (the widest RDTA build deck I’ve yet used in the 25mm class) has a width of 15mm when mounting centrally. I like making my own coils so I was like a kid in a sweetshop thinking of the builds I’m going to get in here.

When I review an RDTA I don’t like using the same build for every product just because it’s fair, who cares about that! As far as I’m concerned you measure up what the product was designed for and build accordingly straight out of the gate! On this bad boy it wants big coils not some puny 2 mm micro something or other that you always run in every single review. Forget about those stock Clapton’s that come with it’s time to get this one going!
For the turbo I felt the 3mm Framed Staple Staggered Fused Clapton’s would suit it great (I know these coil names are ridiculous), but in they went!

You’ll get in 4.5 mm coils on this deck no joke, but I like the 3mm coils in here a lot. As mentioned before the grub screws could have been a little bigger in all honesty, although my leads were held securely but I couldn’t wrench them down like I do on other decks for fear of stripping the threads.
There are channels on the deck which you can use as a guide as to how far out to place your coils which worked perfectly for me.

Then it’s just a case of ensuring the coils are high enough against the airflow opening for air to get under the coil (I usually sit mine with the bottom half showing when looking through the airflow slot)
Wicking is a breeze I’ve found it easiest to assemble it all first. I always use Cotton Bacon v2 for my wicking using the “Scottish Roll” wicking method (google this one for the guy who created it). Straight cut the wicks to a length where they will just sit inside the juice well by about 5mm. Fluff the ends up

Then poke the wicks down the holes before applying juice. I found if I try to do it with the connection ring off the cotton gets snagged into the threads when you screw the ring back on (whether I left them dry or pre primed them) leaving gaps which will always end badly on an RDTA!


