Become a Patron!

Problems wrapping helix staples (other staples fine)

Please forgive me if I mess up any forum etiquette, I read the rules but I am very very new to forums in general. But if I do let me know so I can fix it.

Anyway, I tried coil making a few years ago and failed miserably. Recently I stumbled on some mohawk aliens and found out what I was doing wrong, moved on to regular aliens, then framed staples.

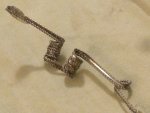
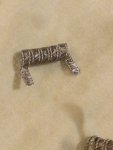
Once I mastered those I tried helix staples, my favorite coil I ever used. But those coils despite framed staples and spaced fraliens of all kinds wrapping just fine, the helix frames don't hold the ribbon together as well and it completely buckles or just flips sideways. I will try to attach a picture. (It's not great but trust me they are folded ribbons. Included one failed and the corrugated that worked)
I have made like 8 coils and they all failed until I tried a corrugated which seemed better but then those started failing too. What could I be doing wrong here? I use a wrapping tool and hold the wire about 2 inches away from the jig, while using my finger to press down the wraps as I make them.
Any tips?
 

Attachments

  • 1600037170418507689271825264924.jpg
    1600037170418507689271825264924.jpg
    2 MB · Views: 26
  • 16000372817136119722862093894269.jpg
    16000372817136119722862093894269.jpg
    2 MB · Views: 23

Carambrda

Platinum Contributor
ECF Refugee
Member For 5 Years
Adding several more ribbons typically works, or else you can try using a mini torch or a jet lighter to (carefully) remove most of the springiness before you start to coil it up, but IMO you might also want to add multiple more strands of wrap wire for fusing it all together more securely. Keeping some (but not too much) tension on the wrap wire the entire time as you go along with the fusing also helps, and, the easiest way to get this right IME is to line the wrap wire up such that the angle correctly matches that of the grooves. You can use cheap plastic magnifying reading glasses to count the same exact number of grooves you need to skip with every half turn, and rub the tip of your thumb's fingernail from one groove over to the next so you don't lose count while you're trying to focus on them with your eyes to count them. After the first fuse is finished, you can effortlessly see where the next fuse needs to go. In my below example, I used a total of 7 strands for the fusing. It's all Ni80 and using .3 ribbon, 32g frames, 40g wrap wire.

stapled helix.jpgstapled helix strand.jpg
 
Adding several more ribbons typically works, or else you can try using a mini torch or a jet lighter to (carefully) remove most of the springiness before you start to coil it up, but IMO you might also want to add multiple more strands of wrap wire for fusing it all together more securely. Keeping some (but not too much) tension on the wrap wire the entire time as you go along with the fusing also helps, and, the easiest way to get this right IME is to line the wrap wire up such that the angle correctly matches that of the grooves. You can use cheap plastic magnifying reading glasses to count the same exact number of grooves you need to skip with every half turn, and rub the tip of your thumb's fingernail from one groove over to the next so you don't lose count while you're trying to focus on them with your eyes to count them. After the first fuse is finished, you can effortlessly see where the next fuse needs to go. In my below example, I used a total of 7 strands for the fusing. It's all Ni80 and using .3 ribbon, 32g frames, 40g wrap wire.

View attachment 168974View attachment 168975
I'm sorry it took so long to reply. I have been using all my free time to try to make these. Do you use a drill or hold it in your hand? Do you use a hoodie string holder or something else to hold the wire together like a clothespin? And when you are done, they wrap into a coil without problems as if they are a normal framed staple?
 

Carambrda

Platinum Contributor
ECF Refugee
Member For 5 Years
6:31 = How to use a torch to remove springiness before you coil it up. It's a fishtail braid, but the same torching technique shown here can also be used with builds that don't use very many ribbon strands for the ribbon stack. Too much springiness in the ribbon stack can cause the ribbon stack to start to twist on itself, especially if the number of ribbon strands you use is small.

17:28 = How to get tighter, tidier wraps by using a vice and a coiling rod. You still might need to go really very slow while coiling it up, i.e. by constantly verifying that the ribbon doesn't start to twist on itself.


I do not use a drill for coiling up my builds. As for using a hoody string holder (what they call a cord lock) or mini clothespins or whatever it is that various people have come up with to hold the ribbon stack lined up with the frames during the fusing it together part, use what works best for you. For most of my builds I prefer to use a key ring with a bit of masking tape (painter's tape) wrapped around it on either side of my strand to hold the key ring nice and centered during the fusing, but use only the type of key ring that is flat like this one:

gear-infusion-titanium-keyring.jpg
 

VU Sponsors

Top