Become a Patron!

Yihi SXmini G Class v.2 Reviewed by SessionDrummer

SessionDrummer

Bronze Contributor
Member For 4 Years
1 Lede.png


Thanks out to @David_SXmini for sending this G Class v.2 out for review along with the previously reviewed SL Class v.2. I knew the SL was a slimmed down version, so I was SUPER excited to see what the G Class had in store for me. I believe the G Class was first introduced in 2016, so I think this updated version 2, was long in the making.

This G Class has a LOT of features, so I've tried to trim this review down as best I could, to give you guys an overview, with a lot of details, but without going TOO far into the weeds.


G Class v.2 Specs:

  • Chipset: SX750
  • Battery: 2 x 18650
  • Size: 94 * 47.7 * 34.3mm
  • 510 Diameter: 30mm
  • 0.96" TFT Display
  • Coil Resistance: 0.05-3.0 ohm
  • Temp Range: 100℃-300 ℃ / 212℉-572℉
  • Material: Zinc alloy, Aluminum & ABS battery Panels
  • Weight: 150g
  • Charging rate: 5V/2A
  • Power Range: 10-200W
  • Output Voltage: 0.7-6V
  • Standby Current:<20μA
  • Temp Ω Read precision: 0.0001Ω


G Class v.2 Features:

  • WiFi - OTA Upgrades, Wallpaper and themes, language packs, and more
  • Waterproof Chipset - So much more durable with that much-appreciated coating
  • 4th Generation Temp Control - with Ohm read accuracy of 0.0001 ohm
  • Two temp modulation to choose from, and easy, much easier to set up
  • Smart Boost - the world's most intelligent preheat system. to put it in short: Preheat only when the coil needs it. period.
  • 7 Curves presets, and very user-friendly adjusting DIY curves
  • Daily puff counter that auto resets according to your schedule
  • Quiescent Current - <20uA
  • 2 CPU - UI Dedicated + Vaping dedicated CPU
  • Battery Overload Notification - based on your CDR!
  • Adjustable cutoff time

What's Included:


  • 1 x YiHi SXmini G Class V2 Mod
  • 1 x USB Type-C cable
  • 1 x User Manual
  • 1 x Warranty Card


Before we dive into this masterpiece, I highlighted four features/specs above that REALLY caught my eye.
Temp Control with 0.0001 ohm accuracy, 2 dedicated CPU's, WIFI ready, and the ability to set a Battery Overload Notification based on your CDR.
WOW, you can ALREADY tell that this one, means business.

The packaging was almost identical to the SL Class ...
2 Box Shot.jpg


The SXmini Team also decided to encase the entire mod in wrap, JUST to make sure it arrived to me (and you) they way they intended it to ...
2a Wrapped.jpg


With that frustration free packaging out of the way ...
3 Box Open.jpg


A USB-C charging cable, and documentation was included ....
4 Extras.jpg


Now, unlike the SL Class, the G Class included a QR code to download the manual for this one, and that was probably a GOOD idea, as it might have been a bit big for the box. Warranty card, and battery safety guide were in there too ....
5 Paperwork.jpg


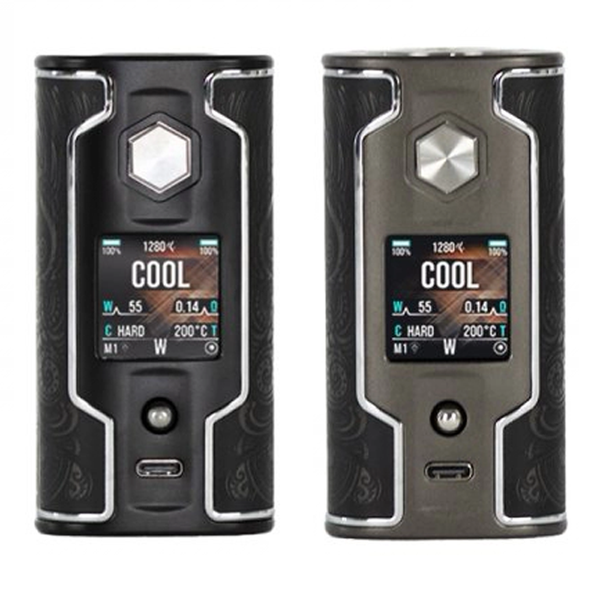
Realizing that I took WELL over 200 photos of this one, I'll try to hold BACK. On the front, we've got the expected fire button, 5-way joystick, and USB-C charging port, along with a gorgeous 0.96" TFT Display.
6 Front.jpg


A matte finish on the rear, with clean chrome trimming, and the SXmini logo (which CAN be adjusted, or turned off if needed)....
7 Back.jpg


Stunning (IMO) side panels ......
8 Side.jpg


A generous 30mm top plate that was centered, textured (yeah, they thought of that too), and with a nicely sprung 510 connection...
9 Top.jpg
 
Last edited:

SessionDrummer

Bronze Contributor
Member For 4 Years
Rock solid bottom plate, BUT, no battery lid ??
10 Bottom.jpg


Looking at the back side, you can barely see the two small indents ....
11 Side Tabs.jpg


Which revealed two side battery lids ....
12 Side Open.jpg


The metal lids were padded, and held in place by two VERY strong magnets ....
13 Side Open 2.jpg


Each battery compartment was polarity marked, with a rip cord, and nicely snug spring loaded posts ....
14 Side Polarity.jpg


Perfectly snug without any movement, and centered .....
15 Batteries Inserted.jpg


David also included two extra ABS side panels, which were mirror images of the stock metal ones, only lighter ...
16 Side Panel ABS.jpg


The backs of the ABS panels were not padded, but were clearly designed to hug the batteries ...
17 Side Panel ABS Back.jpg


The side panels were TOO gorgeous to NOT get a better look at them ....
18 Side Panel ABS Closeup.jpg


Comparing the stock metal (upper right), and extra ABS (lower left) panels ...
19 Side Panel Comparison.jpg
 

SessionDrummer

Bronze Contributor
Member For 4 Years
The magnets were soo strong, that I couldn't set the side panel much closer than this without them sucking the lids closed ....
20 Battery Lid.jpg


Welcome to the G2, errrr G Class V2 that is ......
21 Power Up.jpg


I specifically wanted to test out the WIFI connectivity, and update the unit for this review. This was done by turning ON the WIFI in the G Class, which enabled an AP WIFI Hotspot, connected my cell phone TO the hotspot, using the password "12345678".
22 Manual WIFI 1.png


After connected, the G Class presented a QR code, outlined in yellow. After scanning, it opened a browser window, which allowed selection of my WIFI network FOR the G Class to connect to the internet ....
23 Manual WIFI 2.png


After entering my WIFI network password, and connecting the G Class to the internet, it produced a QR code outlined in GREEN. At this point, I disconnected my phone from the G Class's AP WIFI Hotspot, reconnected to my WIFI network, and clicked the link .....
24 Manual WIFI 3.png


Which connected to the online SX-Panel !!!!!
25 Mobile SX-Panel.jpg


Now you may or may not want to initially upgrade your unit before testing, but I DID, JUST for you guys, and well, for this review. 🙂 I chose to update ALL ....
26 Mobile Updates 1.jpg


This included (2) WIFI updates, Firmware, and Theme updates ....
27 Mobile Updates 2.jpg


Everything was updated to v. 1.50.....
28 Mobile Updates 3.jpg
 

Attachments

  • 28 Mobile SX-Panel Settings.jpg
    28 Mobile SX-Panel Settings.jpg
    59.7 KB · Views: 2

SessionDrummer

Bronze Contributor
Member For 4 Years
What CAN'T you do over the SX-Panel ?? Nothing, because


Post updates, looked great, no smoke .........
34 Main Screen.jpg


Onto the Main Display Information......
35 Manual Main Screen.png


The navigation, commands, and usage, were fairly simple, ONCE you understood, and I'm going to break it down for you, EASY style.

Clickity Clicks:

  • 3 clicks Fire Button -- Locks / Unlocks Unit.
  • 5 clicks Fire Button -- Main Menu / Power up.
  • 3 clicks Joystick -- Locks / Unlocks joystick/quick commands (Mod will still fire).

Joystick Shortcuts:

Press and Hold

  • Hold Up/Down -- Adjusts Wattage, Voltage, or Temp.
  • Hold Right – Scrolls Available Font Colors.
  • Hold Left – Rotates through available Background Images (Theme Dependent).

Press Joystick, then scroll

  • Wattage / Temp / Voltage (mode dependent)
  • Memory settings
  • Curves
  • Mode – Wattage, Voltage, SS316, SS430, Ni200, Titan (Titanium), TCR and Bypass
  • Main Menu

The above shortcuts are very easy once you use them a few times, and become second nature. If you are more of a "Main Menu" or "Icon" based user (like I am), then 5 clicks on the fire button gets you in .....
![37 Manual Icons|392x500](upload://6m6D4QPVIv0iDac6GLty7zydwIN.png)


Clock:

If you lock the mod (3 clicks fire button), or it times out, you are greeted by the clock, which is ALSO selectable. When the clock is displayed, holding left on the joystick, will scroll all of the clock options. The Digital Clock has adjustable backgrounds (hold down on joystick), and font colors (hold right on joystick).
43 Clocks.png


Logo:

The LED Logo actually didn't look as bad as I thought, and actually grew on me. Not only could it be dimmed or turned off, but could also be set to dim and restore per pre-set times.
43a Logo.jpg


Pre-set Temp / Power Curves ......
44 Manual Power Curves.png


User Defined Temp / Power Curves .....
45 Manual User Curves.png
 

SessionDrummer

Bronze Contributor
Member For 4 Years
Smart Boost .....
46 Manual Smart Boost.png


And FINALLY, ...... TEMP CONTROL !!!!!
47 Manual TC.png


Just like on the SL Class, you need to lock in your resistance, and you also can enter your room temp .....
48 Manual Coil Lock 1.png


Auto (if you're coil is cooling down), Manual if it is already cool. Although Auto DOES start a 10 minute countdown clock, I waited less than a minute, and advanced. Really only needed for hot or warm coils as they are cooling down, to give you the BEST TC experience ....
49 Manual Coil Lock 2.png


I decided to load up the Voltrove 30 v.2 LE RTA for the duration of these tests ....
50 Final.jpg


Testing / Usage:

I know, I know, FINALLY hehe. Wow, talk about OPTIONS. I think the G Class v.2 has proven to be the MOST customizable mod I have ever tested. Everything from the etched top plate, down to the slickly finished side panels just showed the attention to detail that was commonplace with this mod. Snug fitting batteries, and side panels, left it dead quiet. Both the fire button and joystick were rattle free, and about perfectly tactile. Throughout my tests, which were mostly Wattage, Voltage and TC, everything worked flawlessly. The curves, and Smart Boost worked perfectly, and made quite a difference. I will admit to being SHOCKED when I saw a 10 minute countdown clock when reading/locking in new coils, BUT, as long as they were cool, you could skip through with no issue.

The mod looked, felt, and worked like a top shelf mod (as it should), and I had close to ZERO issues, BUT, I found ONE, and it took a while to figure it out, but hey, you guys are WORTH IT. During the WIFI setup I tried to connect it to my personal networks which all had lengthy passwords with special symbols, and the mod would not connect. After a bit of fiddling, I setup a Guest Network with a simple numeric password, and it hooked RIGHT UP. SO, be advised, it appears to not like complex, mixed WIFI passwords. Once connected however, it sped right along over the 2.4 radio and pulled all the updates quickly without issue. The SX-Panel (i.e. Web Interface) was VERY slick, polished, and provided you EVERYTHING you would ever need, from support, to settings on the mod.

Pros:

  • First rate fit and finish
  • Felt very good in the hand
  • Super sharp display
  • Stunning side panels
  • Beyond completely customizable
  • Fast Firing, even with more complex coils
  • Dual CPU's
  • Hyper accurate Ω Read precision: 0.0001Ω
  • USB-C
  • WIFI Connected (See Cons)
  • Very large top plate supports larger tanks
  • Ability to define Battery Overload Warning based on CDR.

Cons:

  • WIFI connection issues with complex, multi-type WIFI passwords
  • Only 18650 batteries
  • It ain't free

Conclusion:

Wow, WHERE to begin ?? Yes, if you've got the cash, and you like high end mods, with about everything you could ever think of, or want, you need to pick up one of these. Having just reviewed the SL Class v.2 I was already fairly refreshed on the Yihi chipset navigation and usage, and even with the somewhat more in depth nature of this one, it was actually very intuitive after a short time. I spent almost as much time, tweaking, adjusting, and customizing, as I did physically testing, and it's literally got EVERYTHING you would ever need. Now be advised, TC typically isn't my bag, as I prefer to "gas and go" in Wattage mode, but I think that the SXmini Team has really worked to make TC a lot easier, and much easier to use, right out of the gate, AND, if you WANT to dive in deeper, you can, but you don't NEED to.

For some people NOT having a 21700 battery option might be a con, but I had no issues with run time, and much like the SL Class v.2, it seemed to be more efficient than I expected. With less than 20 micro Amps in stand by, any vampire current bleed looks to be a thing of the past. Heavy, but not overbearing, and just felt REALLY good in the hand. Beyond the slight learning curve, and complex WIFI password issue, I couldn't find ANY issues, big OR small, to even mention, and I WAS looking. I'm glad I was able to test both the SL Class v.2, then this one, as it really allowed me to see the differences, and similarities first hand.

Again, a huge thanks out to @David_SXmini for sending this out for review.


Colors:

  • Matte Black (reviewed)
  • Space Gray

Linkage:


Almost Missed:


I almost missed this, as I didn't see this little sticker in the envelope until after the testing was done. The SXmini team tossed in a protective sticker, JUST IN CASE you were worried about scuffing up the bottom of your G Class v.2

52 Scratchguard.jpg


I know I always say this, but MAN, if you literally made it through this ENTIRE REVIEW, then you ARE one of the few. I could have probably gone on and added much, much more to this review, but as it is/was, it was very hard to cover ALL the features without turning it into a multi-sitting review. I appreciate you giving up some of YOUR free time, to check it out.

53 Thank You.jpg


S.D.

Bonus


54 Wallpaper.jpg


55 SessionDrummer.jpg
 

SessionDrummer

Bronze Contributor
Member For 4 Years
From @David_SXmini on the VC ........

I would like to share with you something, SessionDrummer, and to all of you who read this…
Countless hours of brainstorming., countless months of programming, designing, molding, and sweat which have all turned to years, working on our G2.

There were times that some of us thought that some things just couldn’t be done or were too hard, but we could not accept words like Can’t or Impossible. And so, we have been working a long, long time on G class V2. and had to solve so many problems during our creation path…

I shed tears when reading your review.

Through your words, I felt your understanding. I felt your acknowledgment of our hard-working. of us trying to give a unique experience to you vapers, us vapers. You know how sometimes a dish is so delicious and you ask the chef what’s in it? And the simple answer is Love. Well, that was our special ingredient, and lots of it.

In a time when all that there is are generic mods and pods, when so many people forgot the thrills of a new innovative chipset, and new features…
We decided to bring the thrill back, to bring innovation back to the table.
I know, some might think I’m being corny. But I’m talking from my heart. On the name of the company which I represent, and which I love. Because SXmini cares. Our meetings start with how to bring a better experience to our customers, and end with that in mind.
Our CEO Mr. Chen put so much effort into bringing a safe and satisfactory vaping experience.

I’m touched to see you felt it. Through using our creation. Without me telling you anything. You felt that special ingredient we added to the dish. Thank you for noticing. Thank you for letting others know.
And thank you for letting us know that what we do, matters.
🙏
Yours, Sincerely.
David, a proud manager at SXmini
 

SessionDrummer

Bronze Contributor
Member For 4 Years

Snap 2022-05-18 at 17.18.52.png
 

VU Sponsors

Top