I've been making coils for a few months now. I'm wanting clouds, so I'm using 22 and 24 gauge wire doing dual parallel. My coils seem to get out of shape quick. I pulse them and squeeze them prior to wicking, but they will not stay in shape. Any advice?
Become a Patron!
You are using an out of date browser. It may not display this or other websites correctly.
You should upgrade or use an alternative browser.
You should upgrade or use an alternative browser.
Coils
- Thread starter hogboy261
- Start date
UncleRJ
Will write reviews for Beer!
Staff member
Senior Moderator
VU Donator
Platinum Contributor
Member For 4 Years
ECF Refugee
Reviewer
Moderator
With wire that thick, I don't PULSE them.
Bright cherry red then a pinch.
Repeat if needed.
Just using standard needle nose pliers and making sure there is no current being delivered when I pinch.
No ceramic tweezers needed and my coils last until I feel like replacing them.
In a month or so.
Bright cherry red then a pinch.
Repeat if needed.
Just using standard needle nose pliers and making sure there is no current being delivered when I pinch.
No ceramic tweezers needed and my coils last until I feel like replacing them.
In a month or so.
State O' Flux
Bronze Contributor
Member For 4 Years
Member For 3 Years
Member For 2 Years
Member For 1 Year
Member For 5 Years
What is the net resistance of your dual parallel build, and what wattage is applied?My coils seem to get out of shape quick. I pulse them and squeeze them prior to wicking, but they will not stay in shape. Any advice?
Why not? Do you not know how?I don't apply any tension while wrapping.
Try straightening the wire first? You gotta hold one end tight and pull outwards while you wrap them. You want them as tight as you can get em BEFORE you put em in the atty. Ideally you should hardly have to do any work to them once the coils are in your atty, just minimal adjusting to get rid of any hot spots. Wrapping them loose and then pulling on em while they're installed only makes more frustration and more work for yourself. If i can find a good video on wrapping parallels i'll post a link 
Edit:
Edit:
NIMBUS MAXIMUS
Member For 4 Years
I'm new to parallel coil building, but I'm getting better. I had the same problem you're having and learned that I was wrapping a little too loose, and pinching them to hard when pulsing. I did not have this problem with single strand builds.
I learned to take my time and methodically wrap parallels under fairly extreme tension. The coil needs to look as close to what you think the final product should look like before you ever pulse and pinch. Parallels are a definite "crap in crap out" scenario.
Do your best to keep your wrapping instrument inserted into the coil while mounting. This will keep the coils from separating. Heat the coil and "strum" it before you ever pinch it, sometimes strumming is all you need. If you have to pinch, do it delicately. You can re-insert your coiling instrument to bring the coil back into shape.
I've basically went around the horses ass to get to his nose. I ramble..... Like OBDave said, wrap under tension.
I learned to take my time and methodically wrap parallels under fairly extreme tension. The coil needs to look as close to what you think the final product should look like before you ever pulse and pinch. Parallels are a definite "crap in crap out" scenario.
Do your best to keep your wrapping instrument inserted into the coil while mounting. This will keep the coils from separating. Heat the coil and "strum" it before you ever pinch it, sometimes strumming is all you need. If you have to pinch, do it delicately. You can re-insert your coiling instrument to bring the coil back into shape.
I've basically went around the horses ass to get to his nose.
I ramble..... Like OBDave said, wrap under tension.NIMBUS MAXIMUS
Member For 4 Years
Try straightening the wire first? You gotta hold one end tight and pull outwards while you wrap them. You want them as tight as you can get em BEFORE you put em in the atty. Ideally you should hardly have to do any work to them once the coils are in your atty, just minimal adjusting to get rid of any hot spots. Wrapping them loose and then pulling on em while they're installed only makes more frustration and more work for yourself. If i can find a good video on wrapping parallels i'll post a link
Edit:
This too!
No offense, but holy sheepshit! You're pushing 0.11 ohm on a hybrid mech and you don't know how to wrap coils?!? What kind of batteries are you running with that?Dual 22gauge parallels five wraps. .11 on a kryptonite cam mod mutation xv3.
I've got to tap out on this one. I strongly recommend a regulated mod for the time being, and a look-see here:
http://www.vapingunderground.com/th...-sick-clouds-bro-thread-sticky-edition.78126/
.11 Ohms? at 4.1 volts you are pulling 37.3 amps from your battery. Even a Sony VTC5 would be overtaxed. Build the coil higher in resistance, be safe. at .17 Ohms you will be pulling 24.1 amps, high amps still, but a heck of a lot safer on a mech mod.
NIMBUS MAXIMUS
Member For 4 Years
Dual 22gauge parallels five wraps. .11 on a kryptonite cam mod mutation xv3.
..................................!!! Messy coils should be way down the list. I did not see this. Please, please be careful. The first thing I researched when I started building was safety. You can "Blow huge clouds, Bro" and still be very safe. In fact, lower does NOT always mean better. There's a sweet spot to every build, each individual RDA and person. Arbitrarily building low will usually net bad and unsafe results. Please don't take what we're saying negatively, this community genuinely wants everyone vaping safe.That Twisted Messes video is a revelation! Turn the screwdriver! Just damn.
madmonkey
The Road Warrior
VU Donator
Silver Contributor
Member For 4 Years
Member For 3 Years
Member For 2 Years
Member For 1 Year
Member For 5 Years
First of all if you like your fingers and insist on building dual parallel builds that low you're going to need either a dual or quad parallel box mod filled with VTC's or at least LG HD2's because it's just a matter of time before you over stress your batteries and they commence running away at high thermal velocity and your toast.
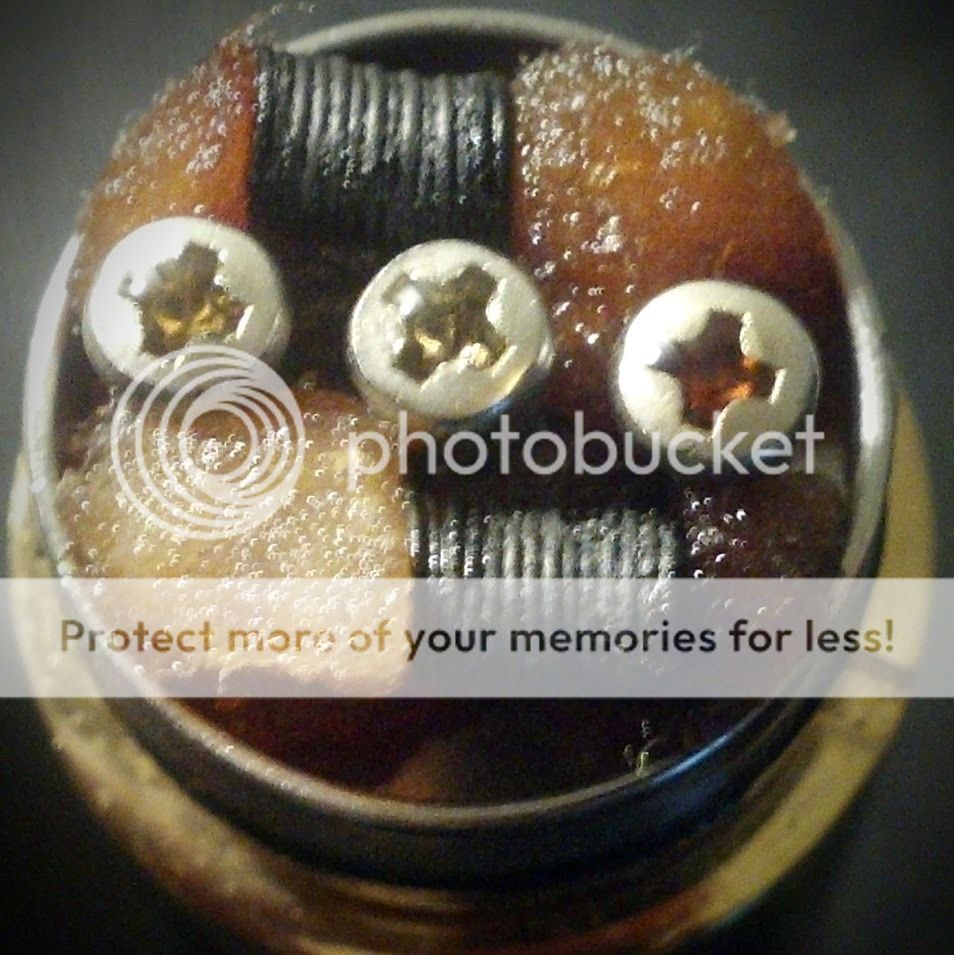
Ok, first of all...what everyone said about tention is key....if you just "mold" wires around whatever you're wrapping them on they will eventually fall out of place and you'll have to fix them when you rewick...I've done this intentionally to see how the coil would preform with staggered wraps and it's nothing to write home about....second of all...get some 26 gauge wire and 2 1/8th inch drill bits. Torch the shit out of your wire before you start wrapping, it will help hold it tight better, and I don't mean run a bic lighter over it a couple times, I mean get a butane torch and make that shit glow.
Take two strands of wire and wrap them in parallel fashion pulling tightly as possible around the drill bit 7 times making sure that all the wraps touch but never over lap and that you pull as tight as you possibly can. Once you've completely your wraps take your needle nose pliers and pull on one lead while holding the the coil by the other lead as tightly as possible and pull as hard as you can on the first lead with the pliers till it feels like the coil is starting to unroll than repeat this step, pulling on the other lead with the pliers the same way to balance it back out. Make a second coil around the second drill bit the same way as the first.
once you have your two coils wrapped tight and tensed by pulling on the leads, install them on your RDA deck and secure them...if properly installed they should meter .24 if you made them with 26 gauge A1 Kanthal. Before you tighten down your screws to trap your coil make sure it is as close to the posts without touching as possible and as centered as possible on each side of the deck. Once you have your screws tightened down, before you trim your leads give a good tug on your coils with the drill bit in them to make sure the leads are properly secured and to tension the coils in place....once you've done that and your screws are good and your leads are trimed and you've used your ohm's meter to verify that the resistance is .24 and there are no loose connections or shorts at this point go ahead and remove your drill bits and start to heat up your coils. if you've done everything correctly up to this point your coils should fire almost perfectly even and need very little to no pinching at this point. So get your coils nice and hot and then, since you don't have ceramic tweezers, get them nice and red, let go of the fire button, and then stick one arm of the tweezer inside of the center of the coil and one over the top and give a gentle pinch to make sure that the coils stay lined up and flat and don't move while they're being heated the first few times...once you've pinched them that way than get your coil red again once more and get your drill bit back in it before it cools as quickly as possible and give it one more tug....that should not only tension but heat your coils into shape and place and "stick them together."
Since it's a lighter gauge wire it is less likely to move and if you do everything as I have described it will stay perfectly in place over the life of the coil and give you plenty of flavor and vapor without the risk of venting your battery. Best of luck to you and safe vaping!
madmonkey
The Road Warrior
VU Donator
Silver Contributor
Member For 4 Years
Member For 3 Years
Member For 2 Years
Member For 1 Year
Member For 5 Years
Here is a picture of the exact build I just described in the post above...this is perfect too because I forgot to pinch across the top on one side and you can see how the top coil is starting to become uneven as I haven't rewicked it since I built it two weeks ago because I barely vape on this dripper....you can see the difference it makes. Sorry the photo is crap, bad lighting and super close up with an old cell phone but it's clear enough to show my point and this will give off more vapor and flavor than you think...especially with a regulated high powered box mod around 70 watts but will do just fine on a single battery tube mech and will be much safer...key word, safer
but will do just fine on a single battery tube mech and will be much safer...key word, safer
I didn't even catch this, he may have posted it while i was typing. Good move posting that link!! I have had a hybrid mech mod explode in my hand.....SAFETY FIRST!!! I should do a better job of making sure folks aren't on a suicide mission before i give pointers!No offense, but holy sheepshit! You're pushing 0.11 ohm on a hybrid mech and you don't know how to wrap coils?!? What kind of batteries are you running with that?
I've got to tap out on this one. I strongly recommend a regulated mod for the time being, and a look-see here:
http://www.vapingunderground.com/th...-sick-clouds-bro-thread-sticky-edition.78126/
Hey all. Glad to have stumbled upon a safety conscious group. Just wrapped my first Clapton coils (yay) Anyway, I also just built my first flashlight mod.
Took a flashlight tube and pressure fit a metal washer with a bit of 510 threading soldered in the middle.
First question is it a really bad idea to have my atty making direct contact with the battery?
Second question is why do I keep burning out flashlight buttons and is there a better button to use?
Sent from my SM-G860P using Tapatalk
Woo that's a lot of twists  I got by first zipper coil wrapped up in my basement waiting for its atty to come in the mail
Sent from my SM-G860P using Tapatalk
 I got by first zipper coil wrapped up in my basement waiting for its atty to come in the mail
Sent from my SM-G860P using Tapatalk
Just a 2 post I-go L from fast tech. It'll b my first 2 post.
I've been using 18650 mechs for about four months using an aspire cf sub ohm& a fuhattan. Been building mostly on my mutilator rda. I also have a vengeance I use for bho- running a vertical coil above a stovetop- as well as a Silverplay.
I have, on order, the igo, mutation x4 mini, derringer, and freakshow mini so I'm pretty stoked for all that. I also am waiting on a smple ss mod cuz I recently stripped the 510 on my fuhattan- necessitating the flashlight mod in the meantime lol
Sent from my SM-G860P using Tapatalk
Yup just 2 twisted stands parallel just twisted opposite directions. Not sure it'll work any differently but it looks pretty coolisn't the zipper coil a twisted parallel
Sent from my SM-G860P using Tapatalk
Oooh I'm gonna haftu check that out. U notice any real difference in flavor/fog using the different builds?
Sent from my SM-G860P using Tapatalk
Sent from my SM-G860P using Tapatalk
madmonkey
The Road Warrior
VU Donator
Silver Contributor
Member For 4 Years
Member For 3 Years
Member For 2 Years
Member For 1 Year
Member For 5 Years
Just a 2 post I-go L from fast tech. It'll b my first 2 post.
I've been using 18650 mechs for about four months using an aspire cf sub ohm& a fuhattan. Been building mostly on my mutilator rda. I also have a vengeance I use for bho- running a vertical coil above a stovetop- as well as a Silverplay.
I have, on order, the igo, mutation x4 mini, derringer, and freakshow mini so I'm pretty stoked for all that. I also am waiting on a smple ss mod cuz I recently stripped the 510 on my fuhattan- necessitating the flashlight mod in the meantime lol
Sent from my SM-G860P using Tapatalk
You're going to want to make sure you've got those screws night and tight around those leads. The I-go L doesn't have holes threw the post like most new atties, it's the older "trap under the screw head " designs. The I go-L is a great atty especially for testing liquids but if it's the same stock old school I go L I bought and still use from a couple years ago it's got a single tiny airflow hole, a 20 mm deck, and 2 posts with small trap screws for smaller gauge wires. It's a different style of atty from a different style of building that may not work well with a zipper coil. I know there are clones of it on Fast Tech that can cost more than the original. even a three post version...but from the looks of them getting a zipper coil on them is still going to be a bitch if possible at all...not trying to be a jerk or ruin or your day...I am just telling you the truth that you're more than likely going to have a fight at the least to get it to work on that little atty
Na thanks for the tip. Much appreciated. Yea I got this one to play with. I'm gonna drill some extra afc's. I wasn't aware of the old style posts tho so thanks for the heads up
Sent from my SM-G860P using Tapatalk
Sent from my SM-G860P using Tapatalk
Damn I wish ur phone had a better camera too lol.
I was unsatisfied with my Clapton coil so I wrapped a pretty dual parallel build with 24g. Tastes great but it won't fire on my aspire (stupid 0.3 ohm limiter) and it was causing my flashlight mod button to get real hot so I'm re wrapping with 28g
Sent from my SM-G860P using Tapatalk
I was unsatisfied with my Clapton coil so I wrapped a pretty dual parallel build with 24g. Tastes great but it won't fire on my aspire (stupid 0.3 ohm limiter) and it was causing my flashlight mod button to get real hot so I'm re wrapping with 28g
Sent from my SM-G860P using Tapatalk
The button fire (calm ur tits nothing actually caught fire) makes me think it's time to step up my battery's game. Using an LG now but Orbtronics has Sony's with 30A discharge and they have a house brand with similar specs.
Sent from my SM-G860P using Tapatalk
Sent from my SM-G860P using Tapatalk
Thanks scarecrow I'll check it out
Sent from my SM-G860P using Tapatalk
Sent from my SM-G860P using Tapatalk
madmonkey
The Road Warrior
VU Donator
Silver Contributor
Member For 4 Years
Member For 3 Years
Member For 2 Years
Member For 1 Year
Member For 5 Years
The button fire (calm ur tits nothing actually caught fire) makes me think it's time to step up my battery's game. Using an LG now but Orbtronics has Sony's with 30A discharge and they have a house brand with similar specs.
Sent from my SM-G860P using Tapatalk
maybe the flashlight button on your homemade mod you're making can't handle the current running threw it maybe? I haven't seen your mod and don't have any details to go on but generally speaking that would make sense from what you have said. Orbtronics aren't cheap but you get what you pay there for sure and that's one of their main selling points.
You're building coils that are drawing a lot of amps very quickly...maybe building a mod with a mosfet and a switch that can handle more current is in order or something with multiple batteries wired in parallel is in order...
And as for "calm your tits, nothing caught on fire." is concerned...it seems obvious to me safety isn't your big priority and that's up to you...I'll never tell anyone how to vape...I just hope you don't hurt yourself and end up being another vape story gone wrong in the news making it worse for us safe vapors to keep our freedoms....I am honestly glad you haven't hurt yourself and hope you don't ...but there's ways to do what you're doing safely and screwing super low builds to a flashlight tube and wondering why the button keeps burning up isn't one of them...maybe the button is trying to tell you something....maybe?
A true friend you are. I did quickly realize that I was running way too many amps for the flashlight buttons and wound up using my fuhattan button instead, which works but still gets hot as it's threading is much smaller than the tube and needs to be held in place. I looked into mosfets and better tact buttons but at this point its a means to an end. I ordered a heat sink which I will permanently jam into my fuhattan cap, effectively replacing the 510, as well as a smpl mod ($10 can't go wrong)
I would, however, like to figure out some diy fought switch purely for curiosity sake
Sent from my SM-G860P using Tapatalk
I would, however, like to figure out some diy fought switch purely for curiosity sake
Sent from my SM-G860P using Tapatalk
andy17s
Silver Contributor
Member For 4 Years
Member For 3 Years
Member For 2 Years
Member For 1 Year
EBay, coil kit. You'll thank me later. I'd go with the coil master..I've been making coils for a few months now. I'm wanting clouds, so I'm using 22 and 24 gauge wire doing dual parallel. My coils seem to get out of shape quick. I pulse them and squeeze them prior to wicking, but they will not stay in shape. Any advice?
madmonkey
The Road Warrior
VU Donator
Silver Contributor
Member For 4 Years
Member For 3 Years
Member For 2 Years
Member For 1 Year
Member For 5 Years
A true friend you are. I did quickly realize that I was running way too many amps for the flashlight buttons and wound up using my fuhattan button instead, which works but still gets hot as it's threading is much smaller than the tube and needs to be held in place. I looked into mosfets and better tact buttons but at this point its a means to an end. I ordered a heat sink which I will permanently jam into my fuhattan cap, effectively replacing the 510, as well as a smpl mod ($10 can't go wrong)
I would, however, like to figure out some diy fought switch purely for curiosity sake
Sent from my SM-G860P using Tapatalk
I'm glad you got it at least partly "upgraded" for lack of a better term...I wasn't trying to be a dick persay...I just worry when there is an entire section on this forum and another entire forum dedicated to mod building that would tell you that a flashlight button is a good way for shit to hit the fan. I know you crazy kids nowadays just want the biggest vapor you can get but there's safe ways to do it, then there's scary ways to do it, then just plain stupid.....
You don't have to build down into the 0.0x range to get the biggest clouds, you really don't have to go below .2ish, and if you do you need a parallel battery setup...preferably with a mosfet and fuses for safety. I just don't want to see anyone get hurt when it could have been avoided. There are accidents yes, but then there is mistakes that can be avoided...I honestly don't want to see it happen to you.
For example...that .24 dual parallel build I put up earlier...for such a "simple" build you'd be suprised how well it performs...it does good on a mech...but if you put it on a box mod and crank it between 70-80 watts it will fill the room with vapor...wouldn't take much to tweak it into a "comp" build....and that's my daily driver for flavor, the vapor is just a side effect
Yep I hear what ur saying. No reason to invite injury. For now I'm done messing with the flashlight. I got it working and rebuilt my deck to around .5 no reason to push any lower on a device I don't entirely trust. I had a nice 28g dual parallel but my aspire kept telling me there was a short after about 3 seconds of firing. I coulnt see the short so I played around with it until I definitely had a short ( ) and replaced it. Ooh well
Sent from my SM-G860P using Tapatalk
 ) and replaced it. Ooh well
Sent from my SM-G860P using Tapatalk
The button fire (calm ur tits nothing actually caught fire) makes me think it's time to step up my battery's game. Using an LG now but Orbtronics has Sony's with 30A discharge and they have a house brand with similar specs.
Sent from my SM-G860P using Tapatalk
These guys are a reliable source for decent batteries:
https://bevapehappy.com/product-category/batteries/
I've had great luck with the MXJO's myself the last few months. And the Sony's they sell are authentic (from my understanding)
Nice they got some serious high drains for a good price. Thanks for the link!
Sent from my SM-G860P using Tapatalk
Sent from my SM-G860P using Tapatalk