KingPin!
In my defence, I was left unsupervised ^^
VU Donator
Platinum Contributor
Member For 4 Years
VU Challenge Team
Reviewer
Hi Folks,
I feel obliged to open this review with a line from Adele; “Ello from the other siiiiiiide…… another Tessera review; that makes a thousand tiiiiimes…..”
You know when you get that one song line in your head and can’t get it out … Damn you Eleaf!!
So what was I talking about again? ….Oh yeah “The Eleaf Tessera Kit, with the Ello TS tank”! Yeah I did just go there, but with a mouthful like that lot; it helps to put it in a song.
I was sent this kit directly from Eleaf for the once over. As usual as with any kit I’ll go over the tank first, then the mod. I don’t like to make recommendations in my reviews; I’ll go over my findings to help bolster your research should you be interested in the product.
So without further ado…
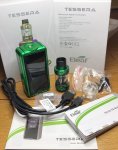
What’s in the Box?
Product Information: https://www.eleafworld.co.uk/Tessera-e-cig-kit-and-e-liquid.html (outside of the UK for 4ml? you can also use www.eleafworld.com/)
Part 1 - The Ello TS Tank
Ello TS Tank Specifications
I like opening a kit to find that the company hasn’t skimped on extras and with this kit you get a fair amount; two coils, spare glass, two drip tips, O-rings. Now depending on where you live (inside Europe having to suffer the TPD regulations) you’ll be picking this up in either 2ml or 4ml form (there is no extension in the kit).
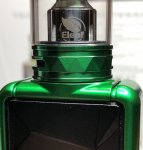
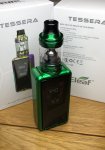
The Ello TS tanks finish is an anodized candy green matching the mod perfectly. From a looks perspective they have incorporated the triangles around the airflow control ring (AFC) and refill assembly to match the design on the mod and to give a little extra grip to those areas.
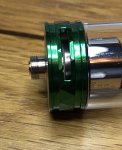
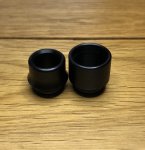
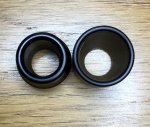
You get two drip tips. They are the standard Smok TFV8 fitting (the one with two O-rings around the base). The first option is the exact kind you will find on Smoks Beast TFV8; it’s a tall chimney design with thin walls and a large bore of 14mm. The other is a slightly lower profile with tapered edges to follow the line of the top cap mount. It has thicker walls and a bore of 11mm. Of the two I much prefer the smaller bore option…it’s very comfortable and is what I’ve chosen to use throughout my testing and review.
The top cap is a slide to refill design. There is a little mark to indicate where to push, once engaged it will move over a spring loaded ball bearing revealing a single 8mm x 4mm juice port. It can be a little tricky to refill this tank with the wider nozzles; PET dropper bottles work really well though. When you are done refilling and you happen to have any juice overspill or condensation sitting on top; you’ll find it pushes everything out just like a penny arcade machine, wiping excess juice away is almost mandatory.
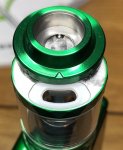
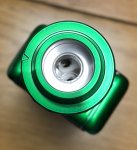
The tank utilises the now standard “Smok baby beast size coils” which opens the tank up to a large range of aftermarket purchase options. The chimney section screws on top of the coil but is slightly recessed making it narrower than some of its competitors; I haven’t noticed a huge amount of difference either way.
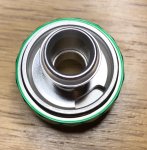
Otherwise this is a very much similar affair as with all of the tanks out there now utilising this sub ohm template. The tank breaks down into 5 pieces, you get two 15mm x 2mm airflow slots with an adjustable AFC, the positive pin sits proud once you screw the coil in. It’s a very safe design approach and there’s a reason for that…..it works well for starter kits.

The only thing I wasn’t overly fond of was the very large rubber seal sitting in the bottom of the tank. Normally the approach is to rest the gasket underneath the edges of the glass and very little, if any will be exposed to E-Juice. That’s not case with this monster though, it encircles the entire coil! Whilst it should be food grade material I still don’t like the idea especially after many months of usage.
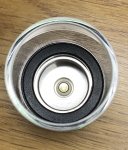
I want to mention how smooth the threading is because they have really done a bang up job of it throughout, even the AFC ring glides like it has a little pressure seal. I found the Ello TS to be very well machined throughout. The only area they could have perfected is to remove the very slight play in the top cap in that the ball bearing could offer a tiny bit more resistance.
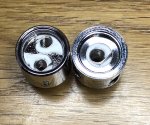
I’ve experienced no leaking, nor condensation seeping from the Ello TS tank throughout the life of both coils. It was good to see the white gaskets sitting flat on the coils with no wires poking out, the cotton also looked to be packed well, very good in comparison to some company’s attempts at these sort of coils.
How’s it Vape?
The HW1 (0.2 ohm coil) is rated between 40-80 watts. I found the stated resistance to be accurate (0.01 ohm Variance); the coil break in time (to get rid of that horrible cotton taste) to be quick at just 3ml. I had to put a good 15ml through the coil before I was able to push the wattage past 40W otherwise I was getting a burnt taste. After this initial period I was able to push the coil to around 55W which is still under their stated range.
The airflow is fairly restricted on the HW1 even wide open. I’ve settled on vaping this with the airflow control ring (AFC) set at just under half way. In my opinion the HW1 is definitely suited to those who prefer the clouds and a decent lung full as the flavour takes a back seat whatever wattage I tried.
I ended vaping the HW1 coil with a preheat of 55W for 0.5 seconds and the wattage set at 45W, which is where I felt it had best balance of cloud and flavour. It lasted 1 week which is disappointing.
The HW2 (0.3 ohms coil is rated between 30-70 watts. I found the stated resistance to be accurate (0.01 ohm Variance). It’s a very similar story with regards to break in time and having to vape at the lowest stated wattage before trying to bump it. I was able to take this coil up to a measly 45W (well below the stated range). I had high hopes for this coil being I prefer the coils based on the Smok X4 design; but this particular one underperformed for me, perhaps it was a janky coil?
The airflow on this coil is still fairly restricted again but this suits my style perfectly. Those out there that like a wide open airy vape neither of the offered coil options will suit you.
I ended vaping the HW2 coil with no preheat and the wattage set at 45W, which is where I felt it had best balance of cloud and flavour. It lasted 2 weeks.
Tank Pro’s
In terms of the numerous tanks on the market offering the now standard “Smok Baby Beast coil size” the Ello TS tank is fairly average in terms of its performance (at least with the coils provided in my kit), it’ll get the job done but I felt those coils were holding it back. Eleaf did a really good job with its quality and the drip tip is really comfortable so it’s a bit of a shame, perhaps aftermarket coils would help it along?
I feel obliged to open this review with a line from Adele; “Ello from the other siiiiiiide…… another Tessera review; that makes a thousand tiiiiimes…..”
You know when you get that one song line in your head and can’t get it out … Damn you Eleaf!!
So what was I talking about again? ….Oh yeah “The Eleaf Tessera Kit, with the Ello TS tank”! Yeah I did just go there, but with a mouthful like that lot; it helps to put it in a song.
I was sent this kit directly from Eleaf for the once over. As usual as with any kit I’ll go over the tank first, then the mod. I don’t like to make recommendations in my reviews; I’ll go over my findings to help bolster your research should you be interested in the product.
So without further ado…

What’s in the Box?
- 1 x Eleaf Ello TS tank standard version 4ml (assembled with the HW2 0.23ohm coil)
- 1 x Spare Coil HW1 (0.2 ohm)
- 1 x Spare Drip tip
- 1 x Spare Glass
- 1 x Eleaf Tessera Mod
- 1 x USB Cable
- 1 x User Manual and other info
- 1 x Spare bits bag
Product Information: https://www.eleafworld.co.uk/Tessera-e-cig-kit-and-e-liquid.html (outside of the UK for 4ml? you can also use www.eleafworld.com/)
Part 1 - The Ello TS Tank
Ello TS Tank Specifications
- Height 40mm (48mm with narrow drip tip, 50mm with wide bore)
- Diameter 25mm
- Airflow: Two adjustable (15mm x 2mm)
- Filling: Top fill - slide top cap to reveal opening (8mm x 4mm)
- Capacity 2ml TPD edition or 4ml standard edition
- Weight: 59g (with juice and coil)
- Materials in construction: Stainless Steel (SS)304, Pyrex
- Drip Tip: Delrin (Comes with 2 – H:8mm, Bore 11mm & H:10mm bore: 14mm)
- Drip Tip: Compatible with Smok Beast Drip Tips
- Positive Pin: Gold plated S 304
I like opening a kit to find that the company hasn’t skimped on extras and with this kit you get a fair amount; two coils, spare glass, two drip tips, O-rings. Now depending on where you live (inside Europe having to suffer the TPD regulations) you’ll be picking this up in either 2ml or 4ml form (there is no extension in the kit).
The Ello TS tanks finish is an anodized candy green matching the mod perfectly. From a looks perspective they have incorporated the triangles around the airflow control ring (AFC) and refill assembly to match the design on the mod and to give a little extra grip to those areas.

You get two drip tips. They are the standard Smok TFV8 fitting (the one with two O-rings around the base). The first option is the exact kind you will find on Smoks Beast TFV8; it’s a tall chimney design with thin walls and a large bore of 14mm. The other is a slightly lower profile with tapered edges to follow the line of the top cap mount. It has thicker walls and a bore of 11mm. Of the two I much prefer the smaller bore option…it’s very comfortable and is what I’ve chosen to use throughout my testing and review.


The top cap is a slide to refill design. There is a little mark to indicate where to push, once engaged it will move over a spring loaded ball bearing revealing a single 8mm x 4mm juice port. It can be a little tricky to refill this tank with the wider nozzles; PET dropper bottles work really well though. When you are done refilling and you happen to have any juice overspill or condensation sitting on top; you’ll find it pushes everything out just like a penny arcade machine, wiping excess juice away is almost mandatory.


The tank utilises the now standard “Smok baby beast size coils” which opens the tank up to a large range of aftermarket purchase options. The chimney section screws on top of the coil but is slightly recessed making it narrower than some of its competitors; I haven’t noticed a huge amount of difference either way.

Otherwise this is a very much similar affair as with all of the tanks out there now utilising this sub ohm template. The tank breaks down into 5 pieces, you get two 15mm x 2mm airflow slots with an adjustable AFC, the positive pin sits proud once you screw the coil in. It’s a very safe design approach and there’s a reason for that…..it works well for starter kits.

The only thing I wasn’t overly fond of was the very large rubber seal sitting in the bottom of the tank. Normally the approach is to rest the gasket underneath the edges of the glass and very little, if any will be exposed to E-Juice. That’s not case with this monster though, it encircles the entire coil! Whilst it should be food grade material I still don’t like the idea especially after many months of usage.

I want to mention how smooth the threading is because they have really done a bang up job of it throughout, even the AFC ring glides like it has a little pressure seal. I found the Ello TS to be very well machined throughout. The only area they could have perfected is to remove the very slight play in the top cap in that the ball bearing could offer a tiny bit more resistance.
I’ve experienced no leaking, nor condensation seeping from the Ello TS tank throughout the life of both coils. It was good to see the white gaskets sitting flat on the coils with no wires poking out, the cotton also looked to be packed well, very good in comparison to some company’s attempts at these sort of coils.

How’s it Vape?
The HW1 (0.2 ohm coil) is rated between 40-80 watts. I found the stated resistance to be accurate (0.01 ohm Variance); the coil break in time (to get rid of that horrible cotton taste) to be quick at just 3ml. I had to put a good 15ml through the coil before I was able to push the wattage past 40W otherwise I was getting a burnt taste. After this initial period I was able to push the coil to around 55W which is still under their stated range.
The airflow is fairly restricted on the HW1 even wide open. I’ve settled on vaping this with the airflow control ring (AFC) set at just under half way. In my opinion the HW1 is definitely suited to those who prefer the clouds and a decent lung full as the flavour takes a back seat whatever wattage I tried.
I ended vaping the HW1 coil with a preheat of 55W for 0.5 seconds and the wattage set at 45W, which is where I felt it had best balance of cloud and flavour. It lasted 1 week which is disappointing.
The HW2 (0.3 ohms coil is rated between 30-70 watts. I found the stated resistance to be accurate (0.01 ohm Variance). It’s a very similar story with regards to break in time and having to vape at the lowest stated wattage before trying to bump it. I was able to take this coil up to a measly 45W (well below the stated range). I had high hopes for this coil being I prefer the coils based on the Smok X4 design; but this particular one underperformed for me, perhaps it was a janky coil?
The airflow on this coil is still fairly restricted again but this suits my style perfectly. Those out there that like a wide open airy vape neither of the offered coil options will suit you.
I ended vaping the HW2 coil with no preheat and the wattage set at 45W, which is where I felt it had best balance of cloud and flavour. It lasted 2 weeks.
Tank Pro’s
- Good production quality
- Decent Clouds on the HW1 coil
- Spot on match for the mod
- Decent capacity
- Compatible with all the baby beast coil size options
- Refill is easy
- Two drip tip options & Kit comes with spare glass
- No Leaking (coil dependant)
- Refilling requires wiping away excess juice
- Felt the HW2 Coil underperformed for its design
- Both coils wattage ranges were wildly overrated
- Coil life was disappointing on the HW1 coil
- Could benefit from a 510 drip tip adaptor
- A little play in the top cap (ball bearing could have a tad larger)
- Big rubber O-ring sits inside the tank section exposed to heat and juice
In terms of the numerous tanks on the market offering the now standard “Smok Baby Beast coil size” the Ello TS tank is fairly average in terms of its performance (at least with the coils provided in my kit), it’ll get the job done but I felt those coils were holding it back. Eleaf did a really good job with its quality and the drip tip is really comfortable so it’s a bit of a shame, perhaps aftermarket coils would help it along?
Last edited:




 this one took bloody ages! ...bet it was a similar experience to read as well haha