Become a Patron!

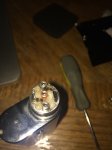
First RDA build. Dual coils for .6, Mad Hatter.

IAmRob

Member For 4 Years
Member For 3 Years
Member For 2 Years
Member For 1 Year
Hey guys, this is my first build and I'm looking to get some feedback on it. So far its performance has been great for me and actually suits what I was going for, but I'm looking for some tips on how to improve the build itself. This is on a Mad Hatter authentic that I actually picked up for a steal today at my local shop. It reads .6 ohms across my eleaf 50 watt, and i've got it running at 35 watts. Could I run it at a higher wattage?

Thanks for reading.

point6 ohm first build.jpg
 

OBDave

VU Donator
Gold Contributor
Member For 4 Years
1. I'd get a standalone ohm meter - the eLeaf is nice as a secondary check, but not the most reliable and it's good to have backup.

2. Try dry-firing and squeezing gently with tweezers to get the coils to contact uniformly before wicking.

3. Yes, you should be able to push higher wattage.

4. Nice work for a first attempt!
 

IAmRob

Member For 4 Years
Member For 3 Years
Member For 2 Years
Member For 1 Year
1. I'd get a standalone ohm meter - the eLeaf is nice as a secondary check, but not the most reliable and it's good to have backup.

2. Try dry-firing and squeezing gently with tweezers to get the coils to contact uniformly before wicking.

3. Yes, you should be able to push higher wattage.

4. Nice work for a first attempt!

Appreciate the feedback Dave, i'll be getting a standalone and ceramic tweezers soon. I've only had needle nose pliers so I didnt want to run current while squeezing it, so I only was able to squeeze as it cooled down.

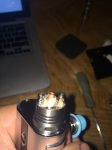
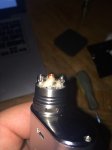
Edit: Just rebuild two parallel 1.2 ohm coils, 5 wraps of 28 g kanthal around some screwdriver I had. Looks better to me and the coils were more consistent in their lighting when I fired it before wicking. I also used less cotton for more airflow below the coils. How does this look?mod.jpg mod3.jpg mod2.jpg mod.jpg
 
Last edited:

OBDave

VU Donator
Gold Contributor
Member For 4 Years
Looking better on the contact, try to keep plenty of clear space under/around the coils where there's no cotton blocking airflow to the coils. You want to see even coil heating, or even heating from the inside out when you dry fire before wicking.

I don't own ceramic tweezers, I just pulse and then squeeze with little needle-nose or regular tweezers making sure not to pulse and squeeze at the same time. I see ceramic as a luxury, but by no means essential to proper building.

I have a big beginner's post stickied at the top of the "Help I Have Questions" subforum - would suggest checking that out. I also link to a great cotton wicking tutorial with pics from @scarecrowjenkins somewhere in that thread...
 

IAmRob

Member For 4 Years
Member For 3 Years
Member For 2 Years
Member For 1 Year
Looking better on the contact, try to keep plenty of clear space under/around the coils where there's no cotton blocking airflow to the coils. You want to see even coil heating, or even heating from the inside out when you dry fire before wicking.

I don't own ceramic tweezers, I just pulse and then squeeze with little needle-nose or regular tweezers making sure not to pulse and squeeze at the same time. I see ceramic as a luxury, but by no means essential to proper building.

I have a big beginner's post stickied at the top of the "Help I Have Questions" subforum - would suggest checking that out. I also link to a great cotton wicking tutorial with pics from @scarecrowjenkins somewhere in that thread...

I built again, keeping in mind your tips. If it wasn't so superfluous to throw my third build in here, I would. But my coils look identical now as opposed to my first build, and I kept more space as you said. Thanks for the tips, and I look forward to advancing my building skills.
 
Looks good. Might wanna try centering your coils a tad more- it's easier if you wrap the coils the opposite way, or fit them in the opposite way. What I mean is, with each coil,, you have one lead running out from the top, and the other from the bottom. Keeping the top lead in the center post and the bottom in the side post for each coil will help you center it.
 

VU Sponsors

Top