Although there are probably quite a few people who have seen this before (And are sick of it.") ) I would like to think that there are still quite a few who have not and will enjoy or benefit from it. As a added benefit the images are now hosted on Imgur vs Photobucket on which the images disappear 10 days into the month due to Bandwidth limitations.( It resets back on the 10th of every month) Well anyway here it is.
) I would like to think that there are still quite a few who have not and will enjoy or benefit from it. As a added benefit the images are now hosted on Imgur vs Photobucket on which the images disappear 10 days into the month due to Bandwidth limitations.( It resets back on the 10th of every month) Well anyway here it is.
A Couple of years ago I made this hopefully easy to follow Tutorial to help out anyone who likes the look of wood mods but for whatever reason chooses not to buy one. This was made in an apartment with hand tools, so you don't need a fancy workshop or special tools to make it. If you can think of a easier way to do something or want to substitute a part you already have please go right ahead. Also I tried to make this as comprehensive as possible , but if you have any questions or comments please feel free to Post.
P.S. I will also be posting a followup Tutorial for a VV Dual 18650 wood mod which will hopefully reference back to this one for the basic build.
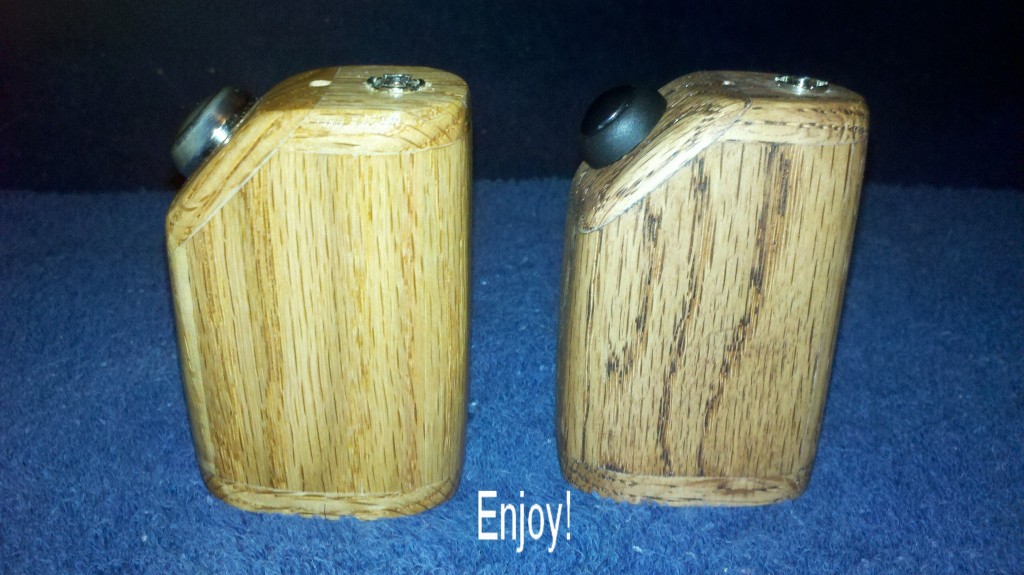
Here is what is getting built.
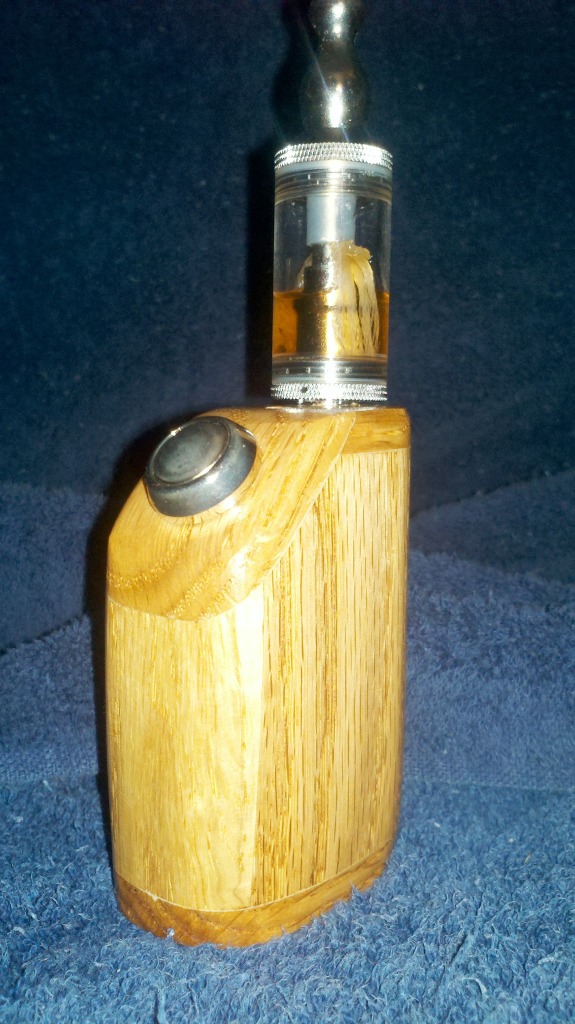
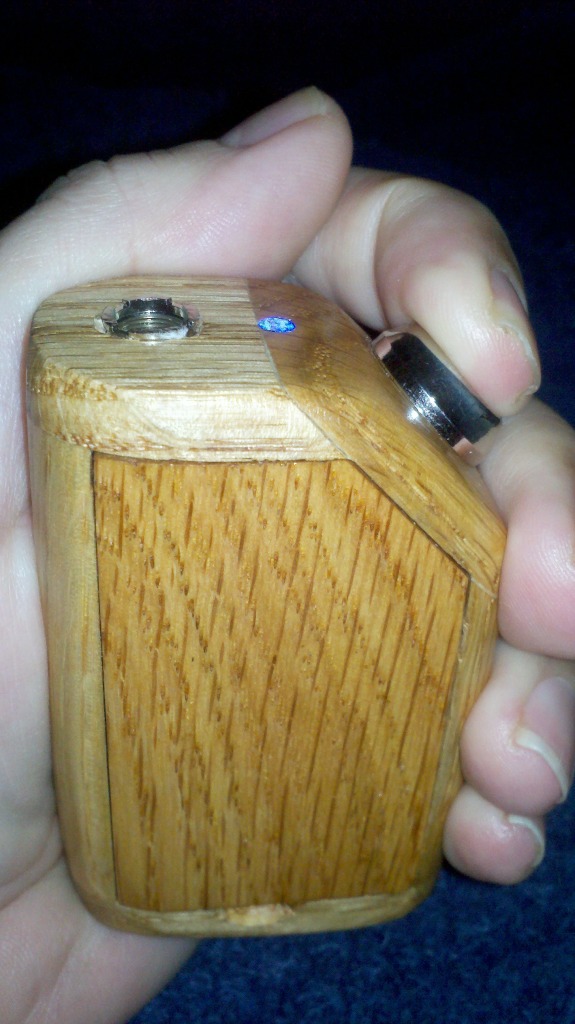
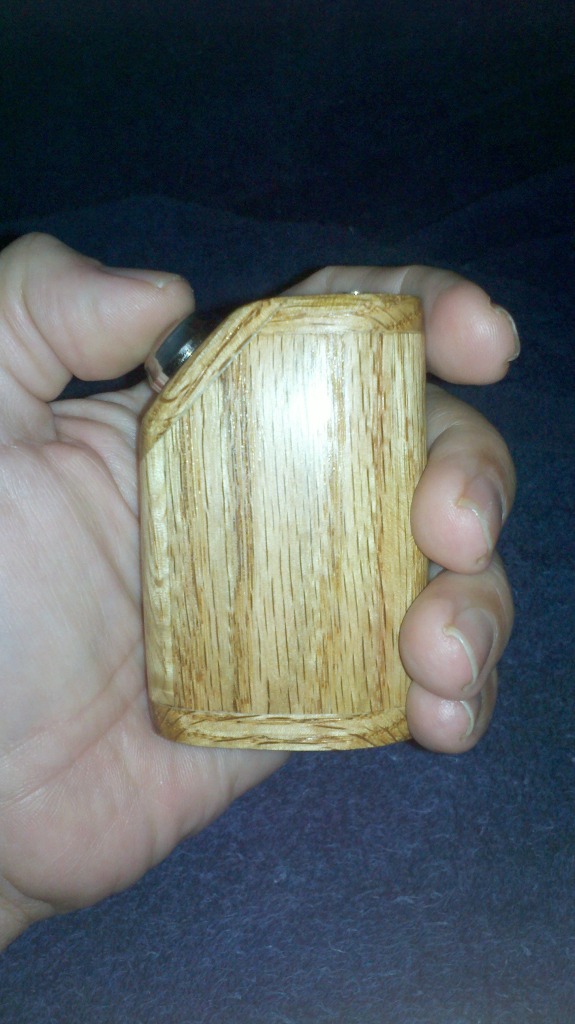
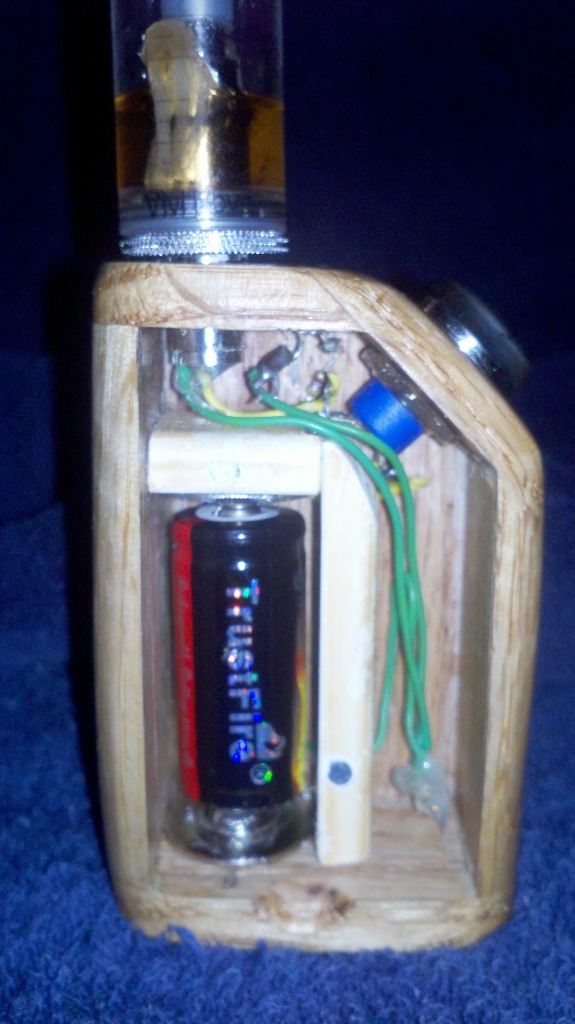
It works great,feels very good in hand, and is surprisingly lighter in weight than you might think.
Here is the part list of what is needed to build it you may already have these items if not I will tell you where I obtained them. If you are anything like me once you build your first mod you want to keep on modding everything. So I recommend that you get a few of these parts so that when mod fever comes over you. Everything you need is right there.
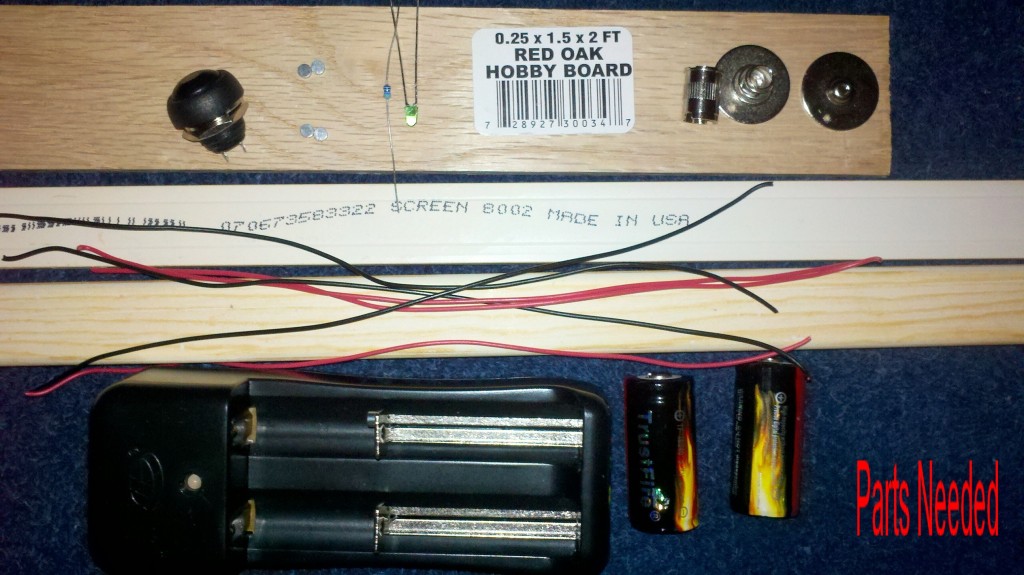
Some of the parts listed may seem a bit dated to some of you so feel free to substitute for more modern copys.
Madvapes -
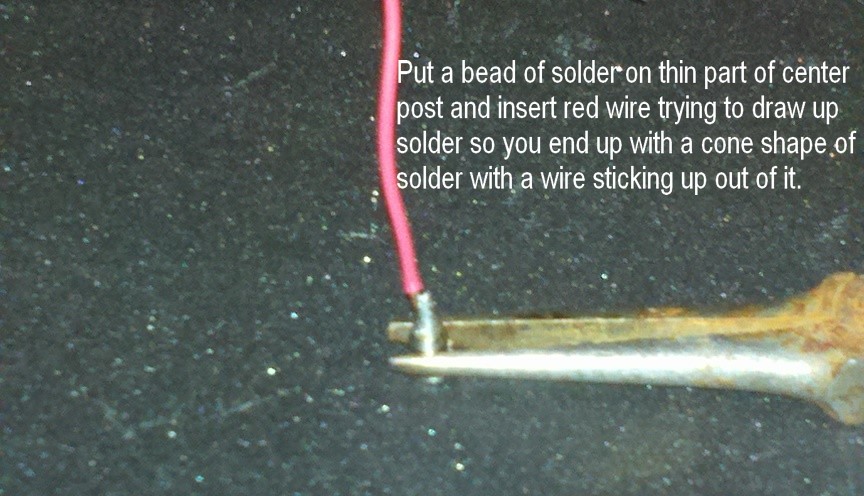
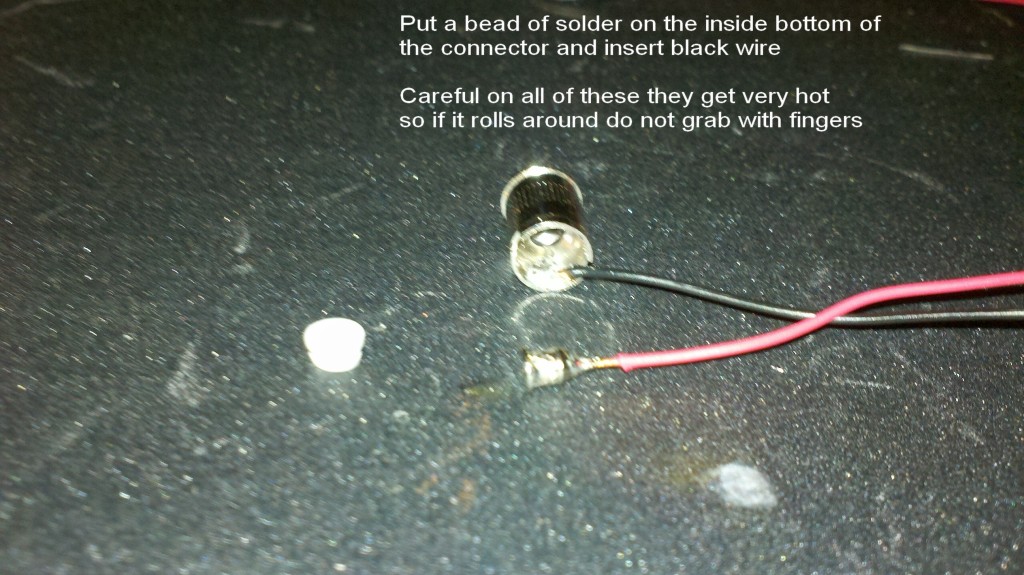
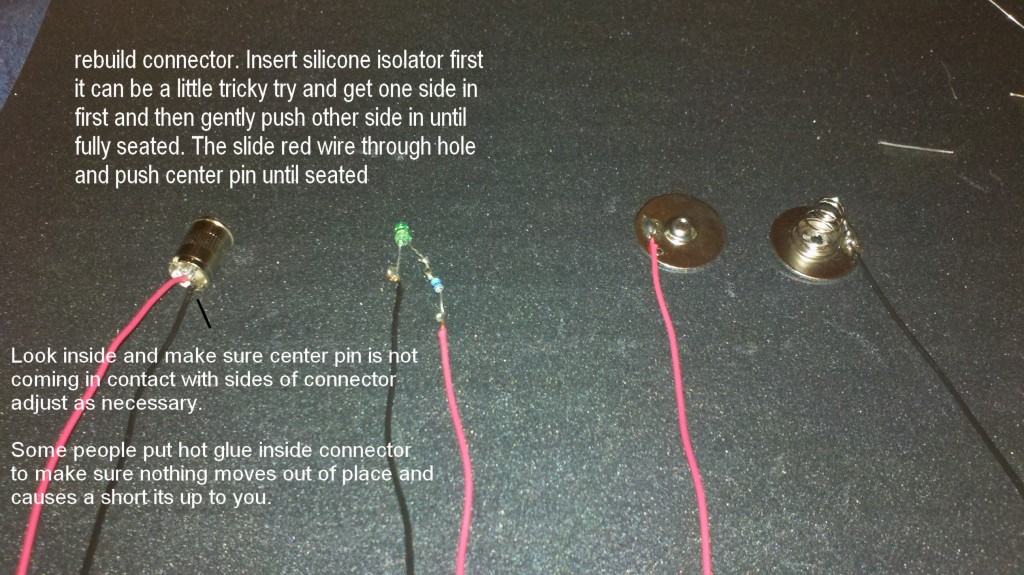
510 sealed battery connector - $1.49 Either silver or brass. They can be a pain to solder so Madvapes offers prewired ones for $2.99 its up to you.
Horn Switch - $.89 they come in many colors and have been very sturdy for me with a nice clicky feel when pushed
$2.99 New chrome switch picked up a couple so far like the way they look but no clicky when pushed
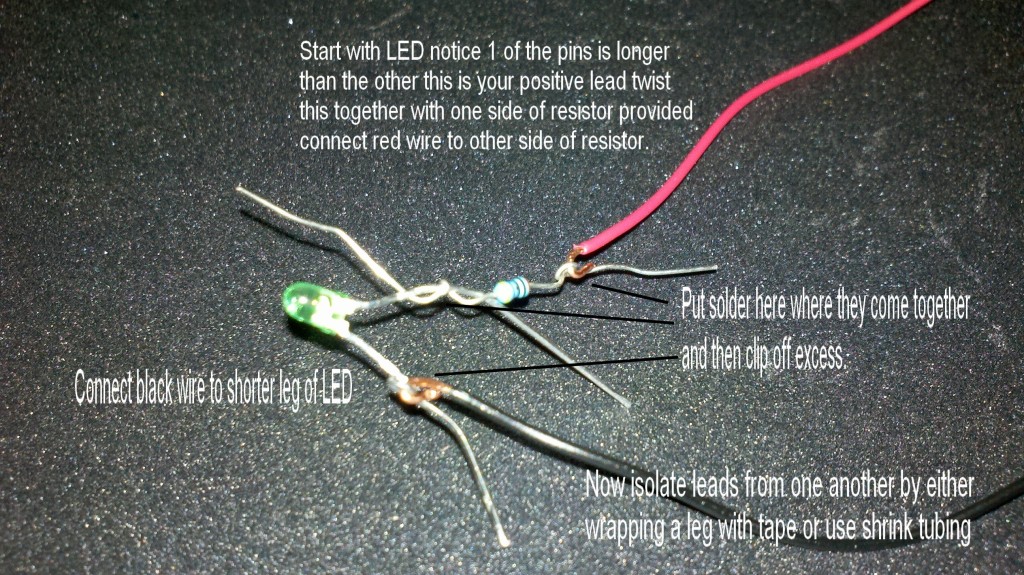
LED - $.49 to $1.59 Come in 3mm or 5mm with many colors to choose from pick the one you like (they come with resistor needed added to package so no need to buy separately)
If you don't already have batteries and a charger you might want to pick some up. The way this mod is built you can use 16340 or 18350 or any battery that will fit a 19mm x 38mm (Spring fully depressed) holder. You can pick IMR or protected your choice I recommend at least 2 (1 charging while other being used)
If you have never been to this site look around some they have a lot of great stuff especially for DIY
Vapoligy -
http://www.vapoligy.com/index.php?l=product_list&c=27
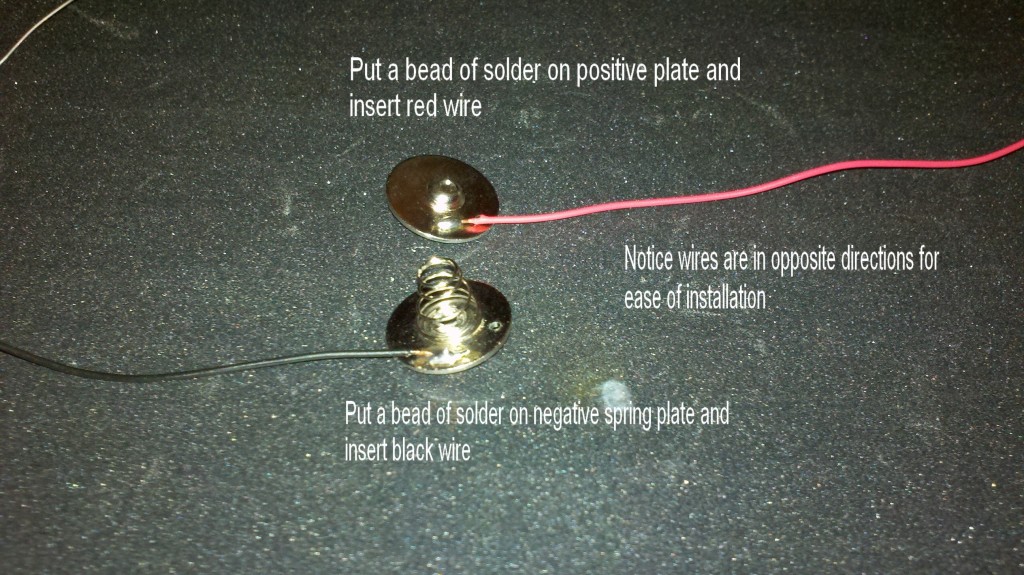
Battery spring plates .99 a pair I found these and like how sturdy & easy to work with these are. But you can use any type of connectors or holders you want. Just adjust the sizes accordingly.
(3) 6 inch red wires and (3) 6 inch black wires - solid or stranded 20 to 22 gauge
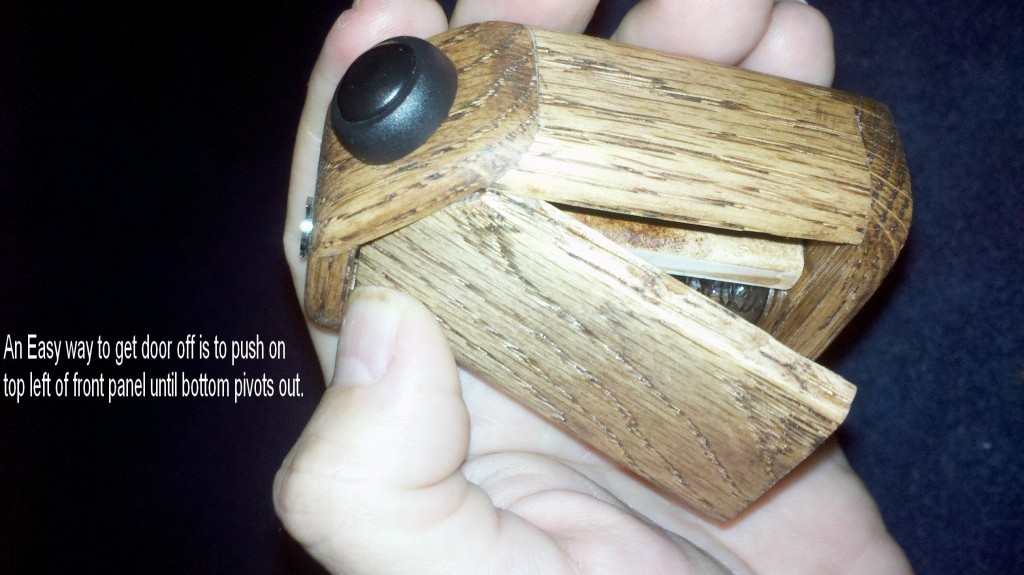
So far these have been optional if built the same way the door stays on by friction and have not needed to add magnets so far YMMV.
Small rare earth magnets - A few months ago I went on amazon and bought (50) 1/8 x 1/16 magnets but can't remember where I bought them at but I believe radio shack carries 1/4" ones which should work you need at least 4
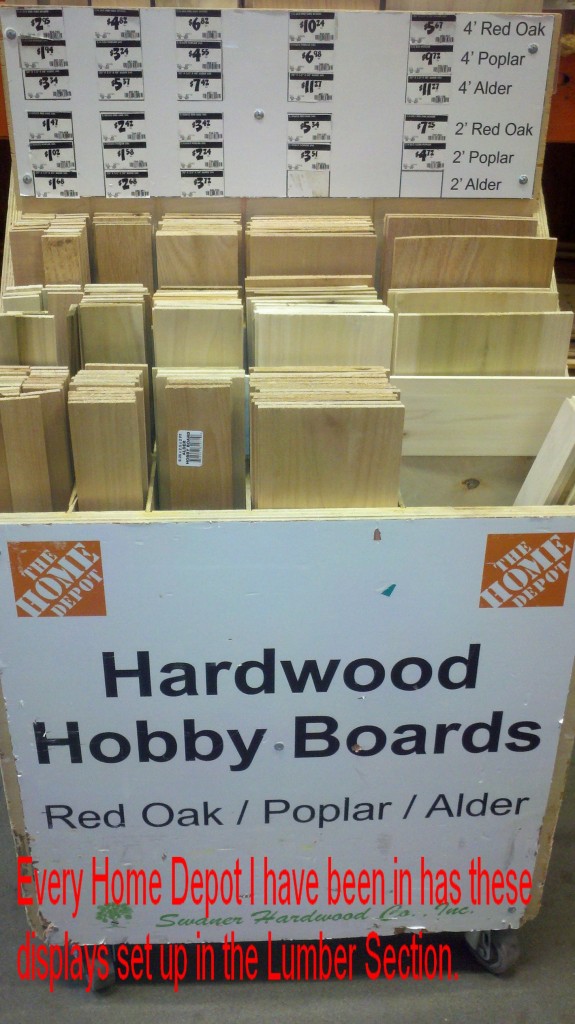
Home depot
Hobby board red oak $1.49 for a 1 1/2" x 1/4" x 2 foot I love the grain on these. They also come in other widths and lengths if you decide to make more mods. To make the complete mod all you need is one piece. And as you can see they come in Poplar and alder also.
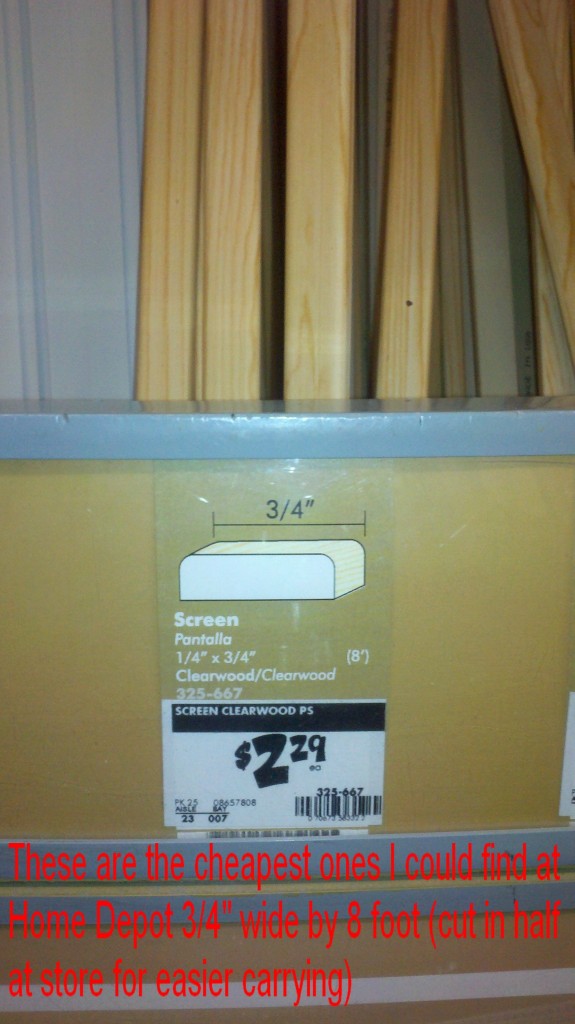
3/4" wood screen $2.29 for 8 foot length. If you already have a piece of wood 3/4" wide use that. If not get this and cut it in half in the store for easier carrying. Once again this exact wood screen is not required any 3/4" wide piece of wood can be substituted.
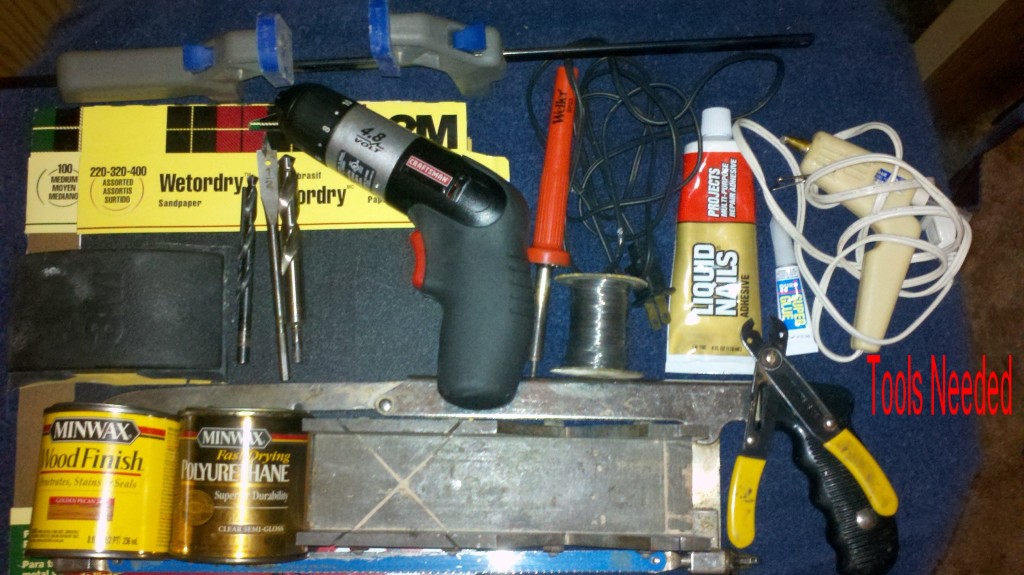
Tools needed
Hopefully you have most of these already which will save you money. If not most can be picked up at Home depot or Walmart.
Drill and various bits
Soldering Iron
Solder and flux or solder embedded with flux
Hand Saw
Miter Box
Some type of Clamp I picked up mine at Big Lots Years ago and can't remember how much. Home Depot sells them for aroung $10 bucks. or you can use tape or string or whatever clamp parts together until glue dries
Some type of Wood Glue make sure its stain-able (Liquid Nails from Home depot has been working for me)
Super Glue
Hot glue gun
Wire strippers
Various grits of sandpaper
Sanding block
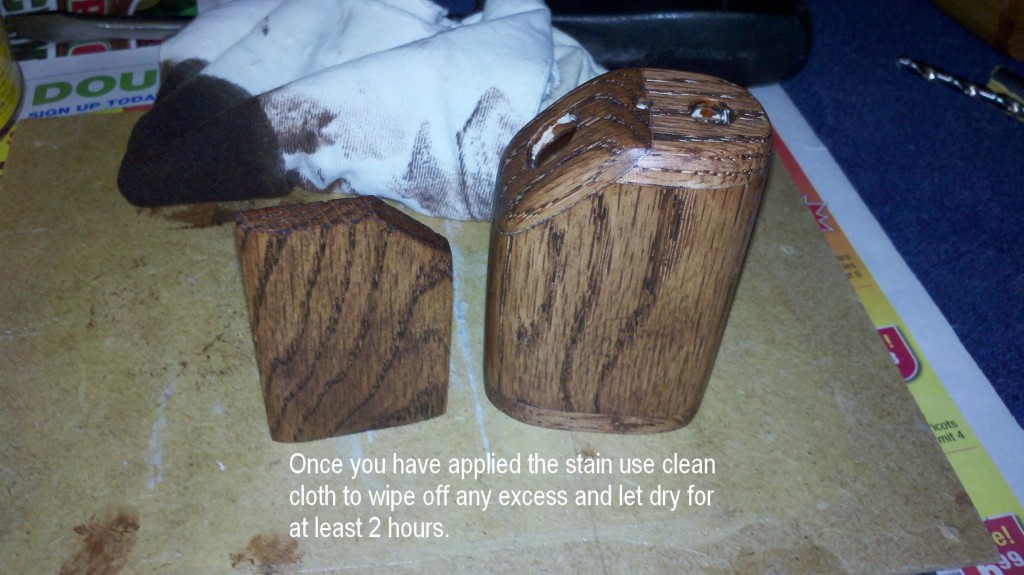
Small can of Wood Stain Pick the color you like best at Home depot near the paint section. I use MinWax brand with success
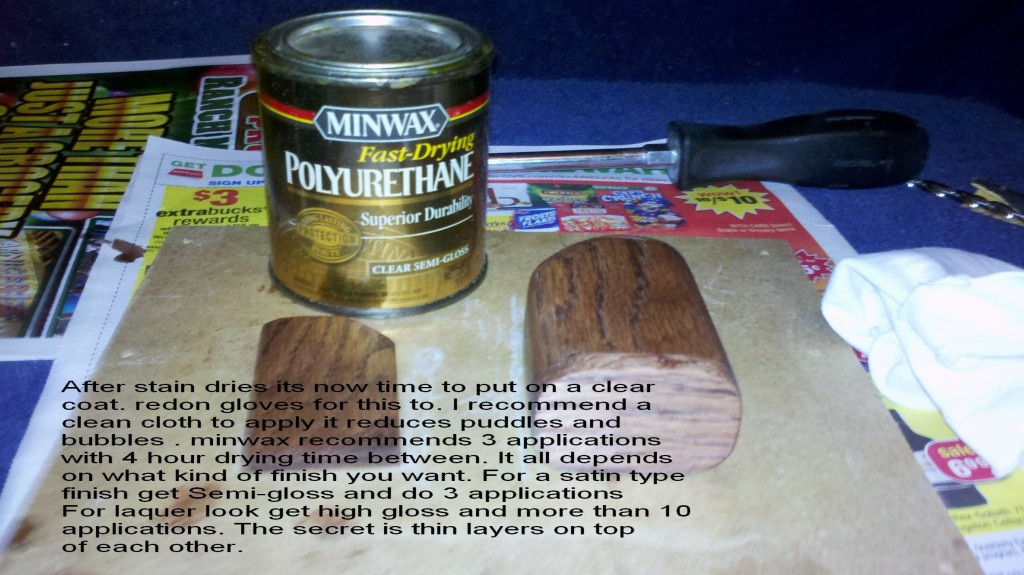
Small can of fast drying polyurethane same as above
(Both can be found at walmart also.)
Alright now that is out of the way lets get to it shall we.
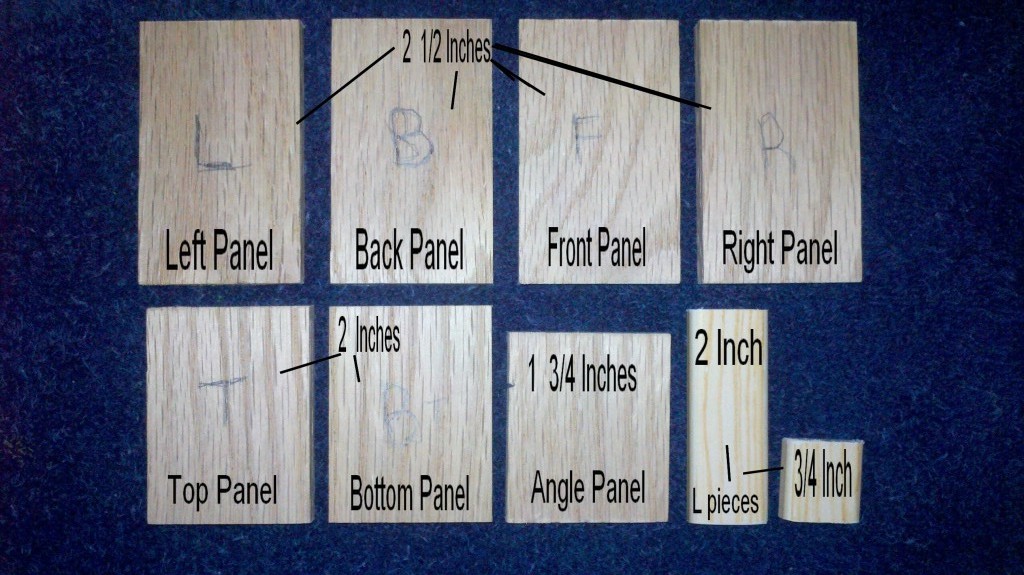
First off using miter box cut red oak hobby board you need
(4) 2 1/2" pieces look at them find some interesting patterns and mark those for your front and back other 2 left and right
(2) 2" pieces again mark them top and bottom
(1) 1 3/4" piece marked as angle panel
from screen wood you need
(1) 2" piece
(1) 3/4" piece
Helpful Tips - Always use the same tool for all your measurements
Measure,mark and cut. Do not mark all your cuts at the beginning and then try and cut them 1 after another some pieces will be longer than the others.
Run sandpaper lightly over cut edges to remove excess before you measure.
always cut on same place of the mark whether you go left/right or directly on the mark.
If you have access to power tools like a table saw or sanders use them it will make this much easier.
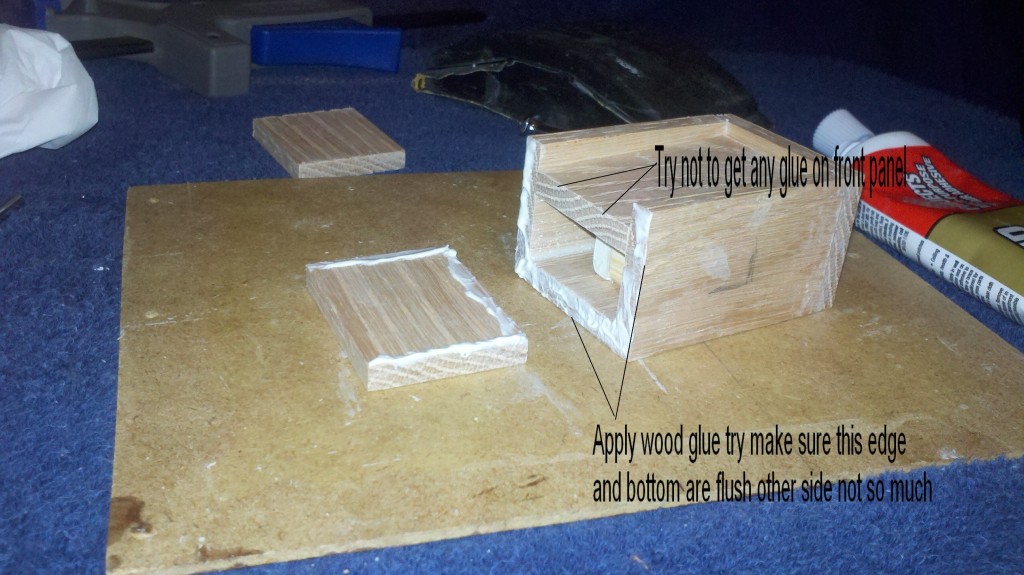
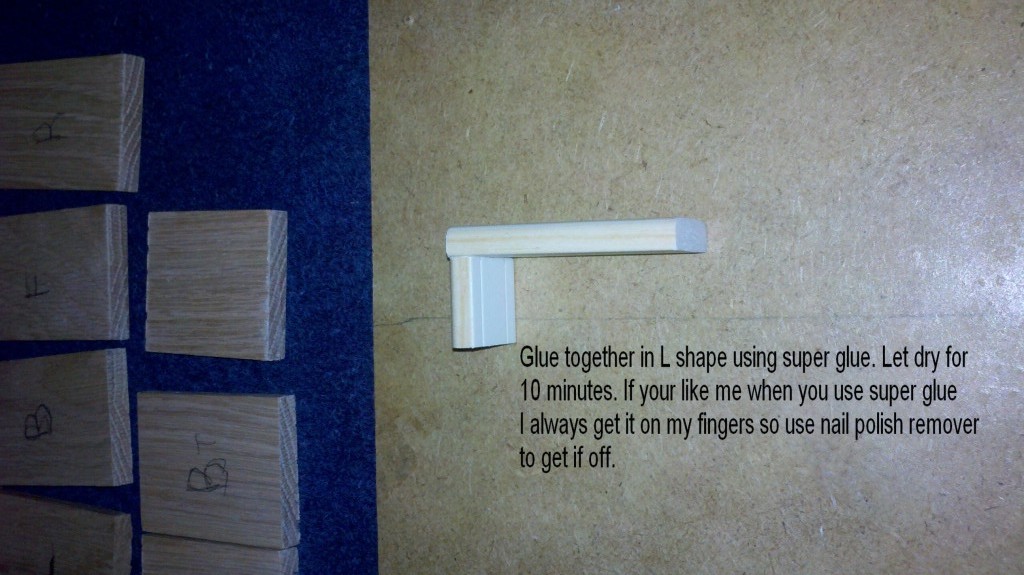
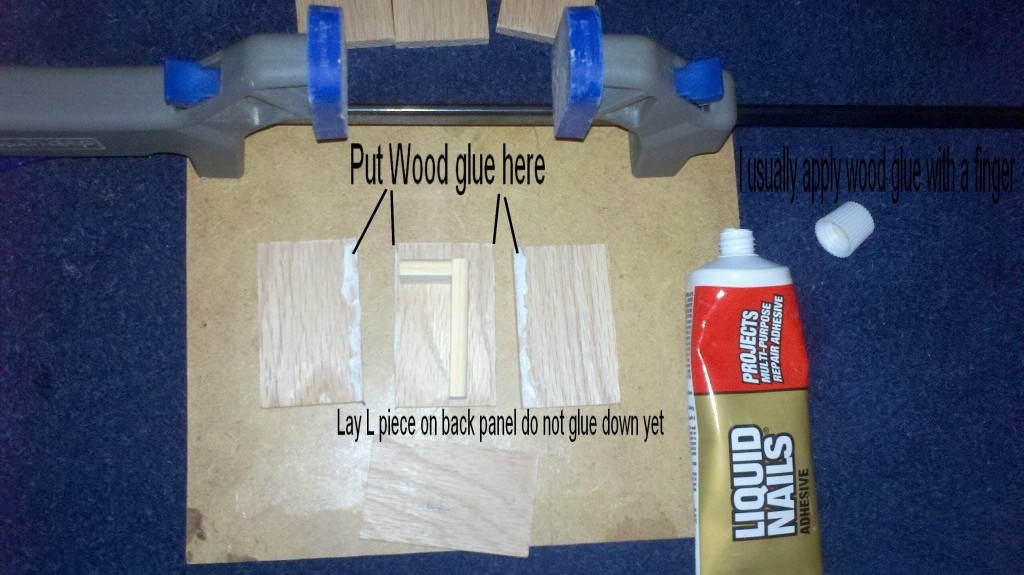
Now on to assembly.


) I would like to think that there are still quite a few who have not and will enjoy or benefit from it. As a added benefit the images are now hosted on Imgur vs Photobucket on which the images disappear 10 days into the month due to Bandwidth limitations.( It resets back on the 10th of every month) Well anyway here it is.A Couple of years ago I made this hopefully easy to follow Tutorial to help out anyone who likes the look of wood mods but for whatever reason chooses not to buy one. This was made in an apartment with hand tools, so you don't need a fancy workshop or special tools to make it. If you can think of a easier way to do something or want to substitute a part you already have please go right ahead. Also I tried to make this as comprehensive as possible , but if you have any questions or comments please feel free to Post.
P.S. I will also be posting a followup Tutorial for a VV Dual 18650 wood mod which will hopefully reference back to this one for the basic build.
Here is what is getting built.
It works great,feels very good in hand, and is surprisingly lighter in weight than you might think.
Here is the part list of what is needed to build it you may already have these items if not I will tell you where I obtained them. If you are anything like me once you build your first mod you want to keep on modding everything. So I recommend that you get a few of these parts so that when mod fever comes over you. Everything you need is right there.
Some of the parts listed may seem a bit dated to some of you so feel free to substitute for more modern copys.
Madvapes -
510 sealed battery connector - $1.49 Either silver or brass. They can be a pain to solder so Madvapes offers prewired ones for $2.99 its up to you.
Horn Switch - $.89 they come in many colors and have been very sturdy for me with a nice clicky feel when pushed
$2.99 New chrome switch picked up a couple so far like the way they look but no clicky when pushed
LED - $.49 to $1.59 Come in 3mm or 5mm with many colors to choose from pick the one you like (they come with resistor needed added to package so no need to buy separately)
If you don't already have batteries and a charger you might want to pick some up. The way this mod is built you can use 16340 or 18350 or any battery that will fit a 19mm x 38mm (Spring fully depressed) holder. You can pick IMR or protected your choice I recommend at least 2 (1 charging while other being used)
If you have never been to this site look around some they have a lot of great stuff especially for DIY
Vapoligy -
http://www.vapoligy.com/index.php?l=product_list&c=27
Battery spring plates .99 a pair I found these and like how sturdy & easy to work with these are. But you can use any type of connectors or holders you want. Just adjust the sizes accordingly.
(3) 6 inch red wires and (3) 6 inch black wires - solid or stranded 20 to 22 gauge
So far these have been optional if built the same way the door stays on by friction and have not needed to add magnets so far YMMV.
Small rare earth magnets - A few months ago I went on amazon and bought (50) 1/8 x 1/16 magnets but can't remember where I bought them at but I believe radio shack carries 1/4" ones which should work you need at least 4
Home depot
Hobby board red oak $1.49 for a 1 1/2" x 1/4" x 2 foot I love the grain on these. They also come in other widths and lengths if you decide to make more mods. To make the complete mod all you need is one piece. And as you can see they come in Poplar and alder also.
3/4" wood screen $2.29 for 8 foot length. If you already have a piece of wood 3/4" wide use that. If not get this and cut it in half in the store for easier carrying. Once again this exact wood screen is not required any 3/4" wide piece of wood can be substituted.
Tools needed
Hopefully you have most of these already which will save you money. If not most can be picked up at Home depot or Walmart.
Drill and various bits
Soldering Iron
Solder and flux or solder embedded with flux
Hand Saw
Miter Box
Some type of Clamp I picked up mine at Big Lots Years ago and can't remember how much. Home Depot sells them for aroung $10 bucks. or you can use tape or string or whatever clamp parts together until glue dries
Some type of Wood Glue make sure its stain-able (Liquid Nails from Home depot has been working for me)
Super Glue
Hot glue gun
Wire strippers
Various grits of sandpaper
Sanding block
Small can of Wood Stain Pick the color you like best at Home depot near the paint section. I use MinWax brand with success
Small can of fast drying polyurethane same as above
(Both can be found at walmart also.)
Alright now that is out of the way lets get to it shall we.
First off using miter box cut red oak hobby board you need
(4) 2 1/2" pieces look at them find some interesting patterns and mark those for your front and back other 2 left and right
(2) 2" pieces again mark them top and bottom
(1) 1 3/4" piece marked as angle panel
from screen wood you need
(1) 2" piece
(1) 3/4" piece
Helpful Tips - Always use the same tool for all your measurements
Measure,mark and cut. Do not mark all your cuts at the beginning and then try and cut them 1 after another some pieces will be longer than the others.
Run sandpaper lightly over cut edges to remove excess before you measure.
always cut on same place of the mark whether you go left/right or directly on the mark.
If you have access to power tools like a table saw or sanders use them it will make this much easier.
Now on to assembly.
Last edited: