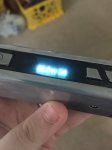
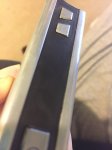
So i have a black IPV Mini 2 and like a lot of other people, the paint started chipping horribly. I went ahead and stripped the paint so I can just cover it with a decal (I didnt leave the paint because parts that the decal doesnt cover are heavily chipped) I used pure acetone and I must have gotten quite a bit on the screen but now the lcd is really foggy and almost looks scuffed. I didn't realize I shouldn't get any on the screen before it happened. Has anyone dealt with anything similar? Can anything be done or am I screwed? It still functions its just hard to see the exact ohms and watts
Become a Patron!
You are using an out of date browser. It may not display this or other websites correctly.
You should upgrade or use an alternative browser.
You should upgrade or use an alternative browser.
IPV Mini 2 LCD Fog
- Thread starter AshActually
- Start date
Try putting in a bag of rice for a week. Worked for me.")
wet the screen by licking your finger and swiping it across the screen. if it shows more clearly, then you can find a clear non acetone based paint or coating that will allow you to see your screen better after you apply it. You also can try buffing the plastic with a bit of jewelers rouge on a soft cloth and see if you can remove a tiny amount of fogged plastic so it displays clearer.
That fixed an acetone damaged plastic screen?Try putting in a bag of rice for a week. Worked for me.
SomeTexan
Bronze Contributor
Member For 4 Years
Member For 3 Years
Member For 2 Years
Member For 1 Year
A fine polishing compound, a pencil, a sheet of construction paper and a sheet of notebook paper. Put a dab of compound on the eraser and give the screen a light polish. Repeat with construction paper and again with notebook paper. Clean the compound off between applications. You may want to use masking tape to make sure no compound makes it behind the screen. This has worked for me on old non-touch screen phones, model car windshields and stuff like that.
Car buffing compound might workA fine polishing compound, a pencil, a sheet of construction paper and a sheet of notebook paper. Put a dab of compound on the eraser and give the screen a light polish. Repeat with construction paper and again with notebook paper. Clean the compound off between applications. You may want to use masking tape to make sure no compound makes it behind the screen. This has worked for me on old non-touch screen phones, model car windshields and stuff like that.
SomeTexan
Bronze Contributor
Member For 4 Years
Member For 3 Years
Member For 2 Years
Member For 1 Year
Car buffing compound might work
A lot of them will. Some may have chemicals that are ok for paint, but not clear plastic. A good modeling polish would be a safer bet. Something from Testors or Tamiya...
So what exactly does the polishing or buffing compound do? Will that just remove the layer I damaged basically so that I can reapply one myself? Because the display feels almost grimy. I tried the licked finger thing along with a drop of water and a wash cloth but that made no difference. It's likely not water damage so I don't think the rice idea works in this case
SomeTexan
Bronze Contributor
Member For 4 Years
Member For 3 Years
Member For 2 Years
Member For 1 Year
So what exactly does the polishing or buffing compound do? Will that just remove the layer I damaged basically so that I can reapply one myself? Because the display feels almost grimy. I tried the licked finger thing along with a drop of water and a wash cloth but that made no difference. It's likely not water damage so I don't think the rice idea works in this case
The acetone messed up the surface of the plastic. The compound is basically liquid sand paper that is very fine. Notebook paper is roughly 2200 grit, construction paper around a 1000 and the eraser is 600ish. You are just taking the damaged surface off of the screen. You won't need to coat it in anything or paint it after. Look at headlight polishing kits, there should be a lot of instructional video's online. I just do it the cheap way...
So should I apply the compound to the entire plastic-y area or confine it to the actual display portion?The acetone messed up the surface of the plastic. The compound is basically liquid sand paper that is very fine. Notebook paper is roughly 2200 grit, construction paper around a 1000 and the eraser is 600ish. You are just taking the damaged surface off of the screen. You won't need to coat it in anything or paint it after. Look at headlight polishing kits, there should be a lot of instructional video's online. I just do it the cheap way...
Not sure about the rice but the lickng the thumb trick is just to show you what it would look like with a clear coat.
Like others have mentiined,you could resurface the plastic with graduating buffing compounds or you could key it up and shoot an enamel clearcoat.
based on my experience with cloudy plastics and going back to my 1/24 scale modeling days,the first step is to try "Future Floor polish".
It will create an acrylic coating that self levels and needs very little buffing.
So basically I should just try to remove the surface I destroyed and resurface the thing? I'm just nervous about making things worse
SomeTexan
Bronze Contributor
Member For 4 Years
Member For 3 Years
Member For 2 Years
Member For 1 Year
So should I apply the compound to the entire plastic-y area or confine it to the actual display portion?
You can do the whole thing. I would just use a very small amount of compound and mask the buttons to prevent anything getting inside the mod. You may end up with little unpolished rings around the buttons depending on how patient you can be. Polishing small details can be trying...
SomeTexan
Bronze Contributor
Member For 4 Years
Member For 3 Years
Member For 2 Years
Member For 1 Year
All you are doing is sanding the damage out, then polishing it until it is smooth and clear again. Not taking one layer off and replacing with something else. I don't know if the screen has a surface coating or not. If it had a mirrored look, that may be gone. But the screen can stand to lose a ten thousandth of an inch to some sanding.So basically I should just try to remove the surface I destroyed and resurface the thing? I'm just nervous about making things worse
Alright I'm gonna hope that works and give it a shot. Any clue where to grab the composite/good brand/price range?
SomeTexan
Bronze Contributor
Member For 4 Years
Member For 3 Years
Member For 2 Years
Member For 1 Year
Auto parts store, Home Depot, lowes, hobby store. I know Tamiya and Testors brands are ok for plastic, other brands I would check for warnings. If you can find the refill for a headlight polishing kit, it will be ok on plastic. I've had my Tamiya polishing compound for years, a little bit goes a long way.
Alright, so I've tried a few DIY tricks. Toothpaste, peanut butter, bug spray. Then I tried a headlight restoration kit from Turtle Wax. 4 buffing pads and a clarification compound. Went through that about 3 times. The visibility now is about 80% better. The one thing I also tried was extra virgin olive oil. While the oil was on the display it looked completely clear, 100% fixed. But as soon as it is removed it's back to fog. So I assume the olive oil fills the pores in the plastic like the clarifying compound should. So at this point my question is, what can I use that's like the olive oil but permanent?
Thanks for the help by the way guys. Honestly I thought I screwed up this mod for good
Thanks for the help by the way guys. Honestly I thought I screwed up this mod for good
Im with Ash on the lexan polish...this is used for oxidized or scratched plastic head light and tail light lenses..Its non abrasive unlike compound and will work great...Use less than you think you need..No sense in it getting into the edges of the lens or anyplace else..You dont have to see the product on the lens for it to work.
Get a wash rag and get it wet then squueze it out good to get the rag damp..Put a teensy tiny dab of the product on the rag and smear it in good..This wont leave you a big mess to have to clean out in the cracks and crevices...You can put a border of masking tape around the lens also and this will help keep it clean and not get shiny spots where you dont want it.
Get a wash rag and get it wet then squueze it out good to get the rag damp..Put a teensy tiny dab of the product on the rag and smear it in good..This wont leave you a big mess to have to clean out in the cracks and crevices...You can put a border of masking tape around the lens also and this will help keep it clean and not get shiny spots where you dont want it.
Do i have to quote myself?Alright, so I've tried a few DIY tricks. Toothpaste, peanut butter, bug spray. Then I tried a headlight restoration kit from Turtle Wax. 4 buffing pads and a clarification compound. Went through that about 3 times. The visibility now is about 80% better. The one thing I also tried was extra virgin olive oil. While the oil was on the display it looked completely clear, 100% fixed. But as soon as it is removed it's back to fog. So I assume the olive oil fills the pores in the plastic like the clarifying compound should. So at this point my question is, what can I use that's like the olive oil but permanent?
Thanks for the help by the way guys. Honestly I thought I screwed up this mod for good
Future Floor polish.....
My bad, over looked that. Ill give that a shot, thanksDo i have to quote myself?
Future Floor polish.....