Introduction
I’m old enough to really appreciate most things that are ‘old school’. I love late ‘80s to early ‘90s music, I think that Blade Runner, Jaws and Terminator 1&2 are the best movies ever, and I live for my Nike Air Force Ones.
The Brunhilde is also old school in more than one way.
Product overview
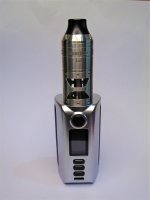
The Brunhilde 1o3 RTA, is a 69.9mm tall (with drip-tip), 25.2mm top-coiler, with 7ml juice capacity, steel wire wicking, and independently adjusted center and side airflow.

What do you get?
First impressions
Ignoring the obvious (it’s really tall), my first impression was of a rattling noise – the center airflow block had removed itself from the deck and was rattling around the tank: more on this later.
The aesthetics of the Brunhilde 1o3 are nice, the etchings are more restrained than on the Lindwurm RTA, and if you get it matched up with a suitable mod it looks quite sexy, especially with the metal cage protecting the tank and its cut-outs to see juice levels.
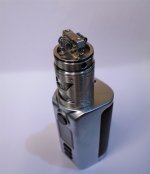
Taking off the top-cap gave me my second old school moment, as the Brunhilde’s velocity deck was revealed to me.
The third old school moment was a beautiful blast from Vapefly’s past – the spring-loaded juice refill port that I loved on the Galaxies RDTA. However, while the Galaxies’ port was on the deck and an absolute joy to use, the Brunhilde’s port is on the side and surrounded by metal, so it’s a little more difficult to get the tip of the juice bottle in, and it can get little messy.

Build
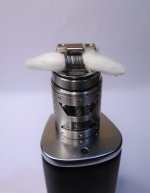
Despite having an old style of deck, installing coils is straightforward. The main thing to be aware of is the space between the post, if your coil isn’t overly wide you’re going to have to either space the coil or bend the legs out to fit. I used the top-cap to adjust my coils to a suitable height, with the bottom row of airflow hitting the underside of the coil and the top row slamming into the side.
Wicking is where things started to get a little tricky, as standard the Brunhilde comes with four wicking wires installed and four spares, however if you remove a pair of grub screws from the deck, you can install a total of six wicking wires. This is the configuration that I went for, I chain vape so extra wicking is always welcome.
As for the cotton, I tried two different methods:
The first method was to cut the wicks long enough to tuck under the coils, not overly thin them and fill that area – this worked well up to about 85w, but at higher wattage things were getting a little dry.
The second method was to cut the wicks to the same length, but to thin the tips a lot. I still made sure to have enough to touch all six steel wires, but left a lot more empty space under the coils. This method kept things wicking perfectly up to 100w, but started to struggle a little once I pushed it to 120w.

How does it perform?
I tried three builds in the Brunhilde 1o3, the supplied triple core fused claptons, a pair of 28g fused claptons and a 26g round wire build – all were spaced due to the wide gap between the posts.
My experience with the performance was inconsistent. There were moments of excellent flavor, followed by zero flavor. Most of the time it was wicking perfectly, but the flavor was severely lacking.
By now, I’m getting totally annoyed – I’ve tried dropping and raising the coils, I’ve tried both airflow inserts and every conceivable airflow configuration.
The best flavor that I got was with the top row of side airflow closed, center slot airflow insert at about 120w – but after a while the wicking couldn’t keep up. Also, with the center airflow closed and the top row of side airflow closed at about 85w was good for a while, at least at 85w the wicking had no problems.
I would have been really happy, if I could consistently replicate the brief moments when the Brunhilde vaped well, because when it did it was very enjoyable.

Airflow
I blame the majority of the issues that I had with flavor on the airflow. Firstly, and unrelated to the flavor, the top-cap adjustment for the side airflow is brutally stiff, even when lubed with juice I still had to remove the top-cap to adjust the airflow.
Secondly, the center airflow inserts didn’t fit well at all. I’d put the insert in and five minutes later I’d find it tilted down and half falling out. I really wish they had stuck with the fixed center airflow from the original Brunhilde.
Final problem with the airflow is the side airflow alignment, or to be more accurate the lack of alignment. When I lined up the middle barrel so that the center airflow was open, the holes for the side airflow were not centered on the coil, I thought this shouldn’t be an issue because you can only open 8 of the 12 airflow holes at one time, so I rotated the side airflow but it was still hitting the coil off center.
Conclusion
I’m really confused with the Brunhilde 1o3, because I can think of three possible reasons for the problems that I had:
Disclaimer
The Brunhilde 1o3 was provided for the purposes of this review by Sourcemore who currently have it in stock for $20.19
I’m old enough to really appreciate most things that are ‘old school’. I love late ‘80s to early ‘90s music, I think that Blade Runner, Jaws and Terminator 1&2 are the best movies ever, and I live for my Nike Air Force Ones.
The Brunhilde is also old school in more than one way.
Product overview
The Brunhilde 1o3 RTA, is a 69.9mm tall (with drip-tip), 25.2mm top-coiler, with 7ml juice capacity, steel wire wicking, and independently adjusted center and side airflow.

What do you get?
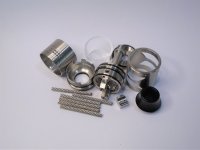
- Brunhilde 1o3 RTA
- spare glass tank
- 2×0.35ohm 26g 3.0mm triple core fused clapton coils
- 2×3.0mm Firebolt cotton
- 510 drip-tip adapter
- single-coil adapter
- alternative center airflow insert
- 4× spare steel wires
- tools and spares
First impressions
Ignoring the obvious (it’s really tall), my first impression was of a rattling noise – the center airflow block had removed itself from the deck and was rattling around the tank: more on this later.
The aesthetics of the Brunhilde 1o3 are nice, the etchings are more restrained than on the Lindwurm RTA, and if you get it matched up with a suitable mod it looks quite sexy, especially with the metal cage protecting the tank and its cut-outs to see juice levels.
Taking off the top-cap gave me my second old school moment, as the Brunhilde’s velocity deck was revealed to me.
The third old school moment was a beautiful blast from Vapefly’s past – the spring-loaded juice refill port that I loved on the Galaxies RDTA. However, while the Galaxies’ port was on the deck and an absolute joy to use, the Brunhilde’s port is on the side and surrounded by metal, so it’s a little more difficult to get the tip of the juice bottle in, and it can get little messy.

Build
Despite having an old style of deck, installing coils is straightforward. The main thing to be aware of is the space between the post, if your coil isn’t overly wide you’re going to have to either space the coil or bend the legs out to fit. I used the top-cap to adjust my coils to a suitable height, with the bottom row of airflow hitting the underside of the coil and the top row slamming into the side.
Wicking is where things started to get a little tricky, as standard the Brunhilde comes with four wicking wires installed and four spares, however if you remove a pair of grub screws from the deck, you can install a total of six wicking wires. This is the configuration that I went for, I chain vape so extra wicking is always welcome.
As for the cotton, I tried two different methods:
The first method was to cut the wicks long enough to tuck under the coils, not overly thin them and fill that area – this worked well up to about 85w, but at higher wattage things were getting a little dry.
The second method was to cut the wicks to the same length, but to thin the tips a lot. I still made sure to have enough to touch all six steel wires, but left a lot more empty space under the coils. This method kept things wicking perfectly up to 100w, but started to struggle a little once I pushed it to 120w.

How does it perform?
I tried three builds in the Brunhilde 1o3, the supplied triple core fused claptons, a pair of 28g fused claptons and a 26g round wire build – all were spaced due to the wide gap between the posts.
My experience with the performance was inconsistent. There were moments of excellent flavor, followed by zero flavor. Most of the time it was wicking perfectly, but the flavor was severely lacking.
By now, I’m getting totally annoyed – I’ve tried dropping and raising the coils, I’ve tried both airflow inserts and every conceivable airflow configuration.
The best flavor that I got was with the top row of side airflow closed, center slot airflow insert at about 120w – but after a while the wicking couldn’t keep up. Also, with the center airflow closed and the top row of side airflow closed at about 85w was good for a while, at least at 85w the wicking had no problems.
I would have been really happy, if I could consistently replicate the brief moments when the Brunhilde vaped well, because when it did it was very enjoyable.

Airflow
I blame the majority of the issues that I had with flavor on the airflow. Firstly, and unrelated to the flavor, the top-cap adjustment for the side airflow is brutally stiff, even when lubed with juice I still had to remove the top-cap to adjust the airflow.
Secondly, the center airflow inserts didn’t fit well at all. I’d put the insert in and five minutes later I’d find it tilted down and half falling out. I really wish they had stuck with the fixed center airflow from the original Brunhilde.
Final problem with the airflow is the side airflow alignment, or to be more accurate the lack of alignment. When I lined up the middle barrel so that the center airflow was open, the holes for the side airflow were not centered on the coil, I thought this shouldn’t be an issue because you can only open 8 of the 12 airflow holes at one time, so I rotated the side airflow but it was still hitting the coil off center.
Conclusion
I’m really confused with the Brunhilde 1o3, because I can think of three possible reasons for the problems that I had:
- I’m an idiot who can’t build an RTA and should stick to pod systems.
- This RTA wasn’t tested enough before it was released.
- There were quality control issues that resulted in loose airflow inserts and miss-aligned airflow holes.
Disclaimer
The Brunhilde 1o3 was provided for the purposes of this review by Sourcemore who currently have it in stock for $20.19
