KingPin!
In my defence, I was left unsupervised ^^
VU Donator
Platinum Contributor
Member For 4 Years
VU Challenge Team
Reviewer
Hi Folks,
This year has seen an awful lot of new products released, and I’ll be excused in thinking a fair share of those releases were very similar, a slight tweak to a post here, different colour drip tip there, add an extra hole in the AFC ring…stand back slap on a random name and go for launch.
Well Aspire aren’t following the herd with their latest release (at least in everything other than random naming). Just before the year is out they have released a tank that is truly different to other products I’ve seen over the past few years.
Aspire sent me the Skystar Revvo kit (2ml TPD version) to give it the once over. Since I don’t like to make recommendations in my reviews, think of this as all my findings in the just shy of a month I’ve had it with a final conclusion as an aid to bolster your research should you be interested in the product.

So what does the Kit come with?
As with kits I’ll go over the tank first (this review will be long as there’s a lot to cover)
Part 1 - Revvo 2ml Tank Overview
Note: 3.6ml version differences in brackets
Aspire don’t tend to go crazy with their graphics on boxes and it’s more of the same for the Skystar kit. Everything inside is well secured, in terms of getting to you ok when purchasing online. The spare coil is sealed away which is good to see, The USB lead is big (plenty for 2A charging). Lastly you get a decent amount of spares with the kit as standard.
Onto the Revvo tank itself, the best way to describe this one is it’s the pre-made coils answer to the RDTA. Whilst Rebuildable tanks have been about for a long time it’s how Aspire approached this design that intrigues me.
The tank itself breaks down into 8 parts. Looking at my assembly picture below I’ll start at the bottom and work up giving you my thoughts.
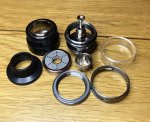

1. The locking ring should have been reversed threaded. When you undo the tank repeatedly from the mod it can work itself lose, so something to keep an eye on. Secondly I have noticed occasional juice seepage under the base, it’s escaping I believe between the securing ring and the tank juice chamber. Perhaps a single piece design would have rectified this issue.
2. The glass has a good thickness to it although it was really difficult to remove for cleaning on the first go. It’s the top O-ring that’s really tight so I had to be careful taking it off.
3. The juice chamber is well executed for the most part.
a. The refill pin is centred and this is one of the stars of the show. The concept of quick refill is not new, I first saw this on the Bombertech Pindad although there may well have been other tanks before it, but the Revvo’s trick is you don’t even have to remove the drip tip to get to it (more on this later)
b. There is an inbuilt air release hole at the square part of the pin which is vital to avoiding spillages. The clever part is this is normally located on the deck somewhere for Rebuildable tanks. You can also listen carefully for air escaping and use it as an aid to determine when to stop refilling above the top of the glass.
c.The pins spring mechanism is soft to push down once you offer a juice bottle up and engage. I feel they have got this tension spot on. The pin is locked when not engaged so juice won’t leave the tank.
d. Threading leaves a little to be desired. My top chamber is difficult to screw back in place at times.
4. Fitting or replacing the new Aspire 'radial' coil is very easy (although never try to do it soon after using the tank). Simply unscrew the top chamber, unscrew the coil mounting screw, remove the used coil, drop another coil over the filling pin, ensure the coil is sitting flush with the body of the tank, then reassemble and that's it.
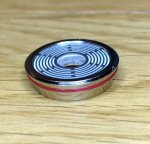
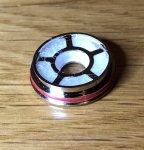
5. The mounting screw is probably my favourite part of the design on this tank. At first glance you could be forgiven for thinking it’s just holding the coil down, but its serving multiple roles on the Revvo;
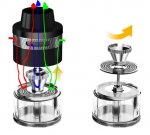
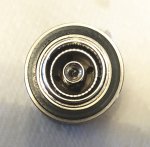
6. The top chamber is made of Delrin in terms of its outer shell. Whilst this styling might not be to everyone’s liking this is absolutely necessary. The coil placement is in the middle and it gets bloody hot, however none of that heat is transferred to you whilst vaping. Even holding the tank top section when vaping at 120W or above is ok (although the metal parts still get hot). Looking into the chamber itself there is a smaller inner chamber (which isn’t conical) the space between the two walls is where the airflow is directed down onto the coil as mentioned earlier.
Condensation build up is pretty dramatic on the Revvo due to all the nooks and crannies inside. For the most part the chamber does its job keeping that condensation under control. This makes for a nice moist vape, however I have noticed that leaving the tank on its side or upside down can lead to this condensation escaping via the airflow holes.
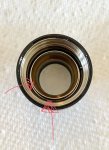
I have tested holding the tank itself upside down without the top chamber attached to see how long it takes for the juice to breach the coil wicking and go everywhere (the hallmark of any RDTA). I have to say here the Revvo passed with flying colours it was upside down 4 hours after this picture was taken and not a single drop came out! Proving that any seepage is condensation.
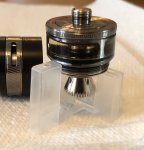
7. The airflow ring can be removed from the top chamber. When in place has a stop point and is really smooth to turn. It also has knurling on it to help remove the chamber from the tank section. This part does heat up with higher wattage vaping.
8. The top cap (drip tip) is Delrin. I personally would have preferred they inserted metal threading into the top cap as you have to be really careful with cross threading on this. Thankfully you rarely have to remove it though. It has a very wide bore again all part of the design because if you have a PET dripper or Unicorn bottle you can simply put the top in, push down the pin and refill without having to remove anything! This is the Revvos hallmark and what makes it special although there are two things to note here;
This year has seen an awful lot of new products released, and I’ll be excused in thinking a fair share of those releases were very similar, a slight tweak to a post here, different colour drip tip there, add an extra hole in the AFC ring…stand back slap on a random name and go for launch.
Well Aspire aren’t following the herd with their latest release (at least in everything other than random naming). Just before the year is out they have released a tank that is truly different to other products I’ve seen over the past few years.
Aspire sent me the Skystar Revvo kit (2ml TPD version) to give it the once over. Since I don’t like to make recommendations in my reviews, think of this as all my findings in the just shy of a month I’ve had it with a final conclusion as an aid to bolster your research should you be interested in the product.

So what does the Kit come with?
- Skystar Mod
- 2ml Revvo Tank (3.6ml version available)
- 2 x Revvo coils (if you can call them coils)
- 1 x Spare Glass tank
- Spare O-rings
- USB cable
- User Manual
- Warranty Card
- Protective Silicone Cap
- Scratch and check authenticity on the back of the outer sleeve
As with kits I’ll go over the tank first (this review will be long as there’s a lot to cover)
Part 1 - Revvo 2ml Tank Overview
Note: 3.6ml version differences in brackets
- Diameter: 24mm
- Height: 41mm (45mm)
- Weight: 48g when full with liquid, (3.6ml unknown!)
- Capacity: 2ml (3.6ml)
- Thread: 510
- Airflow Holes: 3
- Glass Type: Pyrex
- Metal: SS304
- Available Coils: Aspire Radial Coil (Kanthal “notch coil” disc resistance range 0.1-0.16)
Aspire don’t tend to go crazy with their graphics on boxes and it’s more of the same for the Skystar kit. Everything inside is well secured, in terms of getting to you ok when purchasing online. The spare coil is sealed away which is good to see, The USB lead is big (plenty for 2A charging). Lastly you get a decent amount of spares with the kit as standard.
Onto the Revvo tank itself, the best way to describe this one is it’s the pre-made coils answer to the RDTA. Whilst Rebuildable tanks have been about for a long time it’s how Aspire approached this design that intrigues me.
The tank itself breaks down into 8 parts. Looking at my assembly picture below I’ll start at the bottom and work up giving you my thoughts.


1. The locking ring should have been reversed threaded. When you undo the tank repeatedly from the mod it can work itself lose, so something to keep an eye on. Secondly I have noticed occasional juice seepage under the base, it’s escaping I believe between the securing ring and the tank juice chamber. Perhaps a single piece design would have rectified this issue.
2. The glass has a good thickness to it although it was really difficult to remove for cleaning on the first go. It’s the top O-ring that’s really tight so I had to be careful taking it off.
3. The juice chamber is well executed for the most part.
a. The refill pin is centred and this is one of the stars of the show. The concept of quick refill is not new, I first saw this on the Bombertech Pindad although there may well have been other tanks before it, but the Revvo’s trick is you don’t even have to remove the drip tip to get to it (more on this later)
b. There is an inbuilt air release hole at the square part of the pin which is vital to avoiding spillages. The clever part is this is normally located on the deck somewhere for Rebuildable tanks. You can also listen carefully for air escaping and use it as an aid to determine when to stop refilling above the top of the glass.
c.The pins spring mechanism is soft to push down once you offer a juice bottle up and engage. I feel they have got this tension spot on. The pin is locked when not engaged so juice won’t leave the tank.
d. Threading leaves a little to be desired. My top chamber is difficult to screw back in place at times.
4. Fitting or replacing the new Aspire 'radial' coil is very easy (although never try to do it soon after using the tank). Simply unscrew the top chamber, unscrew the coil mounting screw, remove the used coil, drop another coil over the filling pin, ensure the coil is sitting flush with the body of the tank, then reassemble and that's it.


a. It can be changed with e-liquid still in the tank.
b. The notch coil is sensitive to being touched or cleaned and it will jump resistance when you try.
c. The coil doesn’t need priming when freshly installed just hold upside down for a couple of minutes. It takes 3 tanks to break in the coil.
d. Unlike other pre-made coils you may well be able to clean this coil up, re-wick and have another go with a cotton brand you like using (I’m going to give it a crack at some point myself although my original coil is still going nearly a month in at this point)
5. The mounting screw is probably my favourite part of the design on this tank. At first glance you could be forgiven for thinking it’s just holding the coil down, but its serving multiple roles on the Revvo;
a. Securing the coil to the tank section
b. Is a catch cup for slight over filling
c. Acts as an anti-spit guard
d. Is integral to the Revvo airflow design. The airflow on the Revvo is not simple side airflow. It enters the
top, is forced down around the top of the coil disc and back up through a small gap into the drip tip. All of this makes for a very smooth, spit free vape (excuse my wobbly drawing here to demonstrate what I mean)


6. The top chamber is made of Delrin in terms of its outer shell. Whilst this styling might not be to everyone’s liking this is absolutely necessary. The coil placement is in the middle and it gets bloody hot, however none of that heat is transferred to you whilst vaping. Even holding the tank top section when vaping at 120W or above is ok (although the metal parts still get hot). Looking into the chamber itself there is a smaller inner chamber (which isn’t conical) the space between the two walls is where the airflow is directed down onto the coil as mentioned earlier.
Condensation build up is pretty dramatic on the Revvo due to all the nooks and crannies inside. For the most part the chamber does its job keeping that condensation under control. This makes for a nice moist vape, however I have noticed that leaving the tank on its side or upside down can lead to this condensation escaping via the airflow holes.

I have tested holding the tank itself upside down without the top chamber attached to see how long it takes for the juice to breach the coil wicking and go everywhere (the hallmark of any RDTA). I have to say here the Revvo passed with flying colours it was upside down 4 hours after this picture was taken and not a single drop came out! Proving that any seepage is condensation.

7. The airflow ring can be removed from the top chamber. When in place has a stop point and is really smooth to turn. It also has knurling on it to help remove the chamber from the tank section. This part does heat up with higher wattage vaping.
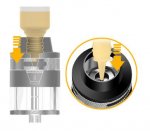
8. The top cap (drip tip) is Delrin. I personally would have preferred they inserted metal threading into the top cap as you have to be really careful with cross threading on this. Thankfully you rarely have to remove it though. It has a very wide bore again all part of the design because if you have a PET dripper or Unicorn bottle you can simply put the top in, push down the pin and refill without having to remove anything! This is the Revvos hallmark and what makes it special although there are two things to note here;

a. Refill to the top of the glass or listen out for the air to stop escaping. If you overfill this tank the coils will not vaporise the juice like regular coils, you are just likely to get hot juice come out of the airflows and go everywhere. I managed to do this on multiple occasions now and it requires the removal of the top chamber entirely to sort out the mess.
b. Needle nose and twist top refill bottles will not work on the Revvo refill system. I don’t own the glass droppers so cannot say whether they work or not
Last edited:






 ...and thanks for enduring it haha tried to cut back a little but loads to go over on this one
 should make a great combo I have used it on the speeder as well ...my orIginal coil is still going like a champ! Really enjoying it
