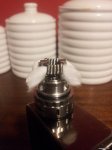
So it has happened to me three times now. I go to change my wick on my griffin RDTA at night. Then I fill it up, with the juice flow holes and air flow holes both closed. When I wake up, I wake up to juice all over my table and mod, half empty tank of juice... Not a great morning to wake up to. What am I doing wrong?? i have the wicking cotton just barely in the channels. They are just in the little rim part and I can just see the bottom of the wick underneath the wick ring. Please help me before I do it happens again and I take it outside and smash it!!!
Become a Patron!
You are using an out of date browser. It may not display this or other websites correctly.
You should upgrade or use an alternative browser.
You should upgrade or use an alternative browser.
GRIFFIN RDTA LEAKING LIKE A BASTARD
- Thread starter Jay_Chedda1014
- Start date
Might be that you haven't got quite enough wick in the recess where it sits so juice is coming up past the wick and down the airflow under the coil there's a fine line between not enough wick and too much and its just a case of getting it in the middle so no dry hits and no leaking.have you tried closing the juice flow off when you go to bed.
Sent from my P022 using Tapatalk
Sent from my P022 using Tapatalk
I would take a look at the o-ring in the top cap, the part you screw down after you fill it ..I didn't have mine a week and had the same thing happen, now I make sure that top cap is screwed down snug, and no more leaks..just sayin
Sent from my XT1080 using Tapatalk
Sent from my XT1080 using Tapatalk
Take a pic of your wicking please and post it, this will help a great deal. I have posted a wicking tutorial for the Griffin, I will link it when I find it.So it has happened to me three times now. I go to change my wick on my griffin RDTA at night. Then I fill it up, with the juice flow holes and air flow holes both closed. When I wake up, I wake up to juice all over my table and mod, half empty tank of juice... Not a great morning to wake up to. What am I doing wrong?? i have the wicking cotton just barely in the channels. They are just in the little rim part and I can just see the bottom of the wick underneath the wick ring. Please help me before I do it happens again and I take it outside and smash it!!!
Thread your Cotton through...Make it so it has a SLIGHT Resistance when pulled in either direction and clip the cotton so theres a inch left on both sides.


Round the cotton up and then measure where it should be if it was just sitting into the ports, then cut the cotton so it would fit in them without stuffing it in.

Guide the cotton into the ports/ring with tweezers or something flat. Then any cotton hanging out lightly tuck it into the ring. If it feels like the cotton is too tight of pressured in then grab the whole cotton end end lift/wiggle it some to loosen it up. There should be NO cotton showing underneath and should just be cupped by the Ring and Ports!


Round the cotton up and then measure where it should be if it was just sitting into the ports, then cut the cotton so it would fit in them without stuffing it in.
Guide the cotton into the ports/ring with tweezers or something flat. Then any cotton hanging out lightly tuck it into the ring. If it feels like the cotton is too tight of pressured in then grab the whole cotton end end lift/wiggle it some to loosen it up. There should be NO cotton showing underneath and should just be cupped by the Ring and Ports!
Attachments
After your cotton is all set I like to raise the ring a full twist or 2 so where the cotton shows from under it that area is widened and higher, this makes it easier for juice to wick.

Now take the Chamber/Barrel and hold it so a hole is over each coil and then push it on, this makes it so the holes are no where near the cotton as it goes down and it leaves the cotton undisturbed.
Someone on a thread told me they kept dryhitting and another person said they were getting leaking so here is some trouble shooting info based on what stemmed from them:
Im guessing your stuffing your cotton in tight into the juice ports, the others didnt have enough wick in them...the cotton needs to be light and fluffy where juice makes contact or it chokes it off instead, having it too loose you can use the juice control to close it to prevent leaking...
Cut your cotton flush to the ring and use a flathead to LIGHTLY guide it into the port, it should just be cupped by the ring and port. If its bunched up then pull it out and fluff it with your screwdriver and then try again.

See how my cotton looks fluffy and not force into the ports? No cotton showing under the ring? Those tips end right after where the ring is and there is about a millimeter between the tips and the juice ledge. You can see the ledge where the cotton should rest on/above if you raise the ring a few twists.
If you have problems getting it right then remove the ring, get your cotton cut at the ledge and then replace the ring and the pull the tips up lightly, not enough to pull them out. The better cotton prep you do the better your wicking will be when vaping, pay attention to detail, after you get it its very easy to replicate.
Now take the Chamber/Barrel and hold it so a hole is over each coil and then push it on, this makes it so the holes are no where near the cotton as it goes down and it leaves the cotton undisturbed.
Someone on a thread told me they kept dryhitting and another person said they were getting leaking so here is some trouble shooting info based on what stemmed from them:
Im guessing your stuffing your cotton in tight into the juice ports, the others didnt have enough wick in them...the cotton needs to be light and fluffy where juice makes contact or it chokes it off instead, having it too loose you can use the juice control to close it to prevent leaking...
Cut your cotton flush to the ring and use a flathead to LIGHTLY guide it into the port, it should just be cupped by the ring and port. If its bunched up then pull it out and fluff it with your screwdriver and then try again.
See how my cotton looks fluffy and not force into the ports? No cotton showing under the ring? Those tips end right after where the ring is and there is about a millimeter between the tips and the juice ledge. You can see the ledge where the cotton should rest on/above if you raise the ring a few twists.
If you have problems getting it right then remove the ring, get your cotton cut at the ledge and then replace the ring and the pull the tips up lightly, not enough to pull them out. The better cotton prep you do the better your wicking will be when vaping, pay attention to detail, after you get it its very easy to replicate.
Vapomizer
Silver Contributor
Member For 4 Years
Member For 3 Years
Member For 2 Years
Member For 1 Year
I do actually stuff a little bit of cotton into the space under the wick retainer ring so that it is just barely showing from the other side, then the rest of the cotton i rest around the posts from both sides without covering the airflow holes this helps 1) stop the liquid from flowing freely and leaking and 2) suck any liquid that makes it to the deck around the juice channels and i never had any amount of leaking happen and never had any dry hits as well.
A good trick to prevent dry hits with stuffed cotton, is that i insert a tiny flat blade underneath the ring from the other side and fluff the stuffed cotton all i can by moving the blade back and forth on the cotton, this makes it work as a sucker instead of a blocker.
I will post a wicking tutorial next time i change my wicks.
Vapomizer
Silver Contributor
Member For 4 Years
Member For 3 Years
Member For 2 Years
Member For 1 Year
After your cotton is all set I like to raise the ring a full twist or 2 so where the cotton shows from under it that area is widened and higher, this makes it easier for juice to wick.
Two good tips, will try these next time.Now take the Chamber/Barrel and hold it so a hole is over each coil and then push it on, this makes it so the holes are no where near the cotton as it goes down and it leaves the cotton undisturbed.
After your cotton is all set I like to raise the ring a full twist or 2 so where the cotton shows from under it that area is widened and higher, this makes it easier for juice to wick.
View attachment 42610
Now take the Chamber/Barrel and hold it so a hole is over each coil and then push it on, this makes it so the holes are no where near the cotton as it goes down and it leaves the cotton undisturbed.
Someone on a thread told me they kept dryhitting and another person said they were getting leaking so here is some trouble shooting info based on what stemmed from them:
Im guessing your stuffing your cotton in tight into the juice ports, the others didnt have enough wick in them...the cotton needs to be light and fluffy where juice makes contact or it chokes it off instead, having it too loose you can use the juice control to close it to prevent leaking...
Cut your cotton flush to the ring and use a flathead to LIGHTLY guide it into the port, it should just be cupped by the ring and port. If its bunched up then pull it out and fluff it with your screwdriver and then try again.
View attachment 42611
See how my cotton looks fluffy and not force into the ports? No cotton showing under the ring? Those tips end right after where the ring is and there is about a millimeter between the tips and the juice ledge. You can see the ledge where the cotton should rest on/above if you raise the ring a few twists.
If you have problems getting it right then remove the ring, get your cotton cut at the ledge and then replace the ring and the pull the tips up lightly, not enough to pull them out. The better cotton prep you do the better your wicking will be when vaping, pay attention to detail, after you get it its very easy to replicate.
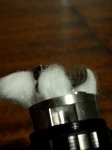
I'll try putting the cotton in the channels without the ring then after they're set I'll put the ring on and then pull them out slightly. It happened to me again last night... SMH
Vapomizer
Silver Contributor
Member For 4 Years
Member For 3 Years
Member For 2 Years
Member For 1 Year
I've tried all of that stuff lol.
Ok two observations from your pics, first of all, wicking the Griffin properly is a very easy process, it should not be that hard, it is not rocket science, you should just tuck the cotton behind the ring and then it should not leak, your cotton in the pictures looks to be placed correctly like the rest of us do, and we do not have any leaking whatsoever, so if you are still getting plenty of leaking then your base could be defective, your o-rings torn or not placed correctly, you might need to replace some o-ring from the bag of spares after inspecting all ring seals of the tank and see if any is not seated properly or is torn.I'll try putting the cotton in the channels without the ring then after they're set I'll put the ring on and then pull them out slightly. It happened to me again last night... SMH
Take the entire tank apart including the glass, the top, the base, the chamber and chimney parts and inspect ALL rubber rings closely, you should have 4 rings on the top chimney piece, 1 on the bottom chamber piece, and one on the build deck base, check all are in place, intact and lubed, if rubber is dry and hard it can leak.
If you can not get it to not leak, with simple rubber ring inspection/replacement then you should get the tank replaced.
One very important observation from the pics as well, your cotton is very loose inside your coils, i used to have a slight leaking when i had cotton loose like that because cotton could be dripping into your airflow opening or liquid slipping it and going into your airflow holes, cut thicker cotton strips so that it fits snug inside your coils, you should feel some tension when inserting your cotton, even a lot of tension is ok, because all this tension goes away when your cotton gets wet and shrinks, and your cotton ends need to be wide enough to sit on all the area on your build deck around the airflow channels and around the outside of the posts, your current cotton strips is doing neither, it is not snug inside the coils and it is not sitting on and covering the area of the deck around the airflow holes in order to suck any liquid that escapes in there and prevent it from going down into your airflow holes.
Ok two observations from your pics, first of all, wicking the Griffin properly is a very easy process, it should not be that hard, it is not rocket science, you should just tuck the cotton behind the ring and then it should not leak, your cotton in the pictures looks to be placed correctly like the rest of us do, and we do not have any leaking whatsoever, so if you are still getting plenty of leaking then your base could be defective, your o-rings torn or not placed correctly, you might need to replace some o-ring from the bag of spares after inspecting all ring seals of the tank and see if any is not seated properly or is torn.
Take the entire tank apart including the glass, the top, the base, the chamber and chimney parts and inspect ALL rubber rings closely, you should have 4 rings on the top chimney piece, 1 on the bottom chamber piece, and one on the build deck base, check all are in place, intact and lubed, if rubber is dry and hard it can leak.
If you can not get it to not leak, with simple rubber ring inspection/replacement then you should get the tank replaced.
One very important observation from the pics as well, your cotton is very loose inside your coils, i used to have a slight leaking when i had cotton loose like that because cotton could be dripping into your airflow opening or liquid slipping it and going into your airflow holes, cut thicker cotton strips so that it fits snug inside your coils, you should feel some tension when inserting your cotton, even a lot of tension is ok, because all this tension goes away when your cotton gets wet and shrinks, and your cotton ends need to be wide enough to sit on all the area on your build deck around the airflow channels and around the outside of the posts, your current cotton strips is doing neither, it is not snug inside the coils and it is not sitting on and covering the area of the deck around the airflow holes in order to suck any liquid that escapes in there and prevent it from going down into your airflow holes.
Alright I'm hoping it's just the fact hat the o rings were dry. I usually clean the whole tank every time I change out my wicks without lubing them when I put it all back together. And I'll try using thicker wicks, although I seem to get a lot of dry hits when I've done that in the past. That's why I've tried to go a bit thinner (but keeping a slight bit of tension, where it scrapes off some cotton when I move it side to side in the coil) I'll try once more again tonight and if I wake up tomorrow with a pool of juice I'm gonna toss it.
Your cotton could be dripping juice into the air hole channels, make sure to push it away from it slightly also. Check all orings and if it continues to happen try closing off the juice control and letting it sit. This will atleast cancel out your wicking completely and see if the problem is being caused elsewhere.
Vapomizer
Silver Contributor
Member For 4 Years
Member For 3 Years
Member For 2 Years
Member For 1 Year
By "dry" i do not mean dry after washing the tank, i mean some of the rubber seals of the griffin come stiff and dry from factory that they break and do not seal well.Alright I'm hoping it's just the fact hat the o rings were dry. I usually clean the whole tank every time I change out my wicks without lubing them when I put it all back together. And I'll try using thicker wicks, although I seem to get a lot of dry hits when I've done that in the past. That's why I've tried to go a bit thinner (but keeping a slight bit of tension, where it scrapes off some cotton when I move it side to side in the coil) I'll try once more again tonight and if I wake up tomorrow with a pool of juice I'm gonna toss it.
You can use thicker wicks if you fluff them significantly before installing them and then fluff the ends some more after installing them, just create a lot of spacing between the cotton threads to make space for liquid to be sucked in.
What i do:
1) If coils ID is say 3mm i cut 6-7mm of cotton strips, so cotton width would be around double the coil's ID
2) If you are using Japanese organic cotton sheets, first remove the two outer machined layers, just the very thin layers from both sides and only use the inner fluffy sandwich
3) Fluff the hell out of them by pulling the threads away from one another gently, fluff them as much as you can without breaking them apart.
4) Stuff them inside your coils and there should be some significant tension with the cotton all fluffed out like that.
5) once placed inside the coils fluff the ends again with a flat blade or something so that you make a lot of space between the threads for liquid
6) Stuff the middle area of each leg gently into the juice channels under the ring
7) lay the rest of the legs around the deck posts from both sides so all areas around the juice channels will be covered with cotton, this will suck and collect any liquid that gets in there and prevent it from going down into the airflow holes
8) insert the flat blade under the ring from the outside and fluff the hell out of the cotton stuffed in there so that the liquid can enter the deck.
Doing that i get no leaking whatsoever and never had a dry hit unless i chain vape like 7 or 8 times in a row without any pauses in between, and it is usually not that complicated, if you have intact rubber seals in all areas of your tank, and all the area on top and around your juice channels is covered with cotton then the tank should not leak at all, if it leaks then something could have went wrong with the machining and the tank needs to be replaced.
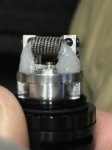
I recommend when taking apart your tank you inspect the machining of all the parts for any gaps or imperfections that could be leaking, also what type of cotton are you using? and what is the ratios of VG/PG in your liquid? maybe you are using cotton that can not retain your liquid? or a very thin liquid? your cotton is way too saturated in the pics, why is it like that?
Your cotton could be dripping juice into the air hole channels, make sure to push it away from it slightly also. Check all orings and if it continues to happen try closing off the juice control and letting it sit. This will atleast cancel out your wicking completely and see if the problem is being caused elsewhere.
I'm thinking it's something else other than the wicking because all I do at night is change the wick, prime it a bit. Close the juice flow and air hole. Fill up the tank, and leave it till morning. Then I wake up and more than half the tank is gone and there's a pool of juice around it. Even though the juice flow holes are closed.
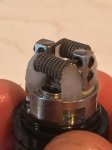
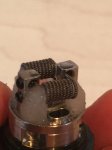
Did you use the Juice control and cut the juice off from the ports yet?More pictures and I haven't changed anything from since it leaked this morning.
Vapomizer
Silver Contributor
Member For 4 Years
Member For 3 Years
Member For 2 Years
Member For 1 Year
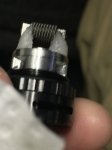
Your wicks look good, just like my wicks, nothing that would cause half a tank to leak, not even close, especially when it happens with the juice and airflow controls closed all the way, your tank is leaking from somewhere else, time to check all the rubber oring seals and machining on all the parts, to find where it is leaking from, also count all your orings are in place and nothing fall off while washing/cleaning the tankMore pictures and I haven't changed anything from since it leaked this morning.
1- Top cap with drip tip has no orings
2- upper chimney part has 4 orings one in the groove where the glass sits, one on the top where the top cap screws, one on top of the chimney under the drip tip, one on the part that screws on the chamber
3- lower part where the chamber is has one oring that seals the other end of the glass
4- deck has one on around the threads where you screw the base to the chamber section, this oring is in place as i can see it in the picture
You should be able to count 6 orings in total, check if one is missing or has fallen off during cleaning/washing
Vapomizer
Silver Contributor
Member For 4 Years
Member For 3 Years
Member For 2 Years
Member For 1 Year
An idea just occurred to me, you always mention that "half" the tank leaks, and also your cotton in the pics look way over-saturated as if you were dripping on them (or something was dripping on them), only one suspect o-ring comes to mind, the o-ring on the bottom of the chimney part where the threads that screw on the chamber are, this could very likely be the culprit, take apart your tank and inspect that particular o-ring, my guess is it either went missing during your washing the tank parts or it is broken, or torn, you should have one in your spares bad that should fix your problem!
An idea just occurred to me, you always mention that "half" the tank leaks, and also your cotton in the pics look way over-saturated as if you were dripping on them (or something was dripping on them), only one suspect o-ring comes to mind, the o-ring on the bottom of the chimney part where the threads that screw on the chamber are, this could very likely be the culprit, take apart your tank and inspect that particular o-ring, my guess is it either went missing during your washing the tank parts or it is broken, or torn, you should have one in your spares bad that should fix your problem!
Okay well I tried taking out the one oring between the chamber and the chimney(the clear one for me) and it looked fine, so I put it back in. Filled it with juice with the juice flow holes closed and I'm gonna let it sit for about an hour and see if it holds up. It seemed like it was seated into the groove pretty good. I always screw it super tight when I put it back together so maybe I did it too tight and it affected it. We'll see I guess
Air Blower
Bronze Contributor
Member For 4 Years
Member For 3 Years
Member For 2 Years
Member For 1 Year
Hmmm....I can't get my wick retainer ring to budge!
I do have a 60" pipe wrench in the garage but that might just be overkill.
I do have a 60" pipe wrench in the garage but that might just be overkill.
Scratch88683
Bronze Contributor
Member For 4 Years
Member For 3 Years
Member For 2 Years
Member For 1 Year
Usually that ring is very easy to remove sometimes to easy like you might take out the bottom to check your build and the ring will come off while unscrewing the bottom and mess your wicks up. I have 2 Griffins and so does my father none of ours has that problem where you can't get it off lol. If your really want to test to see if you can get it off I guess you can try pliers but be very careful you might scratch the shit out of it or bend it I'd suggest putting some kind of cloth between the pliers and ring. Or try one of those clothes you can grip with and try turning it with your hand as hard as you can if that and pliers don't work then I don't know...Hmmm....I can't get my wick retainer ring to budge!
I do have a 60" pipe wrench in the garage but that might just be overkill.
Air Blower
Bronze Contributor
Member For 4 Years
Member For 3 Years
Member For 2 Years
Member For 1 Year
Well my leaking problem was solved when I followed raymo2u's wicking tutorial from another thread to a teeUsually that ring is very easy to remove sometimes to easy like you might take out the bottom to check your build and the ring will come off while unscrewing the bottom and mess your wicks up. I have 2 Griffins and so does my father none of ours has that problem where you can't get it off lol. If your really want to test to see if you can get it off I guess you can try pliers but be very careful you might scratch the shit out of it or bend it I'd suggest putting some kind of cloth between the pliers and ring. Or try one of those clothes you can grip with and try turning it with your hand as hard as you can if that and pliers don't work then I don't know...
")
Turns out the problem I had with my Griffin was lil 'ol me

Last edited:
Scratch88683
Bronze Contributor
Member For 4 Years
Member For 3 Years
Member For 2 Years
Member For 1 Year
That's good I actually wish my ring was stuck lolWell my leaking problem was solved when I followed ramo2u's wicking tutorial from another thread to a tee
Turns out the problem I had with my Griffin was lil 'ol me
Air Blower
Bronze Contributor
Member For 4 Years
Member For 3 Years
Member For 2 Years
Member For 1 Year
Mine still doesn't move but if it's not leaking it ain't broke and if it ain't broke...have a vape and beerThat's good I actually wish my ring was stuck lol

Oh and the tutorial is the one in this thread....jeez, I'm batting 0 today

Scratch88683
Bronze Contributor
Member For 4 Years
Member For 3 Years
Member For 2 Years
Member For 1 Year
It's so frustrating when you go look at your build and the stupid ring unscrews with the tank and messes you wick up. Most of the time when this happens I end up having to replace my wick.Mine still doesn't move but if it's not leaking it ain't broke and if it ain't broke...have a vape and beer
Oh and the tutorial is the one in this thread....jeez, I'm batting 0 today
Air Blower
Bronze Contributor
Member For 4 Years
Member For 3 Years
Member For 2 Years
Member For 1 Year
I wonder if there's a high temp thread sealer that could be used safely?It's so frustrating when you go look at your build and the stupid ring unscrews with the tank and messes you wick up. Most of the time when this happens I end up having to replace my wick.
Scratch88683
Bronze Contributor
Member For 4 Years
Member For 3 Years
Member For 2 Years
Member For 1 Year
Not sure but I've thought about purposely messing up the threads and the forcing it on lol but I'm worried I might not be able to get it back onI wonder if there's a high temp thread sealer that could be used safely?
Scratch88683
Bronze Contributor
Member For 4 Years
Member For 3 Years
Member For 2 Years
Member For 1 Year
Yea I try that and it usually will work for a while but still every now and then it will happen to me
Air Blower
Bronze Contributor
Member For 4 Years
Member For 3 Years
Member For 2 Years
Member For 1 Year
Even a very small punch mark between the joint at the ring and deck with the ring all the way down may hold it. I use to do small turbo work and that's how we'd keep critical nuts from backing off.Not sure but I've thought about purposely messing up the threads and the forcing it on lol but I'm worried I might not be able to get it back on
Scratch88683
Bronze Contributor
Member For 4 Years
Member For 3 Years
Member For 2 Years
Member For 1 Year
Hmm that sounds like a good idea might have to try that thanks!
Scratch88683
Bronze Contributor
Member For 4 Years
Member For 3 Years
Member For 2 Years
Member For 1 Year
Griffins good too I never hadI'd suggest shelving the leaking atty....the Boreas doesn't leak a drop, for me anyway...and is a flavor cloud-chucker....!
done leaking issues with it same goes for the aromamizer supreme never leaks on me
I hate this stupid tank its doin it to me too......it is coming from the rim between the glass and the metal that holds the glass in place.....If you run your finger across it you can tell the glass is off just a hair and one side sticks out a bit on mine anyways. I can push the glass and it clicks into place where its supposed to be then I let go and it leaks some more......Hope this is your problem too and glad im not the only one not enjoying this thing!! We justSo it has happened to me three times now. I go to change my wick on my griffin RDTA at night. Then I fill it up, with the juice flow holes and air flow holes both closed. When I wake up, I wake up to juice all over my table and mod, half empty tank of juice... Not a great morning to wake up to. What am I doing wrong?? i have the wicking cotton just barely in the channels. They are just in the little rim part and I can just see the bottom of the wick underneath the wick ring. Please help me before I do it happens again and I take it outside and smash it!!!
 right? lol
roxynoodle
Gold Contributor
Member For 4 Years
Member For 3 Years
Member For 2 Years
Member For 1 Year
ECF Refugee
I hate this stupid tank its doin it to me too......it is coming from the rim between the glass and the metal that holds the glass in place.....If you run your finger across it you can tell the glass is off just a hair and one side sticks out a bit on mine anyways. I can push the glass and it clicks into place where its supposed to be then I let go and it leaks some more......Hope this is your problem too and glad im not the only one not enjoying this thing!! We just
Which do you think is out of round? The glass or metal part?
I dont think its not rounded I think its just off balance.....the tank is not lined up with the metal on top or bottom and its evenly moved over just a tad. One side of the glass looks set in from the metal at the spot where they join and the other side looks like its sticking out over the metal a tad....The metal may be bent and causing the glass not to sit right? I am gonna have to take it all apart and look at it and dry it.....I thought I was imagining things at first it seemed like the tank was sweating or something. Its worse when its full though and even not filling it up itll be just sitting on the desk and dripping out of the side very slow nothing steady(If it hadnt been laying sideways I prob woulda thought it was coming out the airflow), but I dry it off and pick it back up and its slick again smhWhich do you think is out of round? The glass or metal part?
roxynoodle
Gold Contributor
Member For 4 Years
Member For 3 Years
Member For 2 Years
Member For 1 Year
ECF Refugee
I dont think its not rounded I think its just off balance.....the tank is not lined up with the metal on top or bottom and its evenly moved over just a tad. One side of the glass looks set in from the metal at the spot where they join and the other side looks like its sticking out over the metal a tad....The metal may be bent and causing the glass not to sit right? I am gonna have to take it all apart and look at it and dry it.....I thought I was imagining things at first it seemed like the tank was sweating or something. Its worse when its full though and even not filling it up itll be just sitting on the desk and dripping out of the side very slow nothing steady(If it hadnt been laying sideways I prob woulda thought it was coming out the airflow), but I dry it off and pick it back up and its slick again smh
Just for grins, try your replacement glass. If it's the same, one of the metal pieces is off. I'm hoping it's your glass and that fixes it.
Yeah thats what I was thinking.....The whole metal ring part is definitely a tad confusing and why on earth didnt I get some kind of directions lol??!! a picture or anything woulda been nice......I spent forever on the first install because I though the ring went on after lol.......I have also stripped almost all the screws that it started with although the black backup screws seem to be twice as strong, why not just give me 8 of the black ones.....all IM sayin lolJust for grins, try your replacement glass. If it's the same, one of the metal pieces is off. I'm hoping it's your glass and that fixes it.
roxynoodle
Gold Contributor
Member For 4 Years
Member For 3 Years
Member For 2 Years
Member For 1 Year
ECF Refugee
Yeah thats what I was thinking.....The whole metal ring part is definitely a tad confusing and why on earth didnt I get some kind of directions lol??!! a picture or anything woulda been nice......I spent forever on the first install because I though the ring went on after lol.......I have also stripped almost all the screws that it started with although the black backup screws seem to be twice as strong, why not just give me 8 of the black ones.....all IM sayin lol
Mine are older and don't have the good screws.
Does this help?

There are great videos on YouTube for the griffin. It's one of those tanks that's easy to use but hard to get perfect. But once that learning curve is over, you won't have any more issues with it, in my experienceYeah thats what I was thinking.....The whole metal ring part is definitely a tad confusing and why on earth didnt I get some kind of directions lol??!! a picture or anything woulda been nice......I spent forever on the first install because I though the ring went on after lol.......I have also stripped almost all the screws that it started with although the black backup screws seem to be twice as strong, why not just give me 8 of the black ones.....all IM sayin lol
Mine are older and don't have the good screws.
Does this help?
Sent from my SM-G935V using Tapatalk
I would be upset, I know I would strip those screws especially with SS I am always making sure its tight and still overdo it sometimes, not on purpose of course....Mine are older and don't have the good screws.
not sure yet about the OP but mine is not even leaking out the airflow, I can clean that and it wont come back if it happens, but it is a recurring issue for meyou won't have any more issues with it

I think theres only a few issues here and there, most people rave about it from what ive seen and heard anyways. Dont stress!
mylowill76
Member For 4 Years
Mines always leaked a lil too & I bought this after watching a certain you tube reviewer who said it never leaked...lol...
it's always around the bottom & afc ring, I did fiddle for a bit but no luck - although mines such a tiny leak I can over look it especially at the price!
it's always around the bottom & afc ring, I did fiddle for a bit but no luck - although mines such a tiny leak I can over look it especially at the price!
roxynoodle
Gold Contributor
Member For 4 Years
Member For 3 Years
Member For 2 Years
Member For 1 Year
ECF Refugee
QC issues on some. The ones that are well made work very well. The ones that are janky, well, not so much.