Steam Crave Aromamizer Plus V2 RDTA Advanced Kit
Introduction
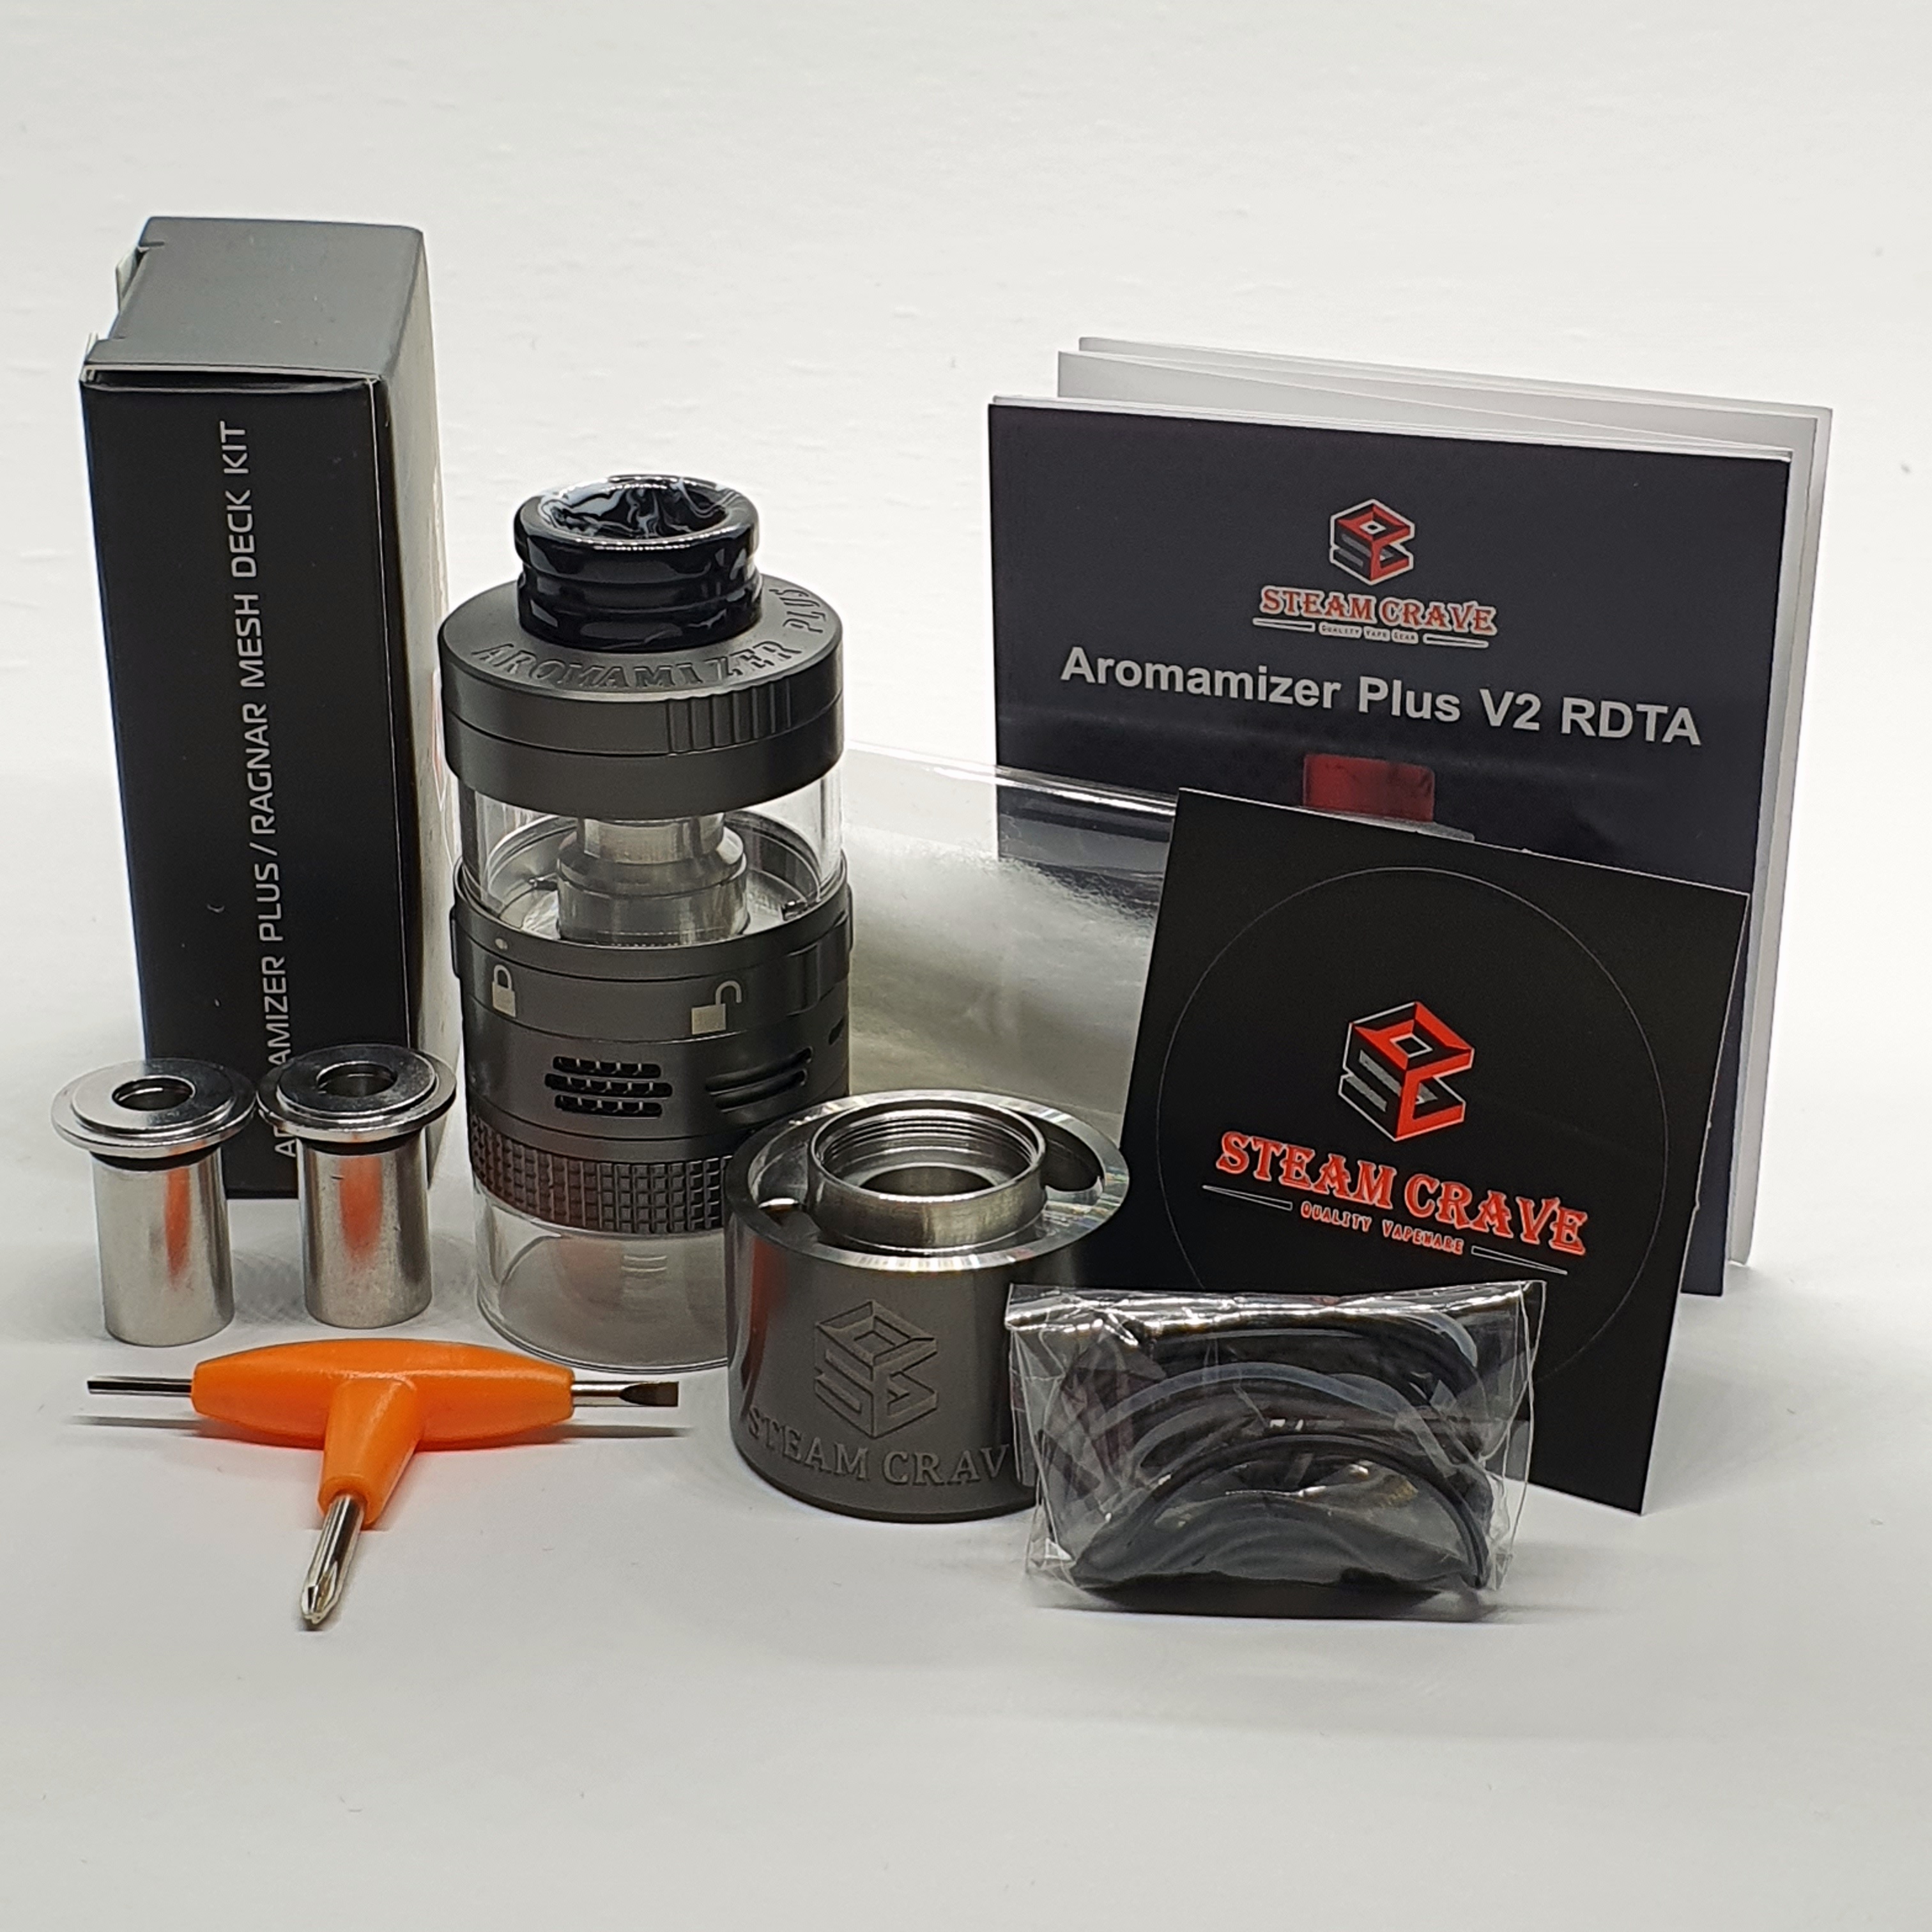
The Steam Crave Aromamizer Plus V2 is a new version of the original Aromamizer Plus, which was a firm favourite with RDTA fans. It is a 30mm diameter rebuildable dripping tank which allows you to switch out the build deck for other compatible build decks. This highly versatile tank allows you to use a dual postless deck, a mesh deck, a single coil deck, a series deck, a velocity style deck and even switch it to an RDA and use for dripping or squonking. I was sent the advanced kit for review which includes a dual postless deck, an additional mesh deck and an extender for the tank, which takes the capacity from an already huge 8ml all the way to a staggering 16ml capacity.
Disclaimer: this kit was sent to me by Steam Crave for review.
Box Contents
- Aromomizer Plus V2 tank (Dual Coil Postless Deck installed)
- Spare 8ml glass section
- Spare o-rings and screws
- T shaped tool
- 8ml metal extension tube
- 2 x 6mm chimney reducers
- Mesh Deck Kit
Specifications
- 30mm diameter
- 50mm height (standard configuration)
- 70mm height (with extension tube installed)
- Dual Coil Postless Deck
- Mesh Deck
- Optional Single Coil Deck, Series Deck, Velocity Style Deck
- 8ml juice capacity (16ml with extension tube installed)
Design & Build Quality
The Aromamizer Plus V2 is a 30mm diameter RDTA and has an 8ml juice capacity in its standard configuration. If you add on the metal extender, which comes in the advanced kit, it will give you a huge 16ml juice capacity.
It comes with a dual postless deck as standard and also includes an additional mesh deck in the advanced kit.
You can also use decks from the V1 Aromomizer or you can purchase them separately if you weren’t an owner of the V1. The additional decks available are a single coil, series dual, velocity style deck and a new single coil deck which has recently been released.
The tank is available in either stainless steel, gunmetal or black.
You get a replacement glass in the box as well as two chimney reducers for restricting the airflow from the chamber.
The tank has an 810 resin drip tip, which is push fit and has an o-ring on the inside of the top cap. I found the drip tip to be very comfortable when in use, but you have the option of switching it out for your own drip tip. The o-rings are on the inside of the top cap so you can use drip tips which don’t have o-rings on them.
The top cap itself is a screw cap which turns smoothly, is nicely machined and has an engraving on the top with the tank name. It also has a section of knurling on either side to allow you to grip the cap when unscrewing.
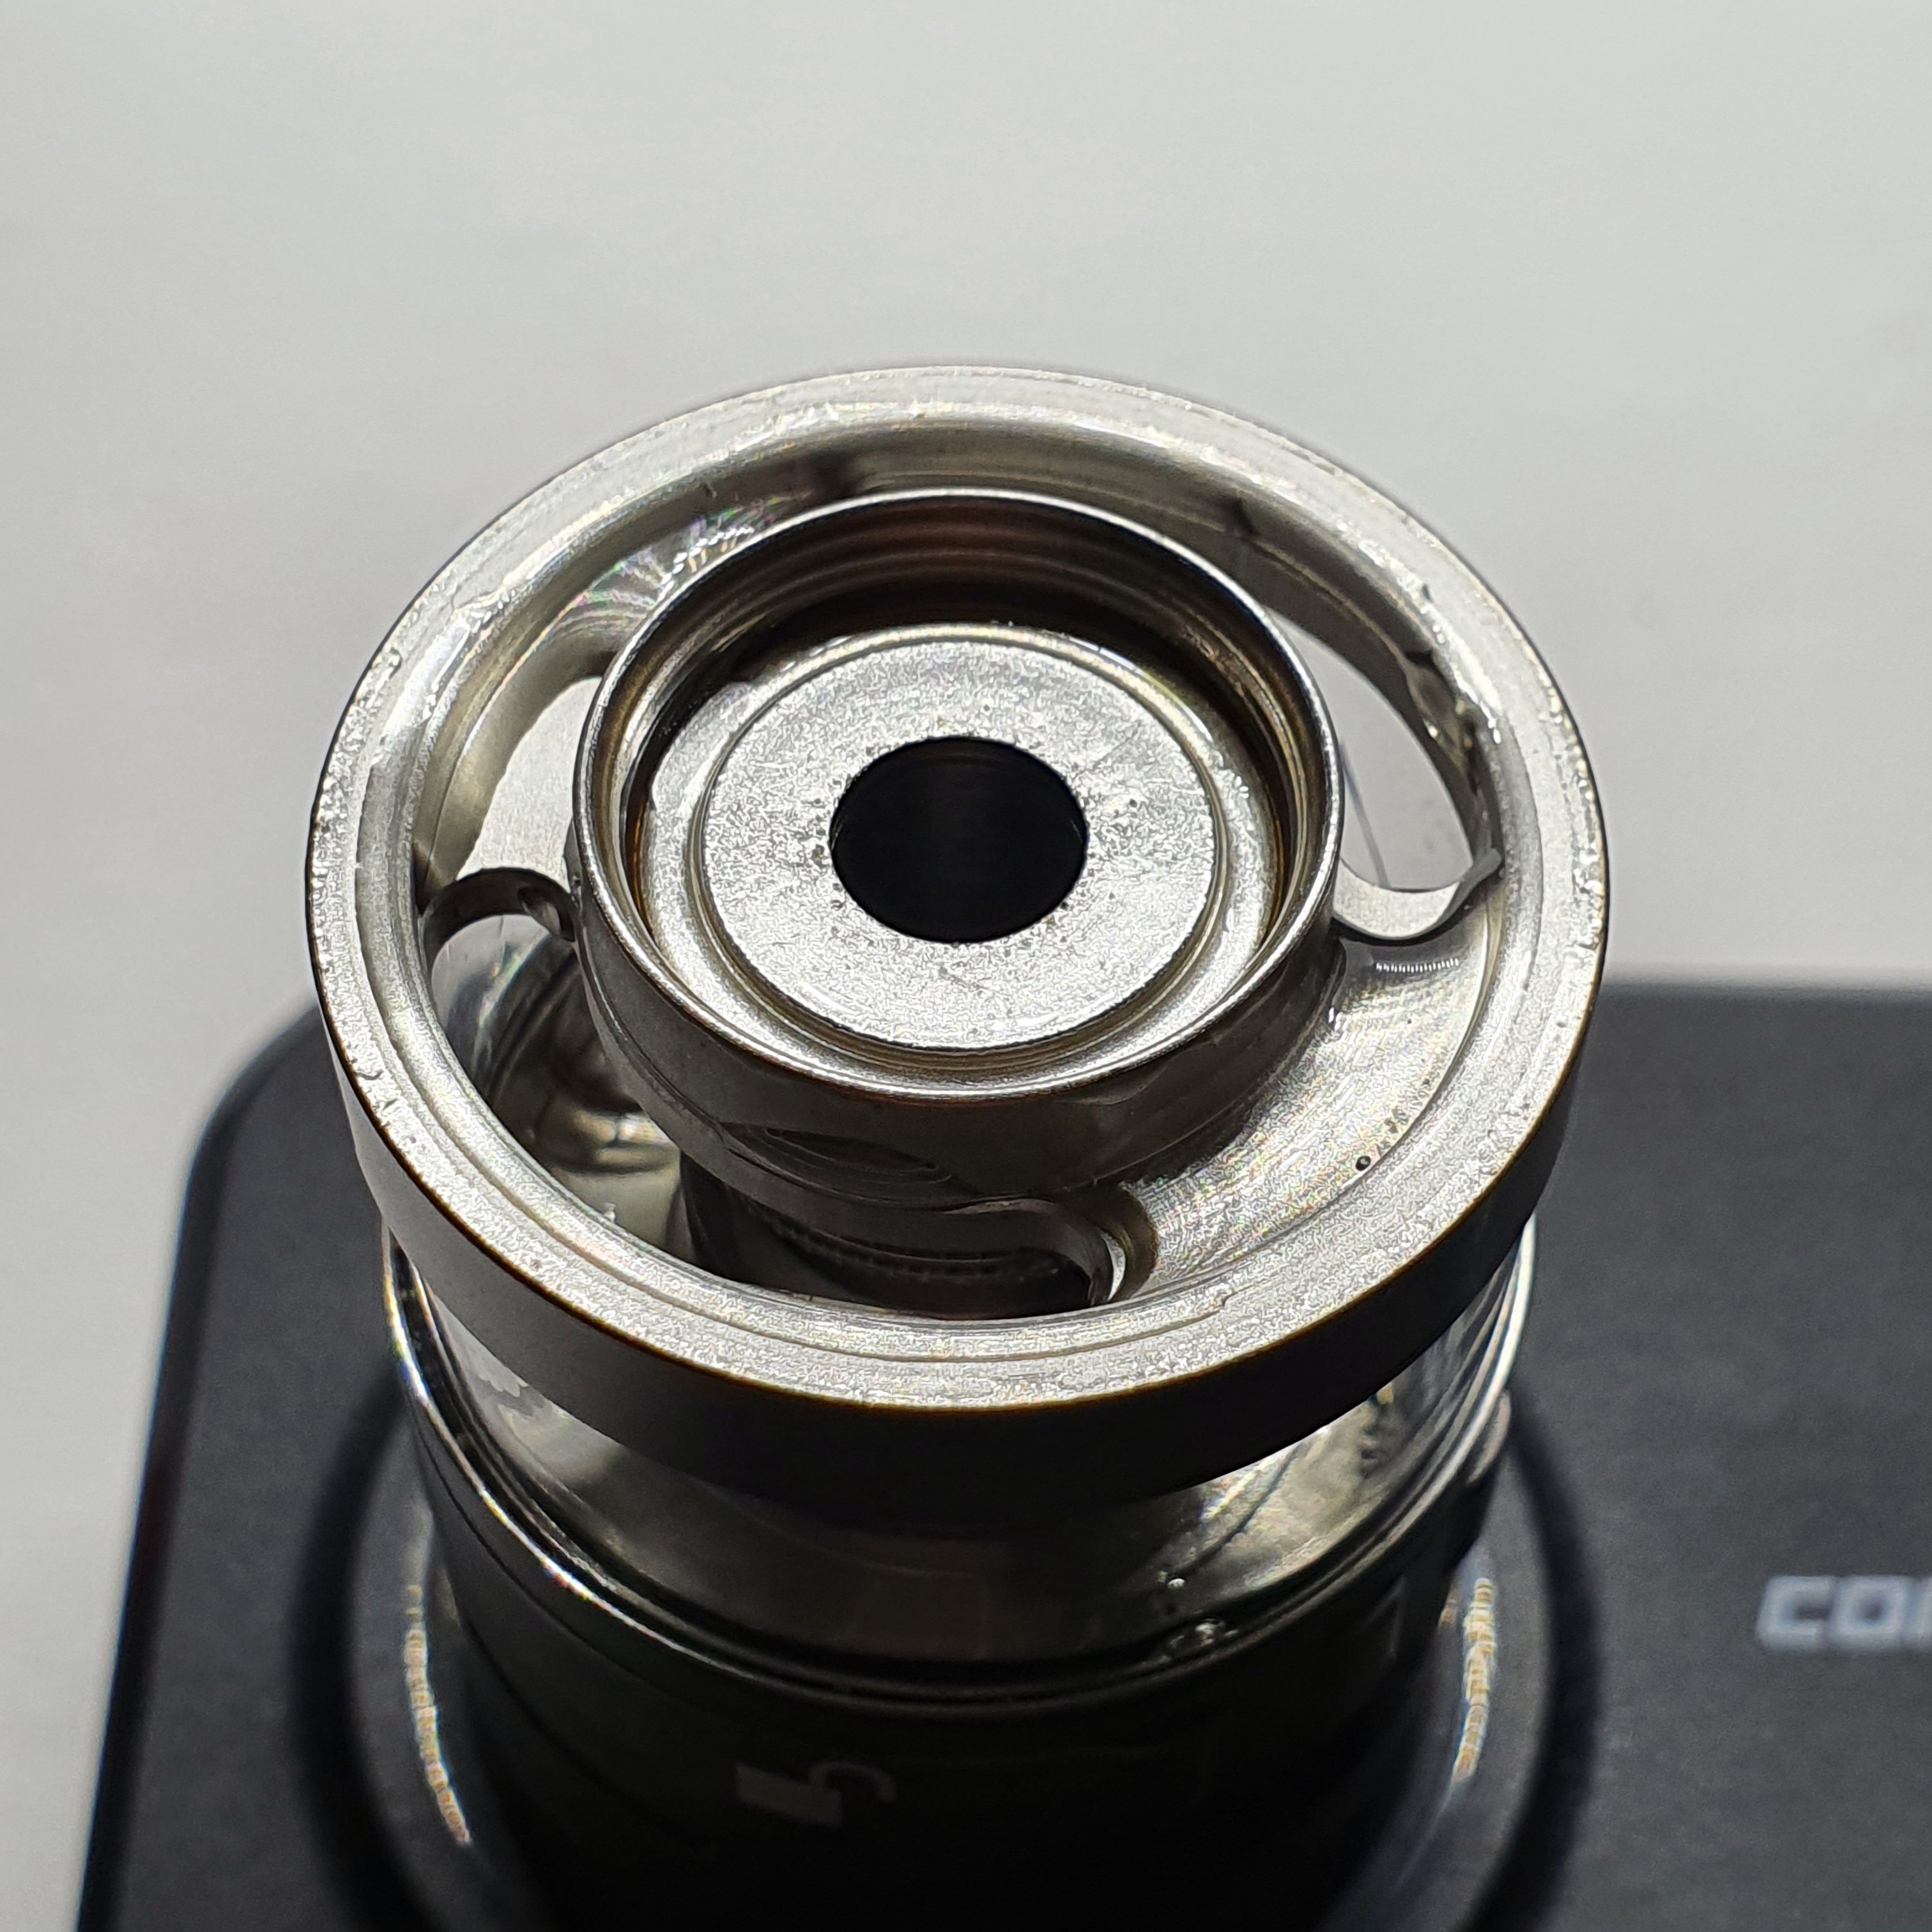
When you remove the top cap you have two huge kidney shaped fill ports which sit in a trough a couple of millimetres below the rim of the top of the tank. I had no issues filling from a really chunky nozzle on a 250ml bottle of liquid.
If you want to use one of the chimney reducers you pop it down into the chimney here. This is also where you screw on the metal extender tube if you want to use it.
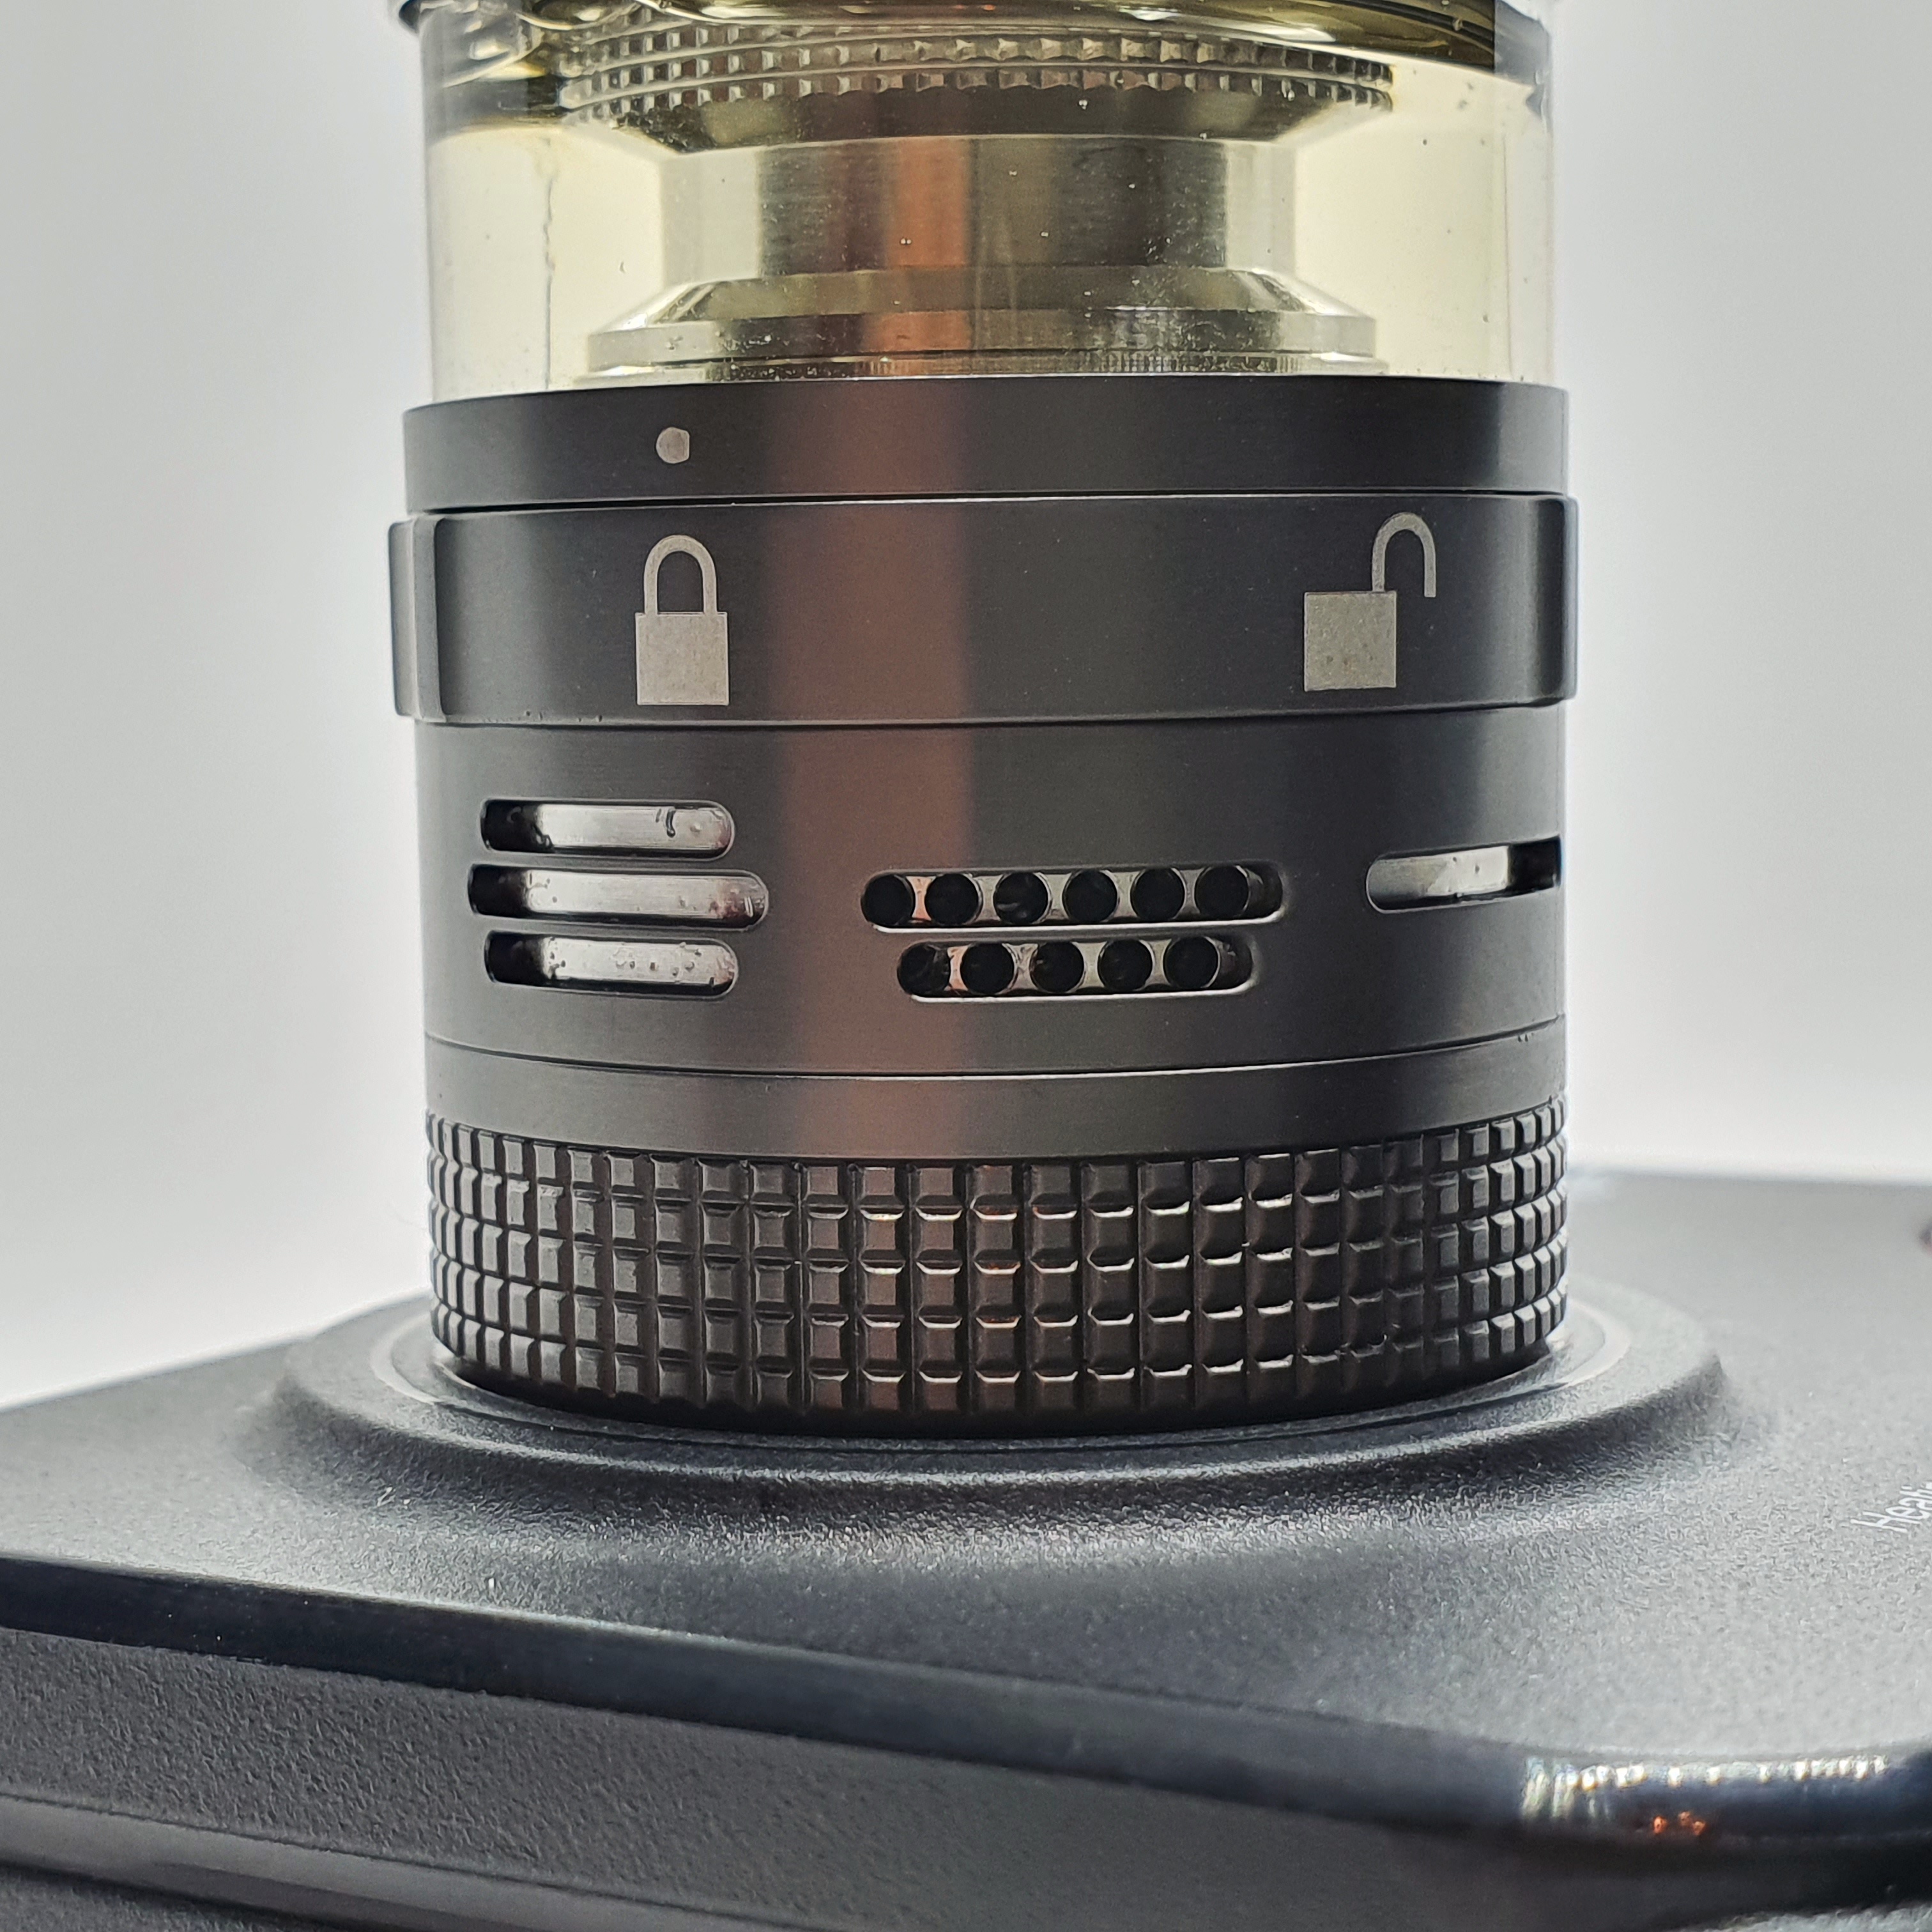
The juice flow control ring sits below the glass section of the tank and turns nice and smoothly, has grips on either side and has a stopper at both the open and closed position.
The airflow control ring sits below the juice control ring. It has three rows of honeycomb style airflow holes which you can close down as you wish. There are lots of options for airflow here, especially with the included chimney reducers to further tailor the airflow to your liking and the airflow ring can be flipped over as well so you choose where to direct the airflow as you wish. The airflow on the Aromamizer Plus V2 is very smooth and not turbulent at all, even when fully open.
Personally I prefer a more restrictive vape so used the chimney reducer and had one row of airflow open. This was perfect for me, but without the chimney reducer and three rows of airflow you can go a lot more open. Closing down the airflow to just one hole with the chimney reducer installed even gives you the option for a loose MTL or very restrictive DTL vape.
Compared to the Aromomizer V1 the airflow and juice control rings have been flipped around, so your airflow is on the bottom. I prefer this setup as you’re not trying to turn the airflow ring between the glass and juice control ring, it’s readily available at the bottom.
The base of the tank has knurling all the way around to enable you to grip while unscrewing the base, which was also not present on the Aromomizer V1. The machining on the threads of the base is spot on, giving a very smooth turn when screwing or unscrewing the base.
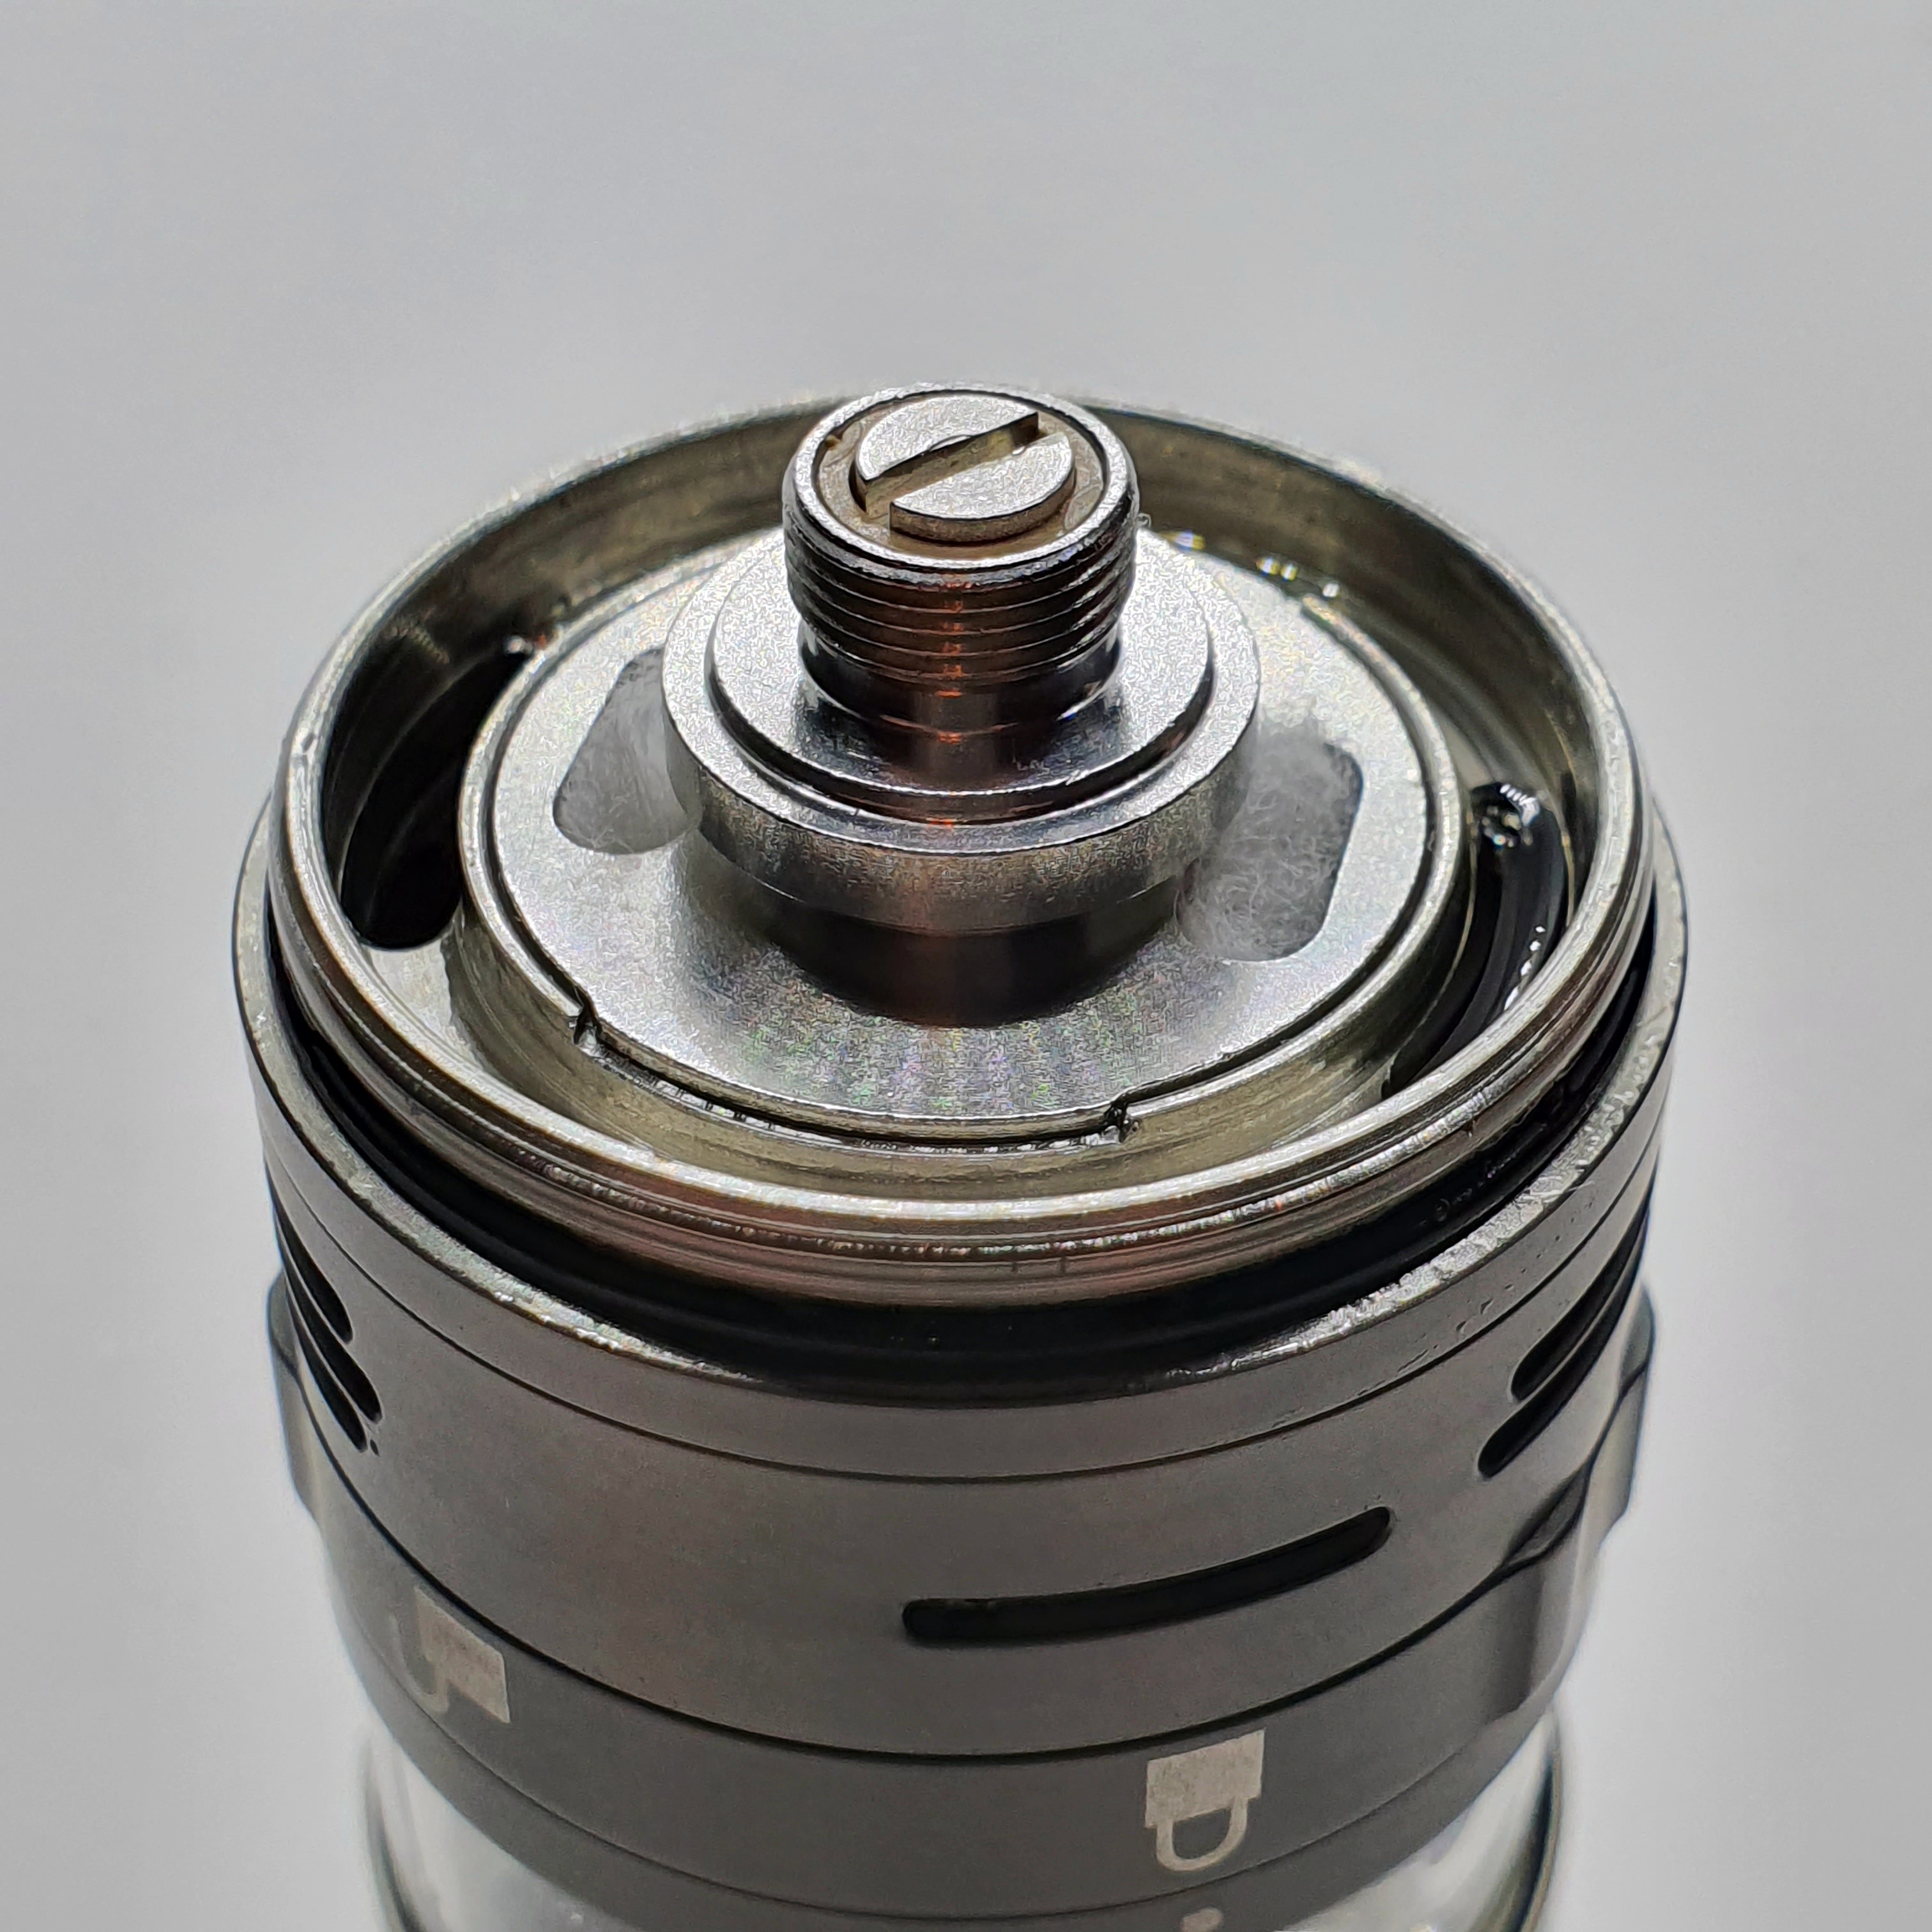
Removing the base of the tank allows you to pull out the build deck. You can do this with a tank full of juice. By turning the tank upside down first, all the juice flows back into the tank. The deck can then be removed without spilling any liquid. This allows you to swap builds and decks at will.
The mesh deck included with the advanced kit doesn’t feature a ceramic spring plate for the cotton to sit on under the mesh strip. I have found that cotton does not collapse even without the ceramic spring plate, so it shows it’s not really needed as long as you put enough cotton under the mesh strip.
Building on the Aromamizer Plus V2: Mesh Deck
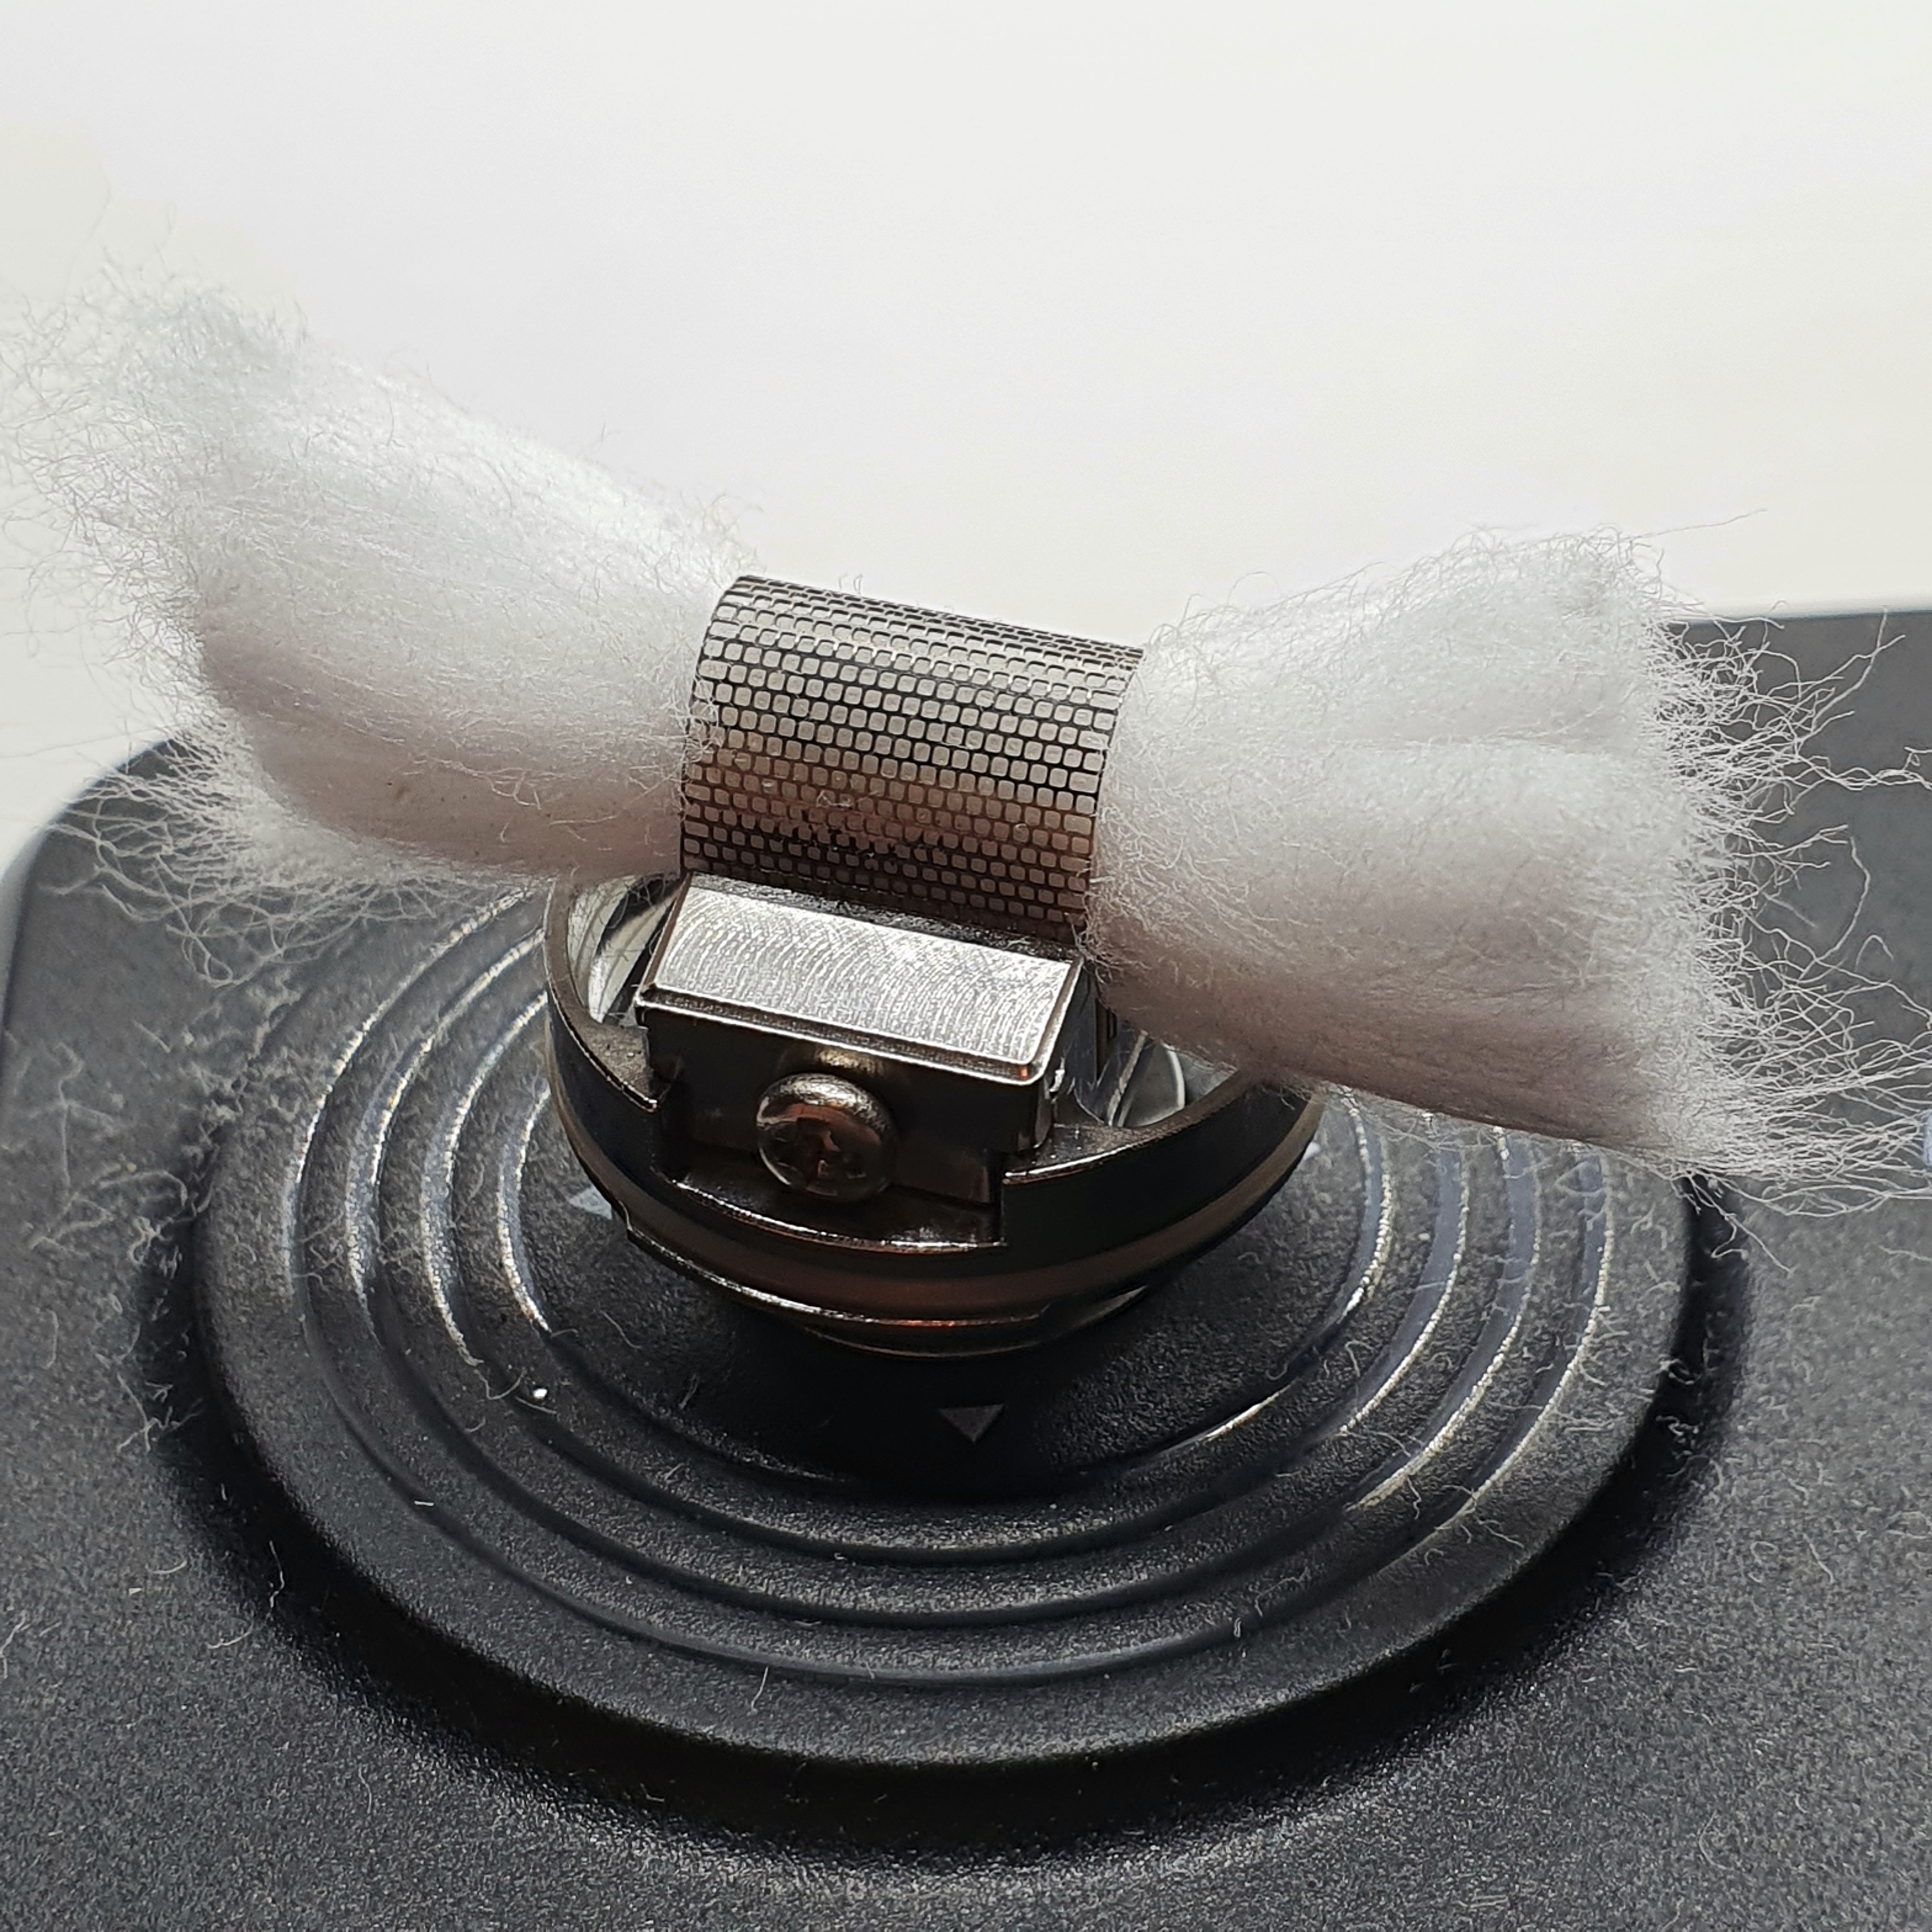
The mesh deck has two spring loaded clamps to install your mesh strip. Each clamp is secured with a Phillips head screw. You get a coil bending tool in the box to help you shape your mesh strip.
Once the mesh has been wrapped around the tool you just slide the mesh strip into the clamps and tighten down. A quick dry burn at a low wattage will clean any impurities off the mesh and ensure there are no hot spots.
You can use the included shoelace cotton as wicking or your own cotton. Once the cotton has been inserted underneath the mesh strip you can thin the tails and trim the excess from the ends. My mistake when first wicking was not leaving a long enough tail of cotton. Finally tuck the cotton tails into the wells on either side. You can check you have covered the wicking port holes sufficiently by looking on the bottom of the build deck. You should see your cotton covering all of the holes.
You can now saturate your cotton and give the coil a pulse.
The deck is then pushed back into the bottom of the tank and the base screwed back into place.
The actual building on the mesh deck is very straight forward. If you have used mesh rebuildables before you won’t have any issues. If you are new with mesh just make sure to not cut your cotton too short. There is a step by step guide included in the mesh deck kit, which I should have followed on my first wicking attempt!
Building on the Aromamizer Plus V2: Postless Deck
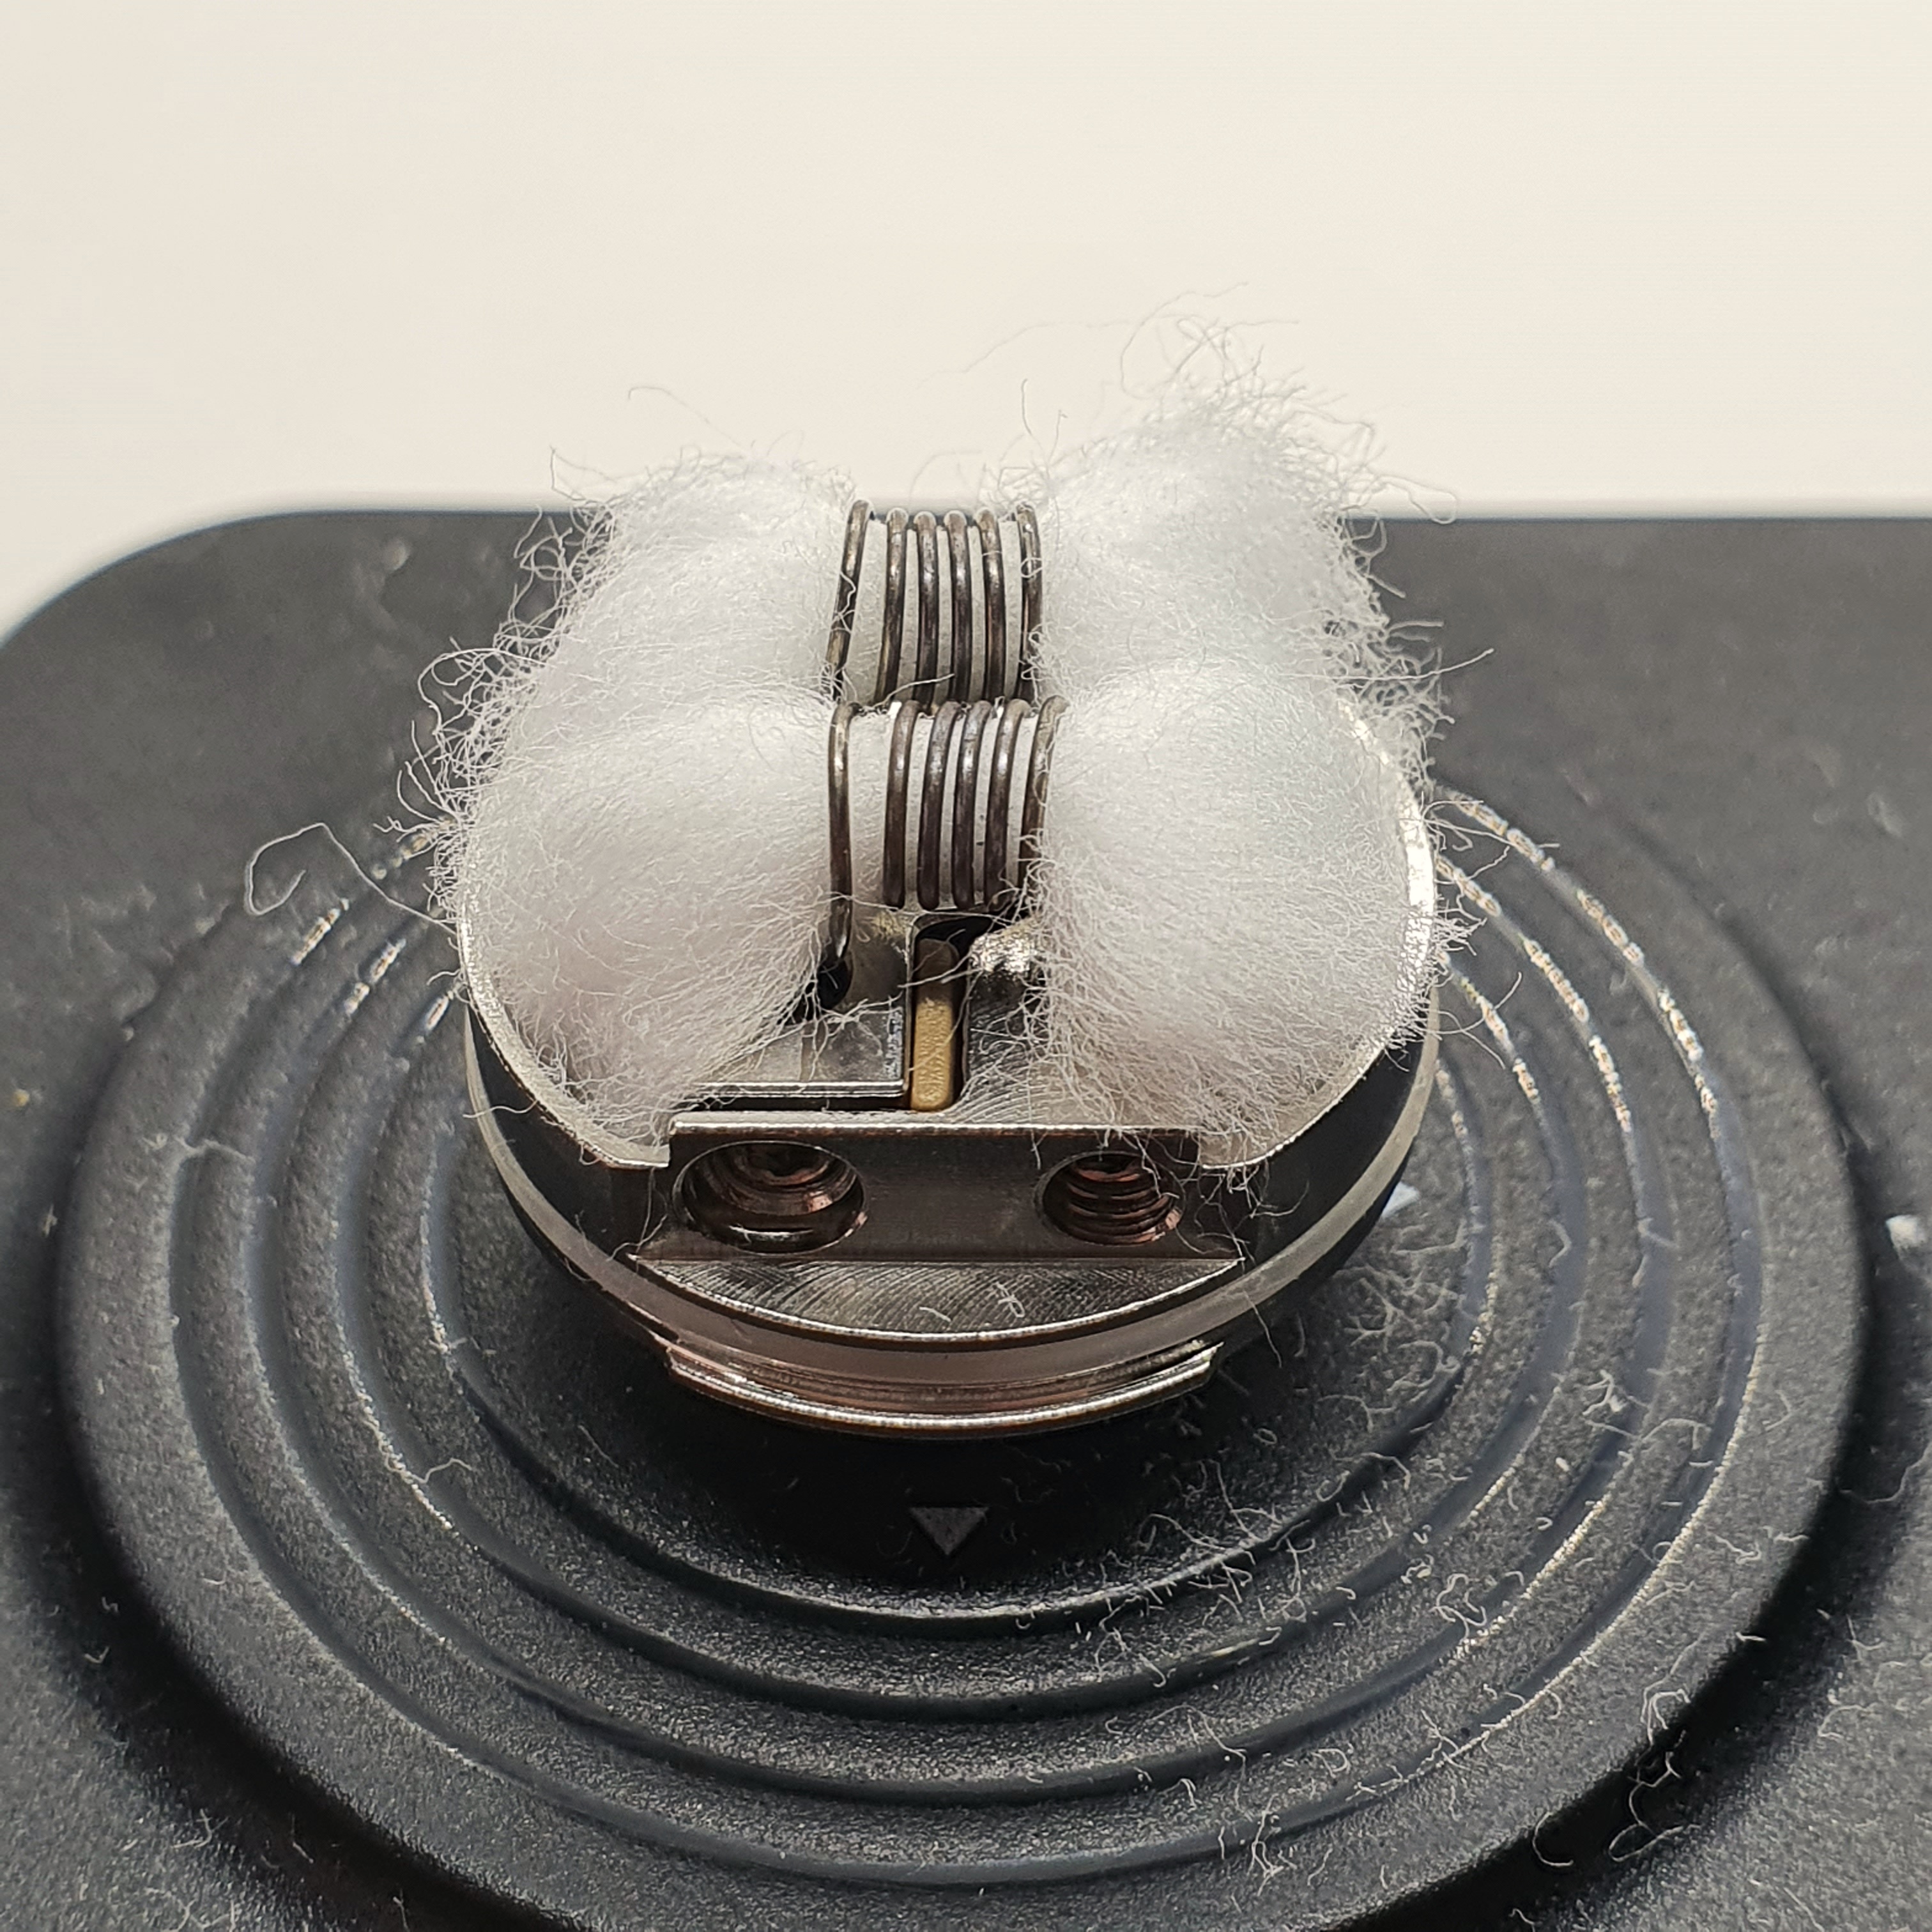
The postless deck has two hex screws on either side to unscrew and insert your coil legs. The coil leg holes are plenty big enough for some bigger coils. When I installed a build I kept it simple with two spaced micro coils.
I won’t walk through installing the coils as I’m sure most people who read this will have some experience with building. If not, a YouTube video can better show you how to do it than I can in words.
The building process was very straight forward on the postless deck as well as the mesh deck. Both decks are well made and the building process is not awkward at all.
I’m not very experienced with rebuilding mesh decks and on my first build I messed the wicking up. This resulted in juice flowing out of the airflow holes.
Learning from my initial mistake I made sure I cut the wicks a bit longer to cover the juice wicking holes on the deck. This was purely user error due to my inexperience with wicking mesh decks and since correctly wicking it has performed flawlessly.
Introduction
The Steam Crave Aromamizer Plus V2 is a new version of the original Aromamizer Plus, which was a firm favourite with RDTA fans. It is a 30mm diameter rebuildable dripping tank which allows you to switch out the build deck for other compatible build decks. This highly versatile tank allows you to use a dual postless deck, a mesh deck, a single coil deck, a series deck, a velocity style deck and even switch it to an RDA and use for dripping or squonking. I was sent the advanced kit for review which includes a dual postless deck, an additional mesh deck and an extender for the tank, which takes the capacity from an already huge 8ml all the way to a staggering 16ml capacity.
Disclaimer: this kit was sent to me by Steam Crave for review.
Box Contents
- Aromomizer Plus V2 tank (Dual Coil Postless Deck installed)
- Spare 8ml glass section
- Spare o-rings and screws
- T shaped tool
- 8ml metal extension tube
- 2 x 6mm chimney reducers
- Mesh Deck Kit
Specifications
- 30mm diameter
- 50mm height (standard configuration)
- 70mm height (with extension tube installed)
- Dual Coil Postless Deck
- Mesh Deck
- Optional Single Coil Deck, Series Deck, Velocity Style Deck
- 8ml juice capacity (16ml with extension tube installed)
Design & Build Quality
The Aromamizer Plus V2 is a 30mm diameter RDTA and has an 8ml juice capacity in its standard configuration. If you add on the metal extender, which comes in the advanced kit, it will give you a huge 16ml juice capacity.
It comes with a dual postless deck as standard and also includes an additional mesh deck in the advanced kit.
You can also use decks from the V1 Aromomizer or you can purchase them separately if you weren’t an owner of the V1. The additional decks available are a single coil, series dual, velocity style deck and a new single coil deck which has recently been released.
The tank is available in either stainless steel, gunmetal or black.
You get a replacement glass in the box as well as two chimney reducers for restricting the airflow from the chamber.
The tank has an 810 resin drip tip, which is push fit and has an o-ring on the inside of the top cap. I found the drip tip to be very comfortable when in use, but you have the option of switching it out for your own drip tip. The o-rings are on the inside of the top cap so you can use drip tips which don’t have o-rings on them.
The top cap itself is a screw cap which turns smoothly, is nicely machined and has an engraving on the top with the tank name. It also has a section of knurling on either side to allow you to grip the cap when unscrewing.
When you remove the top cap you have two huge kidney shaped fill ports which sit in a trough a couple of millimetres below the rim of the top of the tank. I had no issues filling from a really chunky nozzle on a 250ml bottle of liquid.
If you want to use one of the chimney reducers you pop it down into the chimney here. This is also where you screw on the metal extender tube if you want to use it.
The juice flow control ring sits below the glass section of the tank and turns nice and smoothly, has grips on either side and has a stopper at both the open and closed position.
The airflow control ring sits below the juice control ring. It has three rows of honeycomb style airflow holes which you can close down as you wish. There are lots of options for airflow here, especially with the included chimney reducers to further tailor the airflow to your liking and the airflow ring can be flipped over as well so you choose where to direct the airflow as you wish. The airflow on the Aromamizer Plus V2 is very smooth and not turbulent at all, even when fully open.
Personally I prefer a more restrictive vape so used the chimney reducer and had one row of airflow open. This was perfect for me, but without the chimney reducer and three rows of airflow you can go a lot more open. Closing down the airflow to just one hole with the chimney reducer installed even gives you the option for a loose MTL or very restrictive DTL vape.
Compared to the Aromomizer V1 the airflow and juice control rings have been flipped around, so your airflow is on the bottom. I prefer this setup as you’re not trying to turn the airflow ring between the glass and juice control ring, it’s readily available at the bottom.
The base of the tank has knurling all the way around to enable you to grip while unscrewing the base, which was also not present on the Aromomizer V1. The machining on the threads of the base is spot on, giving a very smooth turn when screwing or unscrewing the base.
Removing the base of the tank allows you to pull out the build deck. You can do this with a tank full of juice. By turning the tank upside down first, all the juice flows back into the tank. The deck can then be removed without spilling any liquid. This allows you to swap builds and decks at will.
The mesh deck included with the advanced kit doesn’t feature a ceramic spring plate for the cotton to sit on under the mesh strip. I have found that cotton does not collapse even without the ceramic spring plate, so it shows it’s not really needed as long as you put enough cotton under the mesh strip.
Building on the Aromamizer Plus V2: Mesh Deck
The mesh deck has two spring loaded clamps to install your mesh strip. Each clamp is secured with a Phillips head screw. You get a coil bending tool in the box to help you shape your mesh strip.
Once the mesh has been wrapped around the tool you just slide the mesh strip into the clamps and tighten down. A quick dry burn at a low wattage will clean any impurities off the mesh and ensure there are no hot spots.
You can use the included shoelace cotton as wicking or your own cotton. Once the cotton has been inserted underneath the mesh strip you can thin the tails and trim the excess from the ends. My mistake when first wicking was not leaving a long enough tail of cotton. Finally tuck the cotton tails into the wells on either side. You can check you have covered the wicking port holes sufficiently by looking on the bottom of the build deck. You should see your cotton covering all of the holes.
You can now saturate your cotton and give the coil a pulse.
The deck is then pushed back into the bottom of the tank and the base screwed back into place.
The actual building on the mesh deck is very straight forward. If you have used mesh rebuildables before you won’t have any issues. If you are new with mesh just make sure to not cut your cotton too short. There is a step by step guide included in the mesh deck kit, which I should have followed on my first wicking attempt!
Building on the Aromamizer Plus V2: Postless Deck
The postless deck has two hex screws on either side to unscrew and insert your coil legs. The coil leg holes are plenty big enough for some bigger coils. When I installed a build I kept it simple with two spaced micro coils.
I won’t walk through installing the coils as I’m sure most people who read this will have some experience with building. If not, a YouTube video can better show you how to do it than I can in words.
The building process was very straight forward on the postless deck as well as the mesh deck. Both decks are well made and the building process is not awkward at all.
I’m not very experienced with rebuilding mesh decks and on my first build I messed the wicking up. This resulted in juice flowing out of the airflow holes.
Learning from my initial mistake I made sure I cut the wicks a bit longer to cover the juice wicking holes on the deck. This was purely user error due to my inexperience with wicking mesh decks and since correctly wicking it has performed flawlessly.