gkenney
Member For 4 Years
Member For 3 Years
Member For 2 Years
Member For 1 Year
Member For 5 Years
The following series of pictures shows the steps taken to put a DNA 40 board into a stainless ZNA clone. Nikkita6 identified the manufacturer as Kangxin. Instead of keeping these images on my hard drive (and useful only to me) I decided to put them up so they might help someone else interested in this swap. This has been done successfully by a number of people so it isn't ground breaking but it still may be useful as a reference.
The folio:
1. The clone as received:

2. Removing the tube and looking at the insert cover with its 12/2014 Date of Manufacture tamper sticker:

3. Preparing to remove the plastic insert after taking off the tube connector:

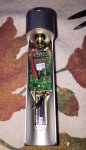
4. Inside the skull:

5. The hot glue removed. The body of this clone has been well thought out and nicely designed. I consider the addition of tapped grounding screw holes above the screen, on either side, and just below the base of the board to be an upgrade. The wiring is concisely laid out making it very easy to disconnect the wiring:

6. The board removed from the body:


I reused the plastic board cover with hot glue attached and it positioned the buttons perfectly while protecting the Evolv board from frying itself with a short . . . (not that I would be so careless as to have this happened to me before )
)

7. DNA 40 and OEM boards side by side:

Reached my file upload limit for this post will follow-on in the next post starting with step 8.
The folio:
1. The clone as received:
2. Removing the tube and looking at the insert cover with its 12/2014 Date of Manufacture tamper sticker:
3. Preparing to remove the plastic insert after taking off the tube connector:
4. Inside the skull:
5. The hot glue removed. The body of this clone has been well thought out and nicely designed. I consider the addition of tapped grounding screw holes above the screen, on either side, and just below the base of the board to be an upgrade. The wiring is concisely laid out making it very easy to disconnect the wiring:
6. The board removed from the body:
I reused the plastic board cover with hot glue attached and it positioned the buttons perfectly while protecting the Evolv board from frying itself with a short . . . (not that I would be so careless as to have this happened to me before
)7. DNA 40 and OEM boards side by side:
Reached my file upload limit for this post will follow-on in the next post starting with step 8.
Attachments
Last edited:


