NoFog
Member For 4 Years
Hi!
Mesh coils are probably one of the biggest milestones in vaping since the sub-ohm tank. Pretty much all modern coil heads are mesh, pods and the controversial disposables are also all mesh, and it's pretty easy to guess why. Mesh coils simply work better. They heat up and cool down instantly, distribute heat evenly, taste amazing and most importantly are very battery efficient, meaning very little power is required to produce an equivalent amount of smoke compared to a more traditional coil, which means smaller devices and more vape time.
Now, while there are rebuildable mesh atomizers, they are all pretty much in the DL and cloudchaser territory with very low resistances, meaning using them in small devices is not feasible. If you want the MTL mesh experience your only option is a standard tank or some cartridge system, both of them rather expensive compared to DIY....UNLESS?
What if I told you you can get dirt cheap mesh coils in pretty much any resistance imaginable and use them in any atomizer you want?
Yes that's correct, and this is a tutorial on how to do it.
1) Getting the coils
So it turns out you can buy on the internet coilhead rebuild kits for some of the most popular coilheads used. Some contain just the mesh coils, some also contain cotton and o-rings and various tools. We are only interested in the mesh coils so those are the ones you are after
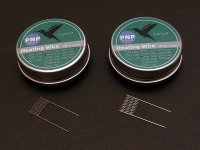
I bought theese on Ali and payed around 3€ per 10 coils but I've seen better deals since then (eBay is full of them as well). Theese come in a plethora of sizes, from absolutely tiny to pretty large ones so be careful what you buy so it fits into your tank. I also recommend buying ones with long leads, as to why will be obvious later.
2) Forming the coil
Now, we need to form this into something that resembles a standard coil. Theese things are pretty delicate so be gentle. Depending on the post deck situation in your particular atomizer you may want the leads to face a different direction than me. I am building on the Requiem RTA.
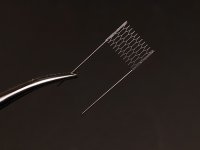
Bend one lead 90 degrees outwards at the point it touches the mesh and bend the other lead 180 degreess so it runs parallel to itself. Next give it a 90degree turn outwards at the opposite corner of the first lead. If you roll the mesh around your coiling rod, you should end up with something like this:
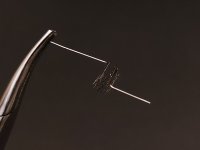
Congratulations! You have a working coil. Feel free to try and install it, and maybe pulse some power through it. You will be surprised how little power thsee things need and how instantly they light up. I would not recommend dry firing with more than 10W or you might melt it! Also, make sure that the two parts where the leads are attached to the wick don't touch, otherwise you will have a short. To maximize vapor production try to have the gap facing away from your airflow channels.
3) Wicking
If you were to try to wick this coil the standard way you would quickly realize that it's not possible, the sharp edges on the sides bind into the cotton and prevent it from going through. Fortunately we have the gap. Roll your cotton and with the coil removed from the deck unwrap it and place your roll inside the coil, then wrap back up. This is what that looks like: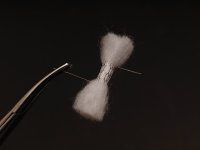
Now the last thing to do is to place your coil in the deck. The last tip I will give you is that you can push on one of the leads while the other is screwed in to minimize the gap (make sure you don't have a short), and squeeze the cotton in, so it makes good contact with the coil. Here is the final build already juiced up: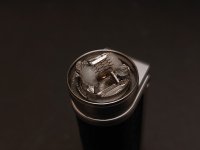
I hope you found this helpful. Share if you like my idea. I am looking forward to the discussion.
Mesh coils are probably one of the biggest milestones in vaping since the sub-ohm tank. Pretty much all modern coil heads are mesh, pods and the controversial disposables are also all mesh, and it's pretty easy to guess why. Mesh coils simply work better. They heat up and cool down instantly, distribute heat evenly, taste amazing and most importantly are very battery efficient, meaning very little power is required to produce an equivalent amount of smoke compared to a more traditional coil, which means smaller devices and more vape time.
Now, while there are rebuildable mesh atomizers, they are all pretty much in the DL and cloudchaser territory with very low resistances, meaning using them in small devices is not feasible. If you want the MTL mesh experience your only option is a standard tank or some cartridge system, both of them rather expensive compared to DIY....UNLESS?
What if I told you you can get dirt cheap mesh coils in pretty much any resistance imaginable and use them in any atomizer you want?
Yes that's correct, and this is a tutorial on how to do it.
1) Getting the coils
So it turns out you can buy on the internet coilhead rebuild kits for some of the most popular coilheads used. Some contain just the mesh coils, some also contain cotton and o-rings and various tools. We are only interested in the mesh coils so those are the ones you are after

I bought theese on Ali and payed around 3€ per 10 coils but I've seen better deals since then (eBay is full of them as well). Theese come in a plethora of sizes, from absolutely tiny to pretty large ones so be careful what you buy so it fits into your tank. I also recommend buying ones with long leads, as to why will be obvious later.

2) Forming the coil
Now, we need to form this into something that resembles a standard coil. Theese things are pretty delicate so be gentle. Depending on the post deck situation in your particular atomizer you may want the leads to face a different direction than me. I am building on the Requiem RTA.
Bend one lead 90 degrees outwards at the point it touches the mesh and bend the other lead 180 degreess so it runs parallel to itself. Next give it a 90degree turn outwards at the opposite corner of the first lead. If you roll the mesh around your coiling rod, you should end up with something like this:

Congratulations! You have a working coil. Feel free to try and install it, and maybe pulse some power through it. You will be surprised how little power thsee things need and how instantly they light up. I would not recommend dry firing with more than 10W or you might melt it! Also, make sure that the two parts where the leads are attached to the wick don't touch, otherwise you will have a short. To maximize vapor production try to have the gap facing away from your airflow channels.
3) Wicking
If you were to try to wick this coil the standard way you would quickly realize that it's not possible, the sharp edges on the sides bind into the cotton and prevent it from going through. Fortunately we have the gap. Roll your cotton and with the coil removed from the deck unwrap it and place your roll inside the coil, then wrap back up. This is what that looks like:

Now the last thing to do is to place your coil in the deck. The last tip I will give you is that you can push on one of the leads while the other is screwed in to minimize the gap (make sure you don't have a short), and squeeze the cotton in, so it makes good contact with the coil. Here is the final build already juiced up:

I hope you found this helpful. Share if you like my idea. I am looking forward to the discussion.
Last edited:

