Vapefly Brunhilde MTL RTA was sent to me for review from Sourcemore
Here’s a coupon code so you can get it at special deal for only $23.99!! Coupon code is: VBMR
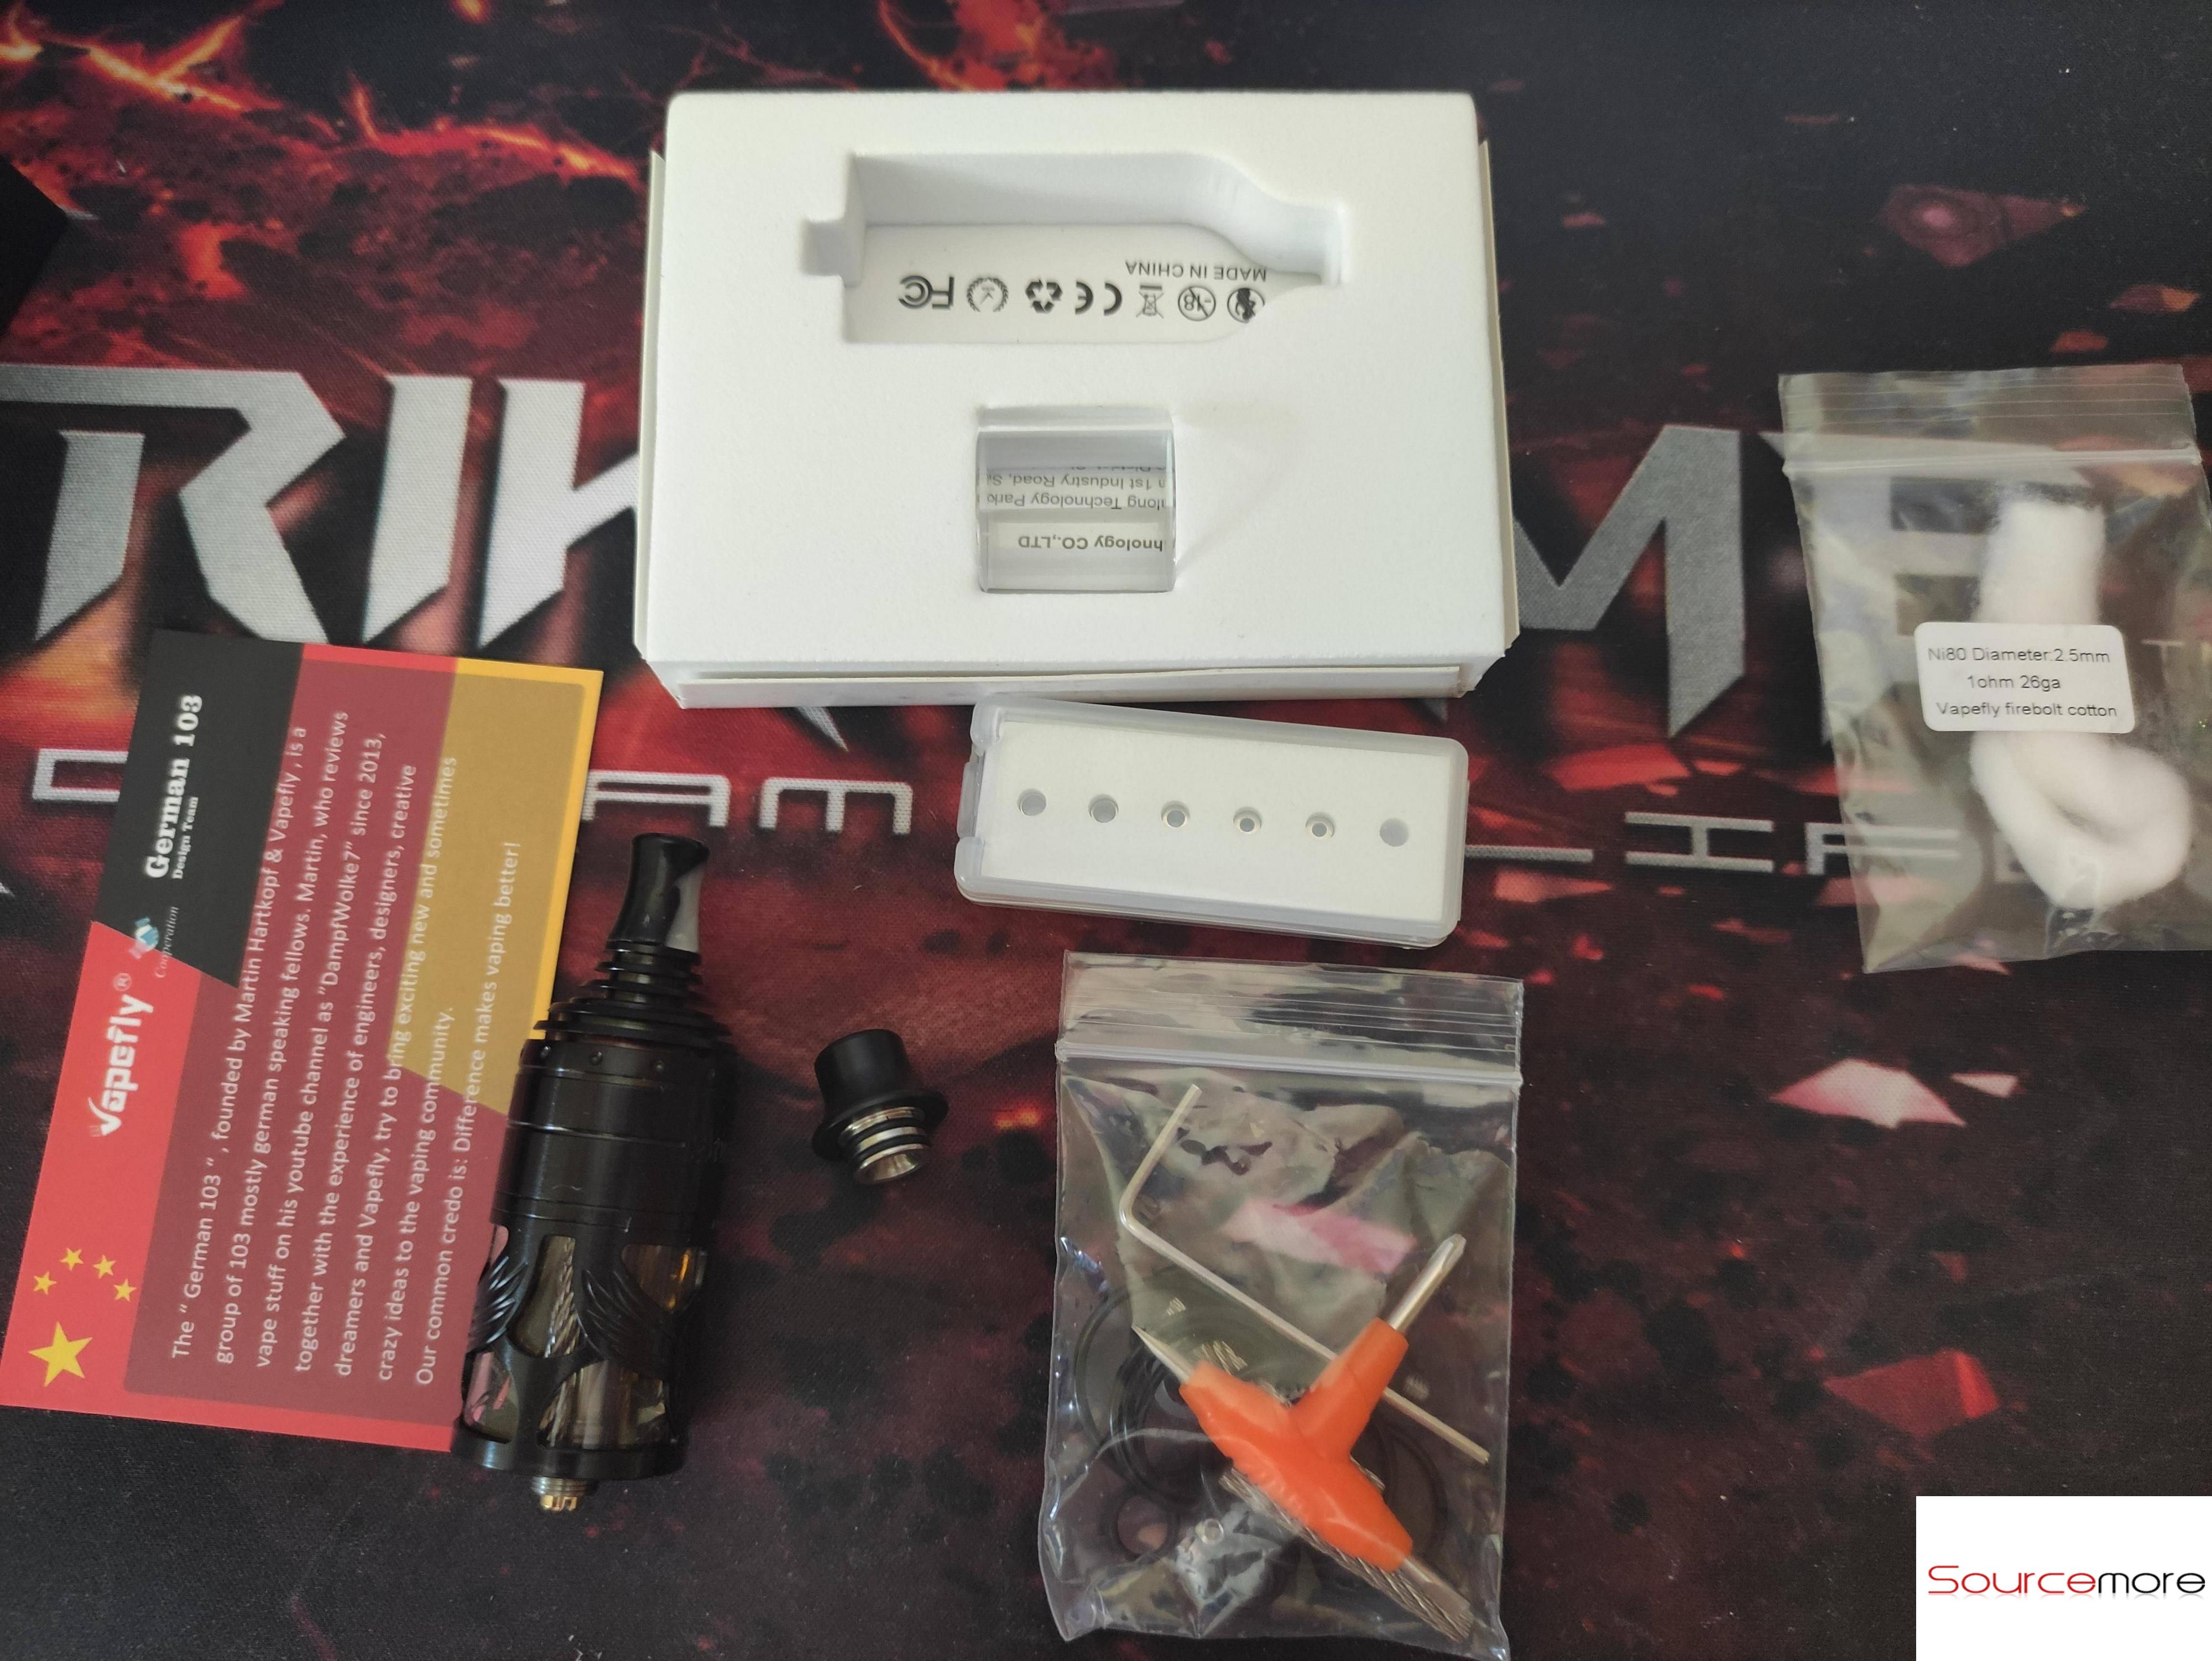
Inside The Box
• Brunhilde MTL RTA
• 6x Airflow Inserts
• 2x Drip Tips (1 preinstalled, 1 extra with radiator fins)
• T-Piece Tool
• Allen Key
• 2x Spare Steel Rope
• 2x Coils (Ni80, 2.5mmID, 1Ω)
• 2x Vapefly Firebolt Cotton
• Spare O-Rings and 8 (!) Spare Grub Screws
• User Manual

Aesthetics
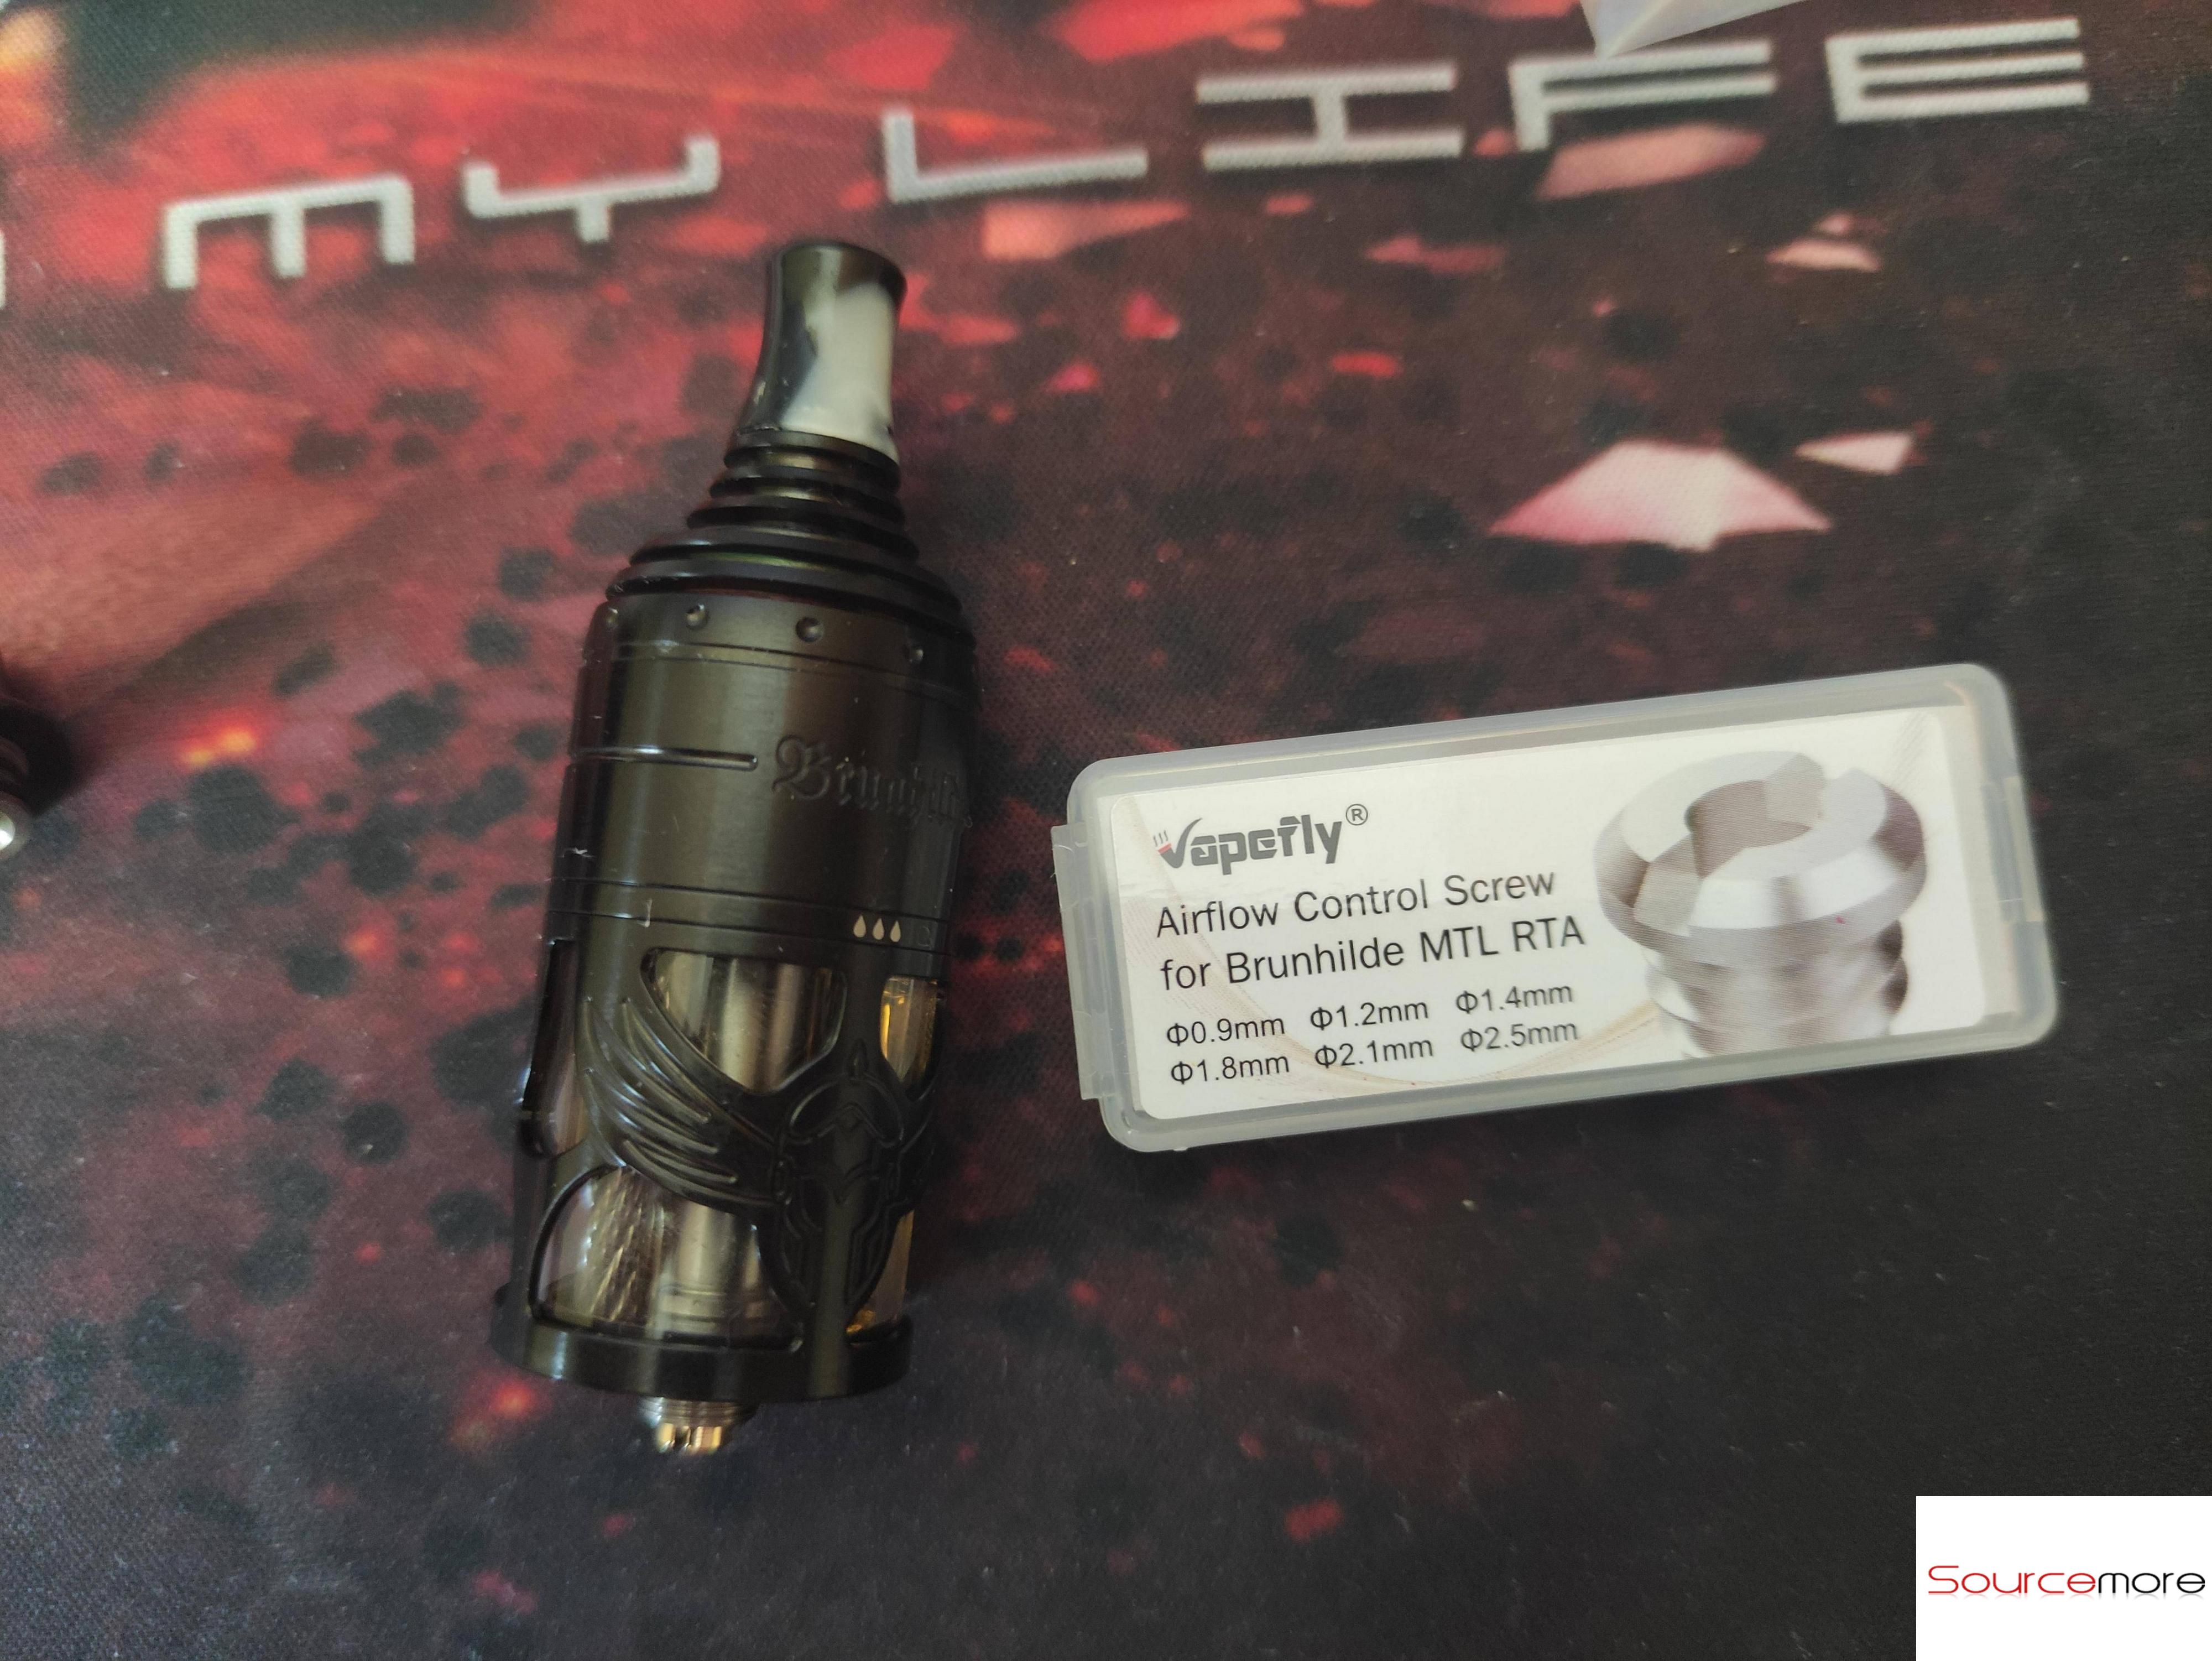
The Brunhilde comes in a cardboard box with a sleeve which is a rather nice shade of beige. I received the Stainless Steel version and while i have no complaints i must say the Gunmetal is the pick for me. The colour options are Stainless Steel, Black and Gunmetal, up top is a short shapely 510 drip tip which is Black on all versions and looks to be delrin. The Brunhilde is 23.00mm in diameter and a whopping 65.5mm in height, it's a skyscraper like it's bigger brother just with a smaller diameter. The tallness and overall look of the Brunhilde will separate people into three camps, those that think it's a monstrosity, those that really like it and those like me who like it but strictly not to be seen in public, just too tall for out and about. The RTA has a hell of a lot of metal to it and all machining and quality of finish is top notch, not just on the outside but also deck and inside the tank itself. I'm not going to get into an argument whats high end but does it need to have at least 3 figures to join the club. The bottom 40% is the glass section which has an outer cage which is 2 crests one on the front and the same on the back which shape leaves plenty of cutout sections to see both your liquid and the Steel replenishing rods, the crests also have some nice engraving on them, very nice. We then see the joint of the metal sleeve and further up what looks to be another joint but is just a machined groove for aesthetics. On the sleeve low down to one side we have a 3.2mm diameter hole, this gets either lined up with the airflow hole which directs air under the deck or can be turned 180 degrees to line up with the fill port. At the top of the sleeve/top-cap we have a ring of round indentations which from any sort of distance looks like studding, above this the top-cap steps to the drip tip.

Brunhilde MTL RTA Specs and Features:
Diameter: 23.0mm
Height with Drip Tip: 65.50mm
Coil Rebuildable: single Coil Building
Capacity: 2ml(TPD Edition) / 5ml(Standard Edition)
Airflow Adjustable: bottom
Fill Liquid: Side
Automatic e-juice transfer
Six levels airflow meet your different needs
Premium Stainless steel wires from Germany
Easy single coil building, best coil position
Convenient side filling design
5ml large capacity for all day vaping (TPD 2ml version available, silicone reduction section fitted)
Thread: 510
Colours: Stainless Steel, Gunmetal, Black
The Airflow
The German 103 team have managed to keep the original design by just getting rid of the honeycomb side airflow and keeping the hole on the side of the deck to allow air to travel underneath the deck and is then controlled by using inserts that screw into the deck directly underneath the coil. On the deck like the original design we have a hole each side the only difference is the holes are 3.2mm instead of 3.0mm but that is more to do with filling the tank.
One hole is your fill port and the opposite directs air as described, on the outer sleeve we have just one 3.2mm hole so to fill it gets lined up with the fill port which is indicated by liquid drops and during normal operation it needs rotating 180 degrees to line up with the airflow hole.
You receive six inserts in a case and also having the choice of not installing one gives you seven options, you can also micro manage the airflow further by slightly adjusting the outer airflow hole alignment. The different airflow outlet diameters of the inserts are:
0.9mm
1.2mm
1.4mm
1.8mm
2.1mm
2.5mm
Filling
The Brunhilde uses a side fill method which means the sleeve just needs rotating 180 degrees to reveal the fill port so no need to take the sleeve off. On the outside of the deck section as mentioned in the airflow section, we have a 3.2mm hole each side and a 3.2mm hole on the outer sleeve. While vaping the hole on the outer sleeve should be lined up with the airflow hole and when you need to fill you turn the sleeve to line it up with the fill port, very simple and sounds great, but it's far from ideal.
On Vapefly sites they do emphasise the size of the fill port has been increased but we are only talking by 0.2mm which makes little difference. The problem really isn't the size of the hole it's simply side-fill isn't that practical. Most nozzles will fit you just have to really take your time and it can get a bit messy. Using a needle nose bottle is a good solution making it mess free but filling a 5ml capacity tank with a needle nose takes quite some time, at least once it's filled you don't need to refill for a while.
The Deck and Build
It's a very user friendly deck, first make sure the steel replenishing rods are lifted slightly and also screw in place whichever insert you want to use if any.
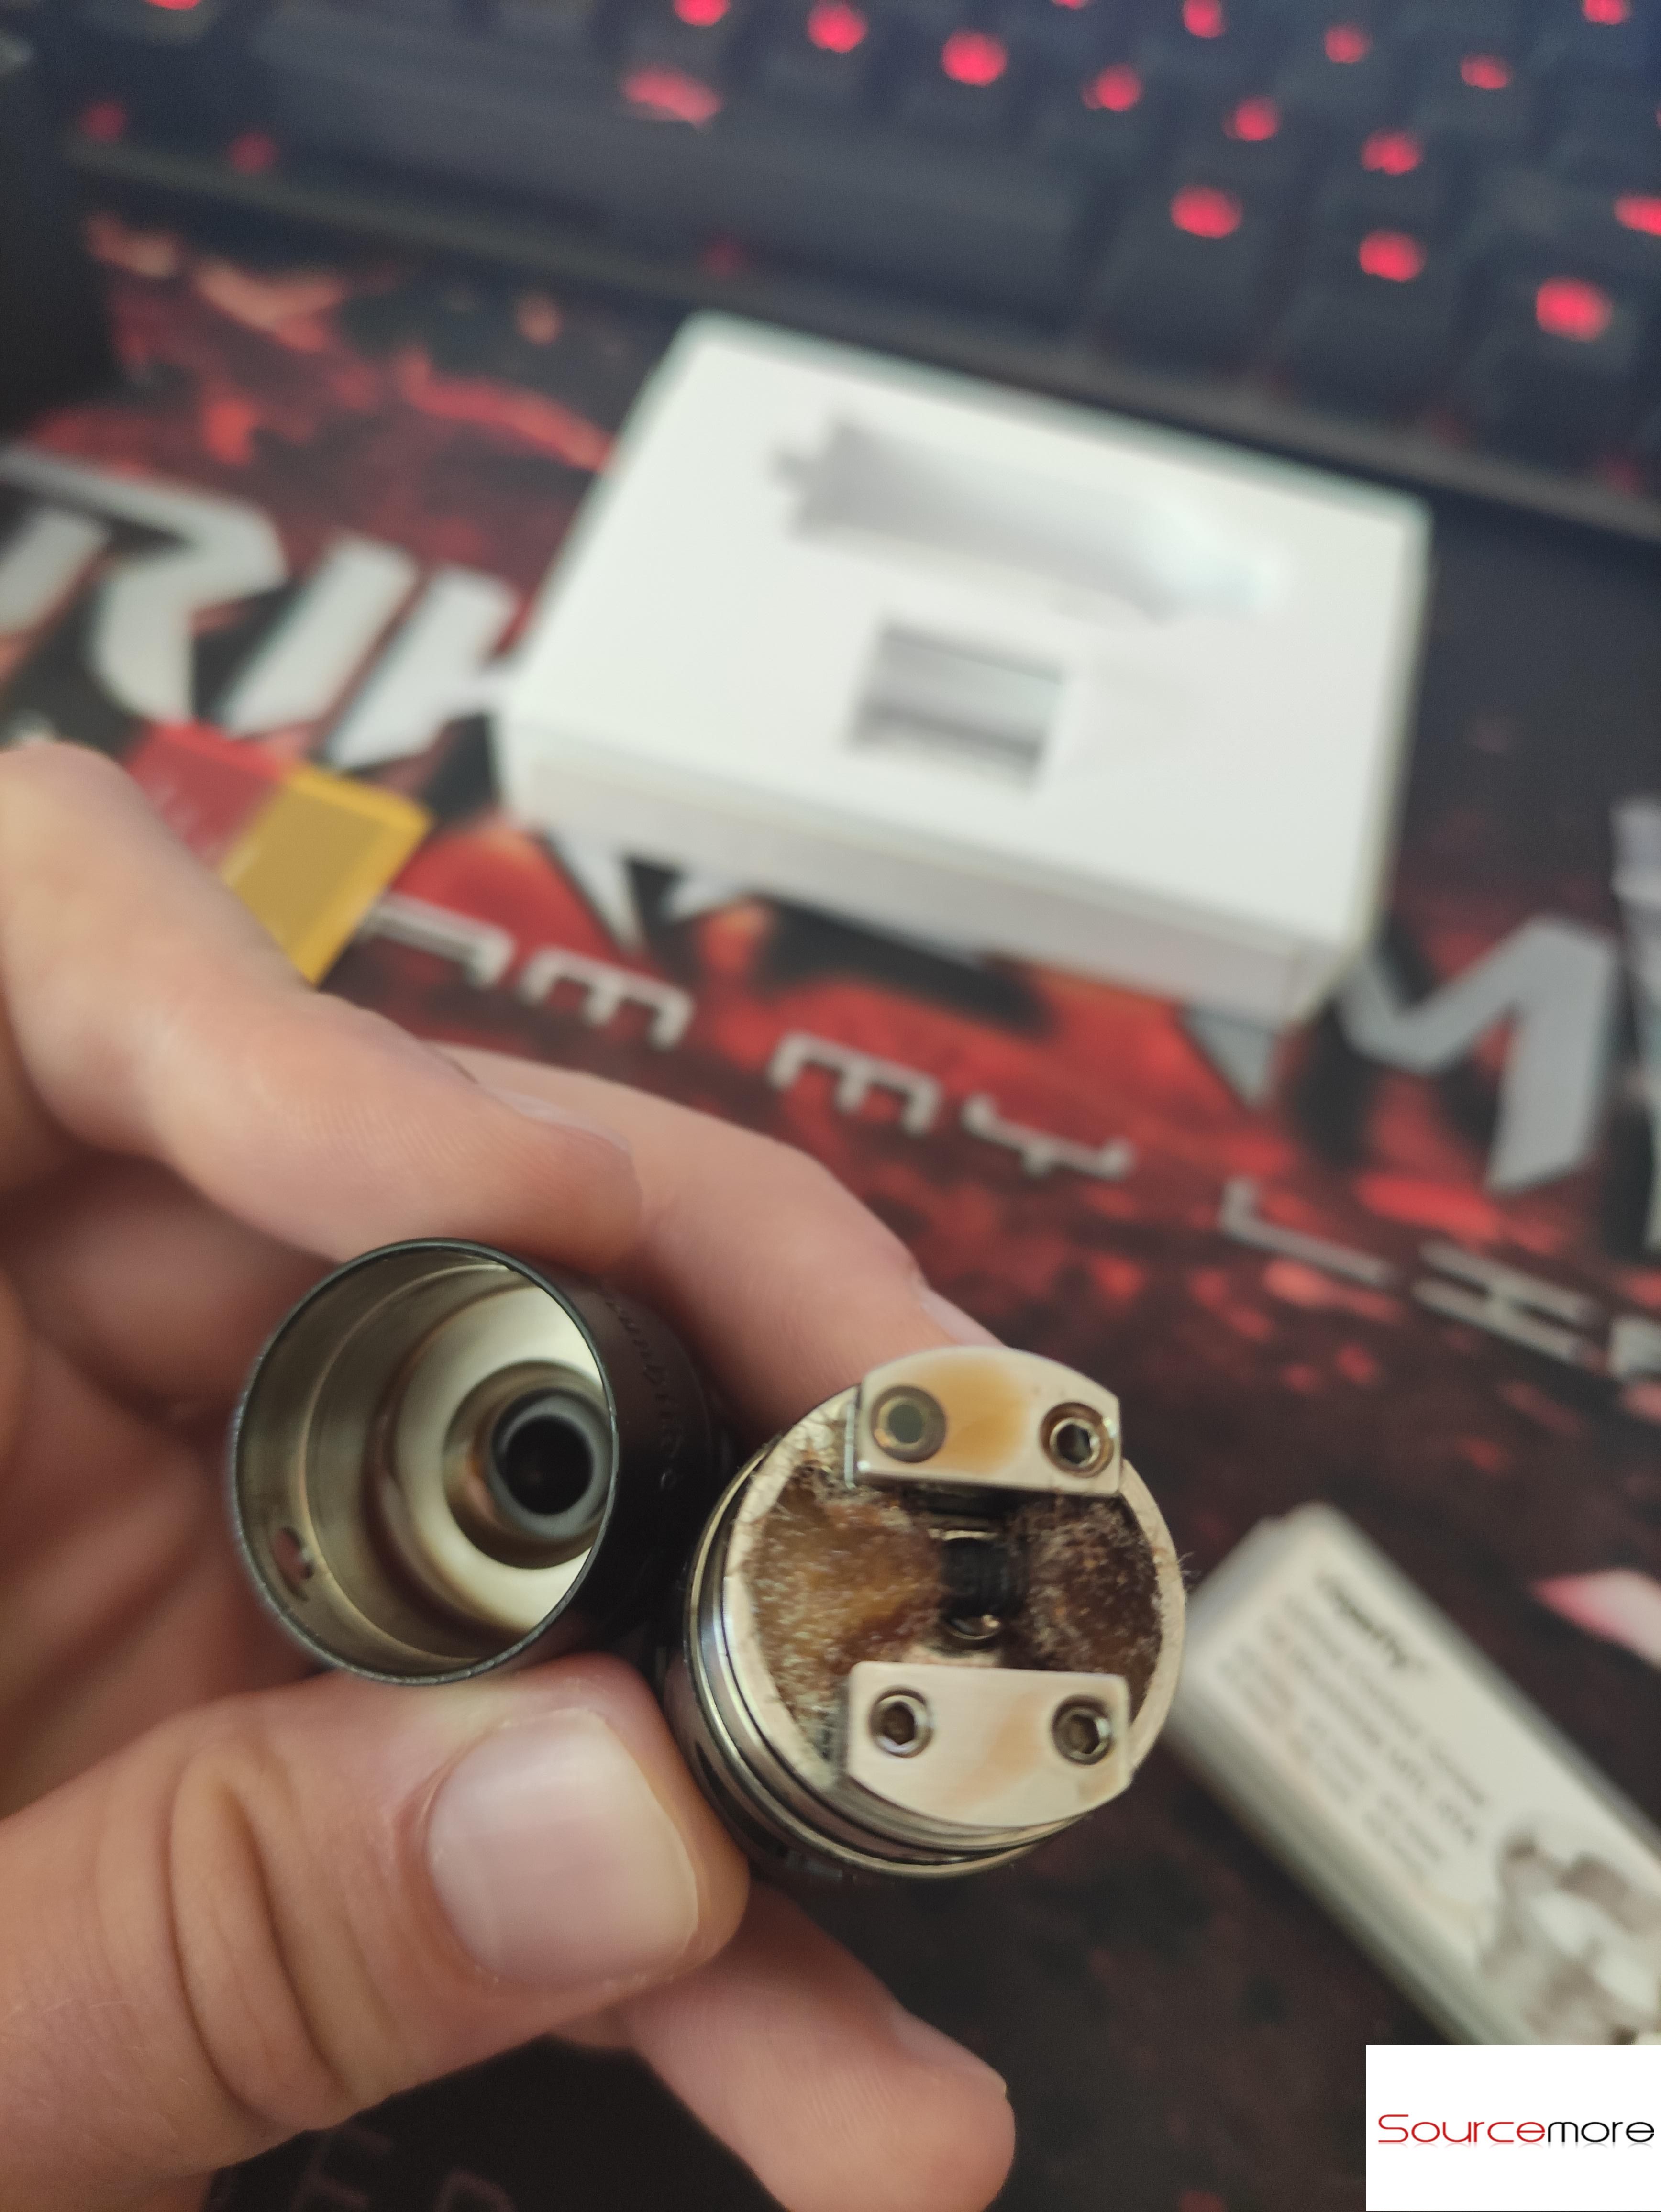
We have 2 large posts facing each other with a terminal to either side so 4 terminals in total so it doesn't matter which way the coil is wrapped. Your coil leads just slide in the terminals from the side and then the hex screws (my favourite) are fastened from above. Holding your coil in place while fastening the leads is easy enough and a coiling rod or fit for purpose tool can be used afterwards to improve the position if needed. Then just snip your leads and wick as if you are wicking an RDA but leave enough cotton to fill the channels.
I did 2 builds, the one pictured using one of the supplied round wire coils and the other using a fused clapton and both builds were a piece of cake!

How It Vapes And Final Thoughts
The first thing to mention is you can't swap inserts on the fly as they need screwing in and out directly underneath the coil, after saying that with a bit of use people would know which insert they prefer with which builds but at first you have to rely on an educated guess. Doing 2 builds but trying to get a good knowledge of the airflow spectrum i used the second smallest with the supplied 1.0ohm coil and the second biggest with the 0.7ohm fused clapton i used.
The draw with the second smallest insert with the hole on the sleeve fully open i got not a super tight pull but what i would consider s cigarette draw, when i closed the outer hole slightly the draw became tighter still so with a smaller insert available those that like a really tight draw should have no issues with this.
When using the second largest insert this gave me the exact loose MTL draw i prefer and with both a larger insert and the option of using no insert at all even a restricted lung hit will be perfectly possible.
The flavour i have absolutely no complaints about, i have had better but this is still giving well above average flavour with the fused clapton edging it over the tighter draw i was using with the supplied coil which surprised me slightly. When it came to wicking lifting the rods slightly seemed to do the trick again as i had no issues with my cotton getting supplied with liquid in fact apart from it's a large tank which might put some people off and time needs taken when filling i have absolutely no complaints, it's a winner!
Here’s a coupon code so you can get it at special deal for only $23.99!! Coupon code is: VBMR
Inside The Box
• Brunhilde MTL RTA
• 6x Airflow Inserts
• 2x Drip Tips (1 preinstalled, 1 extra with radiator fins)
• T-Piece Tool
• Allen Key
• 2x Spare Steel Rope
• 2x Coils (Ni80, 2.5mmID, 1Ω)
• 2x Vapefly Firebolt Cotton
• Spare O-Rings and 8 (!) Spare Grub Screws
• User Manual

Aesthetics
The Brunhilde comes in a cardboard box with a sleeve which is a rather nice shade of beige. I received the Stainless Steel version and while i have no complaints i must say the Gunmetal is the pick for me. The colour options are Stainless Steel, Black and Gunmetal, up top is a short shapely 510 drip tip which is Black on all versions and looks to be delrin. The Brunhilde is 23.00mm in diameter and a whopping 65.5mm in height, it's a skyscraper like it's bigger brother just with a smaller diameter. The tallness and overall look of the Brunhilde will separate people into three camps, those that think it's a monstrosity, those that really like it and those like me who like it but strictly not to be seen in public, just too tall for out and about. The RTA has a hell of a lot of metal to it and all machining and quality of finish is top notch, not just on the outside but also deck and inside the tank itself. I'm not going to get into an argument whats high end but does it need to have at least 3 figures to join the club. The bottom 40% is the glass section which has an outer cage which is 2 crests one on the front and the same on the back which shape leaves plenty of cutout sections to see both your liquid and the Steel replenishing rods, the crests also have some nice engraving on them, very nice. We then see the joint of the metal sleeve and further up what looks to be another joint but is just a machined groove for aesthetics. On the sleeve low down to one side we have a 3.2mm diameter hole, this gets either lined up with the airflow hole which directs air under the deck or can be turned 180 degrees to line up with the fill port. At the top of the sleeve/top-cap we have a ring of round indentations which from any sort of distance looks like studding, above this the top-cap steps to the drip tip.

Brunhilde MTL RTA Specs and Features:
Diameter: 23.0mm
Height with Drip Tip: 65.50mm
Coil Rebuildable: single Coil Building
Capacity: 2ml(TPD Edition) / 5ml(Standard Edition)
Airflow Adjustable: bottom
Fill Liquid: Side
Automatic e-juice transfer
Six levels airflow meet your different needs
Premium Stainless steel wires from Germany
Easy single coil building, best coil position
Convenient side filling design
5ml large capacity for all day vaping (TPD 2ml version available, silicone reduction section fitted)
Thread: 510
Colours: Stainless Steel, Gunmetal, Black
The Airflow
The German 103 team have managed to keep the original design by just getting rid of the honeycomb side airflow and keeping the hole on the side of the deck to allow air to travel underneath the deck and is then controlled by using inserts that screw into the deck directly underneath the coil. On the deck like the original design we have a hole each side the only difference is the holes are 3.2mm instead of 3.0mm but that is more to do with filling the tank.
One hole is your fill port and the opposite directs air as described, on the outer sleeve we have just one 3.2mm hole so to fill it gets lined up with the fill port which is indicated by liquid drops and during normal operation it needs rotating 180 degrees to line up with the airflow hole.
You receive six inserts in a case and also having the choice of not installing one gives you seven options, you can also micro manage the airflow further by slightly adjusting the outer airflow hole alignment. The different airflow outlet diameters of the inserts are:
0.9mm
1.2mm
1.4mm
1.8mm
2.1mm
2.5mm
Filling
The Brunhilde uses a side fill method which means the sleeve just needs rotating 180 degrees to reveal the fill port so no need to take the sleeve off. On the outside of the deck section as mentioned in the airflow section, we have a 3.2mm hole each side and a 3.2mm hole on the outer sleeve. While vaping the hole on the outer sleeve should be lined up with the airflow hole and when you need to fill you turn the sleeve to line it up with the fill port, very simple and sounds great, but it's far from ideal.
On Vapefly sites they do emphasise the size of the fill port has been increased but we are only talking by 0.2mm which makes little difference. The problem really isn't the size of the hole it's simply side-fill isn't that practical. Most nozzles will fit you just have to really take your time and it can get a bit messy. Using a needle nose bottle is a good solution making it mess free but filling a 5ml capacity tank with a needle nose takes quite some time, at least once it's filled you don't need to refill for a while.
The Deck and Build
It's a very user friendly deck, first make sure the steel replenishing rods are lifted slightly and also screw in place whichever insert you want to use if any.
We have 2 large posts facing each other with a terminal to either side so 4 terminals in total so it doesn't matter which way the coil is wrapped. Your coil leads just slide in the terminals from the side and then the hex screws (my favourite) are fastened from above. Holding your coil in place while fastening the leads is easy enough and a coiling rod or fit for purpose tool can be used afterwards to improve the position if needed. Then just snip your leads and wick as if you are wicking an RDA but leave enough cotton to fill the channels.
I did 2 builds, the one pictured using one of the supplied round wire coils and the other using a fused clapton and both builds were a piece of cake!

How It Vapes And Final Thoughts
The first thing to mention is you can't swap inserts on the fly as they need screwing in and out directly underneath the coil, after saying that with a bit of use people would know which insert they prefer with which builds but at first you have to rely on an educated guess. Doing 2 builds but trying to get a good knowledge of the airflow spectrum i used the second smallest with the supplied 1.0ohm coil and the second biggest with the 0.7ohm fused clapton i used.
The draw with the second smallest insert with the hole on the sleeve fully open i got not a super tight pull but what i would consider s cigarette draw, when i closed the outer hole slightly the draw became tighter still so with a smaller insert available those that like a really tight draw should have no issues with this.
When using the second largest insert this gave me the exact loose MTL draw i prefer and with both a larger insert and the option of using no insert at all even a restricted lung hit will be perfectly possible.
The flavour i have absolutely no complaints about, i have had better but this is still giving well above average flavour with the fused clapton edging it over the tighter draw i was using with the supplied coil which surprised me slightly. When it came to wicking lifting the rods slightly seemed to do the trick again as i had no issues with my cotton getting supplied with liquid in fact apart from it's a large tank which might put some people off and time needs taken when filling i have absolutely no complaints, it's a winner!
