Can we give you some shades on your avatar or something? For being the coolest Mod on the forums!!


Can we give you some shades on your avatar or something? For being the coolest Mod on the forums!!
Now someone just needs to go through the trouble of animating a .gif of those two.
Now someone just needs to go through the trouble of animating a .gif of those two.

Tried monkeying around with this method on a blue screwdriver and it does make a tighter coil. Ordered that cheaper pin vise, thanks for the link. Surprised that no hardware stores around me carry one.
")
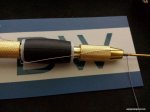
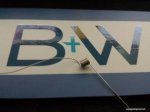
Just received the pin vise from Amazon and wanted to try this thing out. Drill bit doesn't quite work as I can't get the coil off, so I stuck a precision screwdriver in and that's where the finished coil comes from. Below is my first coil using this method, 10 wraps, 28g, 2mm screwdriver. Figured my new business card would make a good enough background.
Unwrap it, wind it, pinch it, torch it, install it, wick it, vape it, make sandwich whilst watching utube tutorials.

I sir.....LIKE FIRE!!!!! lolI'll take some of whatever that wonderful brandy you're sniffin'…no need to be torching a coil that mother nature's already made perfect with tension.
View attachment 6618
But I like your spirits.
Vape on!
The brandy for records sake, is Hine Extra Antique XO

Hey @MacTechVpr I have my pin-vises in hand and have tried wrapping a couple of coils since then.
Definitely need to work on not muffing my coils up during the mounting process, but I am thoroughly enjoying the grip these vises provide. I'll be editing this post later today with some photos of experiences today, thanks again for your massively helpful method.
Is there a trick to keep a micro coil from separating when installing? I typically do a 9/10 wrap on 3/32" drill bit and frequently end up with the coil separating when pushing the wire through the posts. I know they need to be placed a bit further away from the post to keep this from happening, but no matter how far away I attempt to install I still end up with the separation too often.
Most good hardware stores will have metal dowels in various metals. As I am a chain mailler, I have a set of metric carbon steel mandrels, but they are quite long.
Thanks again for the props. Are you the same otd on that other forum? lol
I've been trying to get things kickstarted on the underground but things are lagging. It's frustrating watching folks keep on pokin' around at getting it right, gloss right over things and miss the very simplest (and correct electrically) way of doin' it.
Could use some help, as you did, and thanks.
Good luck.
MacTechVpr. I have read, and re-read your posts over, and over. You are some kind of genius! Hat's off to you. Right now I don't have all of the necessary components to get started. But as soon as I do, I will give it a shot. Still not sure if I have enough brain matter to fully comprehend all of your wisdom. But at 55 I will just have to make do. Thanks So much for your help. Take care. Mark


All I can say is Amazing! Now, is there any chance you may be making a video?Even with a simple screwdriver holding the wire with tape and feeding directly off the spool it's easy and takes seconds…
View attachment 7203
View attachment 7202
However a pin vise and drill bits or drill blanks affords for leverage and control. Once you get that baseline, you get spoiled and it's repeatability and performance.
Good luck.
Hey Mac,I'm going to try and capture a couple of clips made by others, segments. That may be helpful to avoid adding opinion. You have plenty of time to refine your preferences once the dang thing works.
Believe me I had to REMOVE a lot of my own [prejudices] to get it right. We all do it. Get tarnished by what we see. Mostly previous failure which we insist on repeating. Remove those kinds of artifacts and what's left is simple and just right. Not too much, not too little.
I call it being the coil.
LOL
It's really not much different than a dripper build where the coil is narrower than the posts. I just use a 1/16" or equivalent mandrel which fits nicely into the slots so you keep it on the original while working with it. Slightly smaller diameter and slightly wider width to achieve your desired resistance. A little adjustment on the legs to reduce the tendency to spread. I respect Mac's viewpoint on this but I've found that re-inserting the mandrel after that first pulsing if the results aren't perfect and a very light tug gives nice results on that next pulse. I'm quite enjoying vaping on the result in the Rose as I type. YMMV.
Thanks Mac, I have to say that after reading al your posts about the tensioned micros , it kind of added a new dimension to my vaping. Been teaching it to a couple of friends and unanimously their first reaction was a grin from ear to ear, followed by a 'No way man!'. So again, thanks a bunch.I've seen the Rose several times. Beautiful atty and I adore ceramic base devices. My favorite is the Immortalizer and I own four originals. But the Rose is a bitch man. I had to revisit Richard Ng's rebuild of the Rose v2 to visualize this.
First, because of the narrow slots on the ceramic cup you can't keep the mandrel used for the wind to localize the coil in the set. Therein is the crux of the problem. To get optimal alumina oxide adhesion provides the closest fit. Disrupt that relationship and you no longer have that symmetry of the coil necessary for uniform oxidation. You may get close but it's not the best you might have achieved. Definitely not if it's unwinding or separating when heated...
Thanks Mac, I have to say that after reading al your posts about the tensioned micros , it kind of added a new dimension to my vaping. Been teaching it to a couple of friends and unanimously their first reaction was a grin from ear to ear, followed by a 'No way man!'. So again, thanks a bunch.
none
What guage is that twisted? looks like 22?Thanks for your like Caff. Nice set. Love duals. A bit hard to master in getting the balance. It's about symmetry. Disparity in resistance gets you an uneven vape and often spoils the build. But I gotta tell ya it couldn't be easier with the tensioned m.c.'s I'm talkin' about. There is just enough precision in the human hand to tell exactly when adhesion happens. Then the coil behaves like a screen door spring. It wants to be a microcoil. Unlike a coil that was forced into its shape by external energy, it had the energy and shape imparted to it internally. Net result it's about as uniform as it could be (so long as you don't trash it too much setting it). When you pulse it that's when the magic happens. The alumina oxide layers which insulate this continuous short occur coherently forcing a fusion of the layers turn-to-turn. Except for imperfections in the wire it's as perfectly tight as it can get. What's that mean for resistance? Well for one, predictable. And that reproducible outcome means you'll get a lot of sets that fire microcoil the first time and together. Those are the kind of odds I like.
Tap me on the shoulder anytime if you give it a try and need a shout out.
Good luck.
p.s. Speaking of hot legs…here's a pair of twisted-leg parallels I did this evening. Twisting stabilizes the parallels which are fidgety to begin with and helps deter shorting. Makes for an easier install. You'll have to wait for surprise on performance when you tension a wind and try this…
View attachment 4234

Hey Vanilla,Mark, the concept is pretty simple. Rather than loose wrapping of coils that will subsequent spring apart, apply good tension to the wire when you are wrapping and carefully place the coils next to each other. The result will be coils that don't need to be subsequent heating and compression.
If you you lack the manual dexterity or feel to do so, an inexpensive tool (and widely available) that will get you the results is the "Artistic Wire Coiling Gizmo Deluxe Winder" for Jewelry Making. I'm a rookie coil builder but getting near perfect results after a dozen or so coils. BTW, I also use a desktop magnifier with lamp.