Become a Patron!

ORCHID MODIFICATION THREAD

Rommel

Silver Contributor
Member For 4 Years
Member For 3 Years
Member For 2 Years
I love my zipper build. Superbly moist and saturated flavor, propably best i've ever gotten from any build. And suprisingly cool for 0.14 build, thats due to the way those babies fire. Instant explosion of those small traces of vapor. Im always excited to see that, it's a promise of solid flavor.
 

fq06

Gold Contributor
Member For 4 Years
You can always just chop what's needed off the 2 piece chimney pipe with a dremel so it doesn't extend too far through the top cap.
 

sohkis

Member For 4 Years
Member For 3 Years
Member For 2 Years
Member For 1 Year
Member For 5 Years
i never had an issue w/my long v4 chimney & the short kayfun tank, the excess just sticks through the o-ring & into the mouthpiece area.

doesn't get in the way of the DT or anything, maybe if the DT has an extremely small inner diameter, but all of my DT's fit around the extended chimney.


had my local shop drill out one of my v4's yesterday & i'm enjoying the increased airflow, might have to take another one or two back.. possibly the v6 as well
 

brianriggs

Member For 4 Years
Member For 3 Years
Member For 2 Years
Member For 1 Year
Member For 5 Years
I lust made my owned tank for it and chimney.air flow drilled to 1/8 drip tip drilled to 1/16.
 

Attachments

  • received_750703325016952.jpeg
    received_750703325016952.jpeg
    85.7 KB · Views: 26
  • received_750703255016959.jpeg
    received_750703255016959.jpeg
    39 KB · Views: 18
Last edited:

trpxcst

Member For 4 Years
Member For 3 Years
Member For 2 Years
Member For 1 Year
Member For 5 Years
The base threads for the chimney are all the same, so that's not an issue. Length is the issue.

Orchid tanks come in two basic sizes. V1-3 are short, same as Kayfun nano tanks. V4 and the new V6 Style A are long, same as regular Kayfun tanks. Likewise there are two basic chimney lengths. Kayfun Bell Cap is a nano size tank, therefore too short for that two-piece chimney, which was introduced in the V6 Style A.

If you want to use the bell cap on your Orchid, I suggest using the V3 stock chimney, which it appears you have. Otherwise modify the two-piece chimney.

I actually don't own any orchids or parts at this moment. I just like to have a game plan in place with reasonable expectations before shopping - after all if I am going to wait for FT shipping, I want to make sure I get everything I need all in one shot.

Thought of a question that I didn't think to ask earlier - with your shortened chimney bell/oven (mentioned first in post #2), do your threads bottom out with room for the phillips screws, or would I need to attempt to source some of the hex grub screws to not have issues?

That is also why I was looking at the longer (v4/v6) chimney. With the shortened bottom to minimize wasted liquid volume, I assumed that I would need additional length in the chimney to still seal against the o rings/driptip using the bell shaped nano tank.

I was even tossing around the idea of using an acrylic/pmma drip tip and tooling out the bottom to create a mild interference fit on the top of the chimney--using the drip tip's o rings to create the pressure seal for the tank and leaving out the chimney o ring. The goal of this would would be to allow me to cover the air holes, pull the drip tip, and and use a syringe/needle bottle to top fill.

Realistically, I could just buy a complete v4, a v6 chimney, and the bell cap kit--but the cheap bastard in me figured I could save myself $5-7 (that's like free money to buy another dripper, or a set of needle files) by ordering only the parts I needed to make it the tank I have in my mind. Also thought this would be the place to ask as I had some size/compatibility questions, and who better to ask than the people that already have and mod the parts.

Thanks
 

CaFF

Platinum Contributor
Member For 5 Years
FWIW, the Orchid v4 I got from Cigabye in their contest, it came with screws on the deck AND a full set of more PH in the packet. :D

IMG_0607.JPG

That, plus the spare deck I'd bought from FT and I'm totally screwed...in a good way. ;)

Now, I just need the damned threaded chimney and cap so I can use my purdy KF Quartz tank rings..
 

TheWestPole

Gold Contributor
Member For 4 Years
Thought of a question that I didn't think to ask earlier - with your shortened chimney bell/oven (mentioned first in post #2), do your threads bottom out with room for the phillips screws, or would I need to attempt to source some of the hex grub screws to not have issues?

That is also why I was looking at the longer (v4/v6) chimney. With the shortened bottom to minimize wasted liquid volume, I assumed that I would need additional length in the chimney to still seal against the o rings/driptip using the bell shaped nano tank.

No shorting issues with the shortened one piece chimney, either on screw heads or coils. I checked the clearances before doing it.

The one piece chimneys have a bit better clearance for the coils than the two-piece, simply because the two-piece chimney section has a thread ring that extends into the chamber section, reducing the diameter. This is usually a non-issue, but I would probably not choose a two-piece chimney to shorten from the bottom because of this reason.
 

TheWestPole

Gold Contributor
Member For 4 Years
I was even tossing around the idea of using an acrylic/pmma drip tip and tooling out the bottom to create a mild interference fit on the top of the chimney--using the drip tip's o rings to create the pressure seal for the tank and leaving out the chimney o ring. The goal of this would would be to allow me to cover the air holes, pull the drip tip, and and use a syringe/needle bottle to top fill.

I thought about this as a solution for fitting the Taifun GT top cap to Orchid. Personally, I wouldn't bother to experiment with an interference vacuum seal of chimney with DT; I would insist there be a replaceable o-ring. You could do it by making a custom DT with the OD o-ring gland offset from the ID o-ring gland. They have to be offset, because there is not enough room for both otherwise.

I didn't try it because I wanted to keep my DT options open. ;)
 

CaFF

Platinum Contributor
Member For 5 Years
Interesting...using this new Orchid v4 from Cigabuye.

I got the KF brass quartz tank to stay on, sorta. Used the better black o-rings on it as well. This Orchid v4 has a brass 510 pin, not copper.


The look is where I'm going with it. But, basically, I need a threaded chim and cap to pull it together tight. As-is, this one fits rather nicely, but only the tank o-rings are holding it together....eep.

Anyone know how to do a threaded chimney and cap so it won't fall off?

The v6 stuff would work, but not with the KF rings....which is why I'm doing it.
Of course, soon as I figure it out, they'll have a brass tank already done in stock.... :p

The v6 stuff:

Replacement Top Cap for Orchid V6 RTA (threaded)
http://www.fasttech.com/products/3023/10009751/2044805

Replacement Chimney for Orchid V6 RTA (threaded - fits v4 base but not the v4 cap, obviously)
http://www.fasttech.com/products/2044803

If there is a top cap that is bottom threaded for the KF rings, AND chimney threaded that would fit the Orchid v6 chimney, I can't find one.
 
Last edited:

brianriggs

Member For 4 Years
Member For 3 Years
Member For 2 Years
Member For 1 Year
Member For 5 Years
I love the Orchid. Tastes and breathes like a small dual coil dripper but with the convenience, mobility and put-togetherness of a Kayfun. Versions 1, 2, 3 and 4 all share the same core goodness with various improvements, and some non-improvements. (Would not say the same for the feature castrated, single air vent 28mm version.) I have been visiting various threads where Orchids are discussed, but thought it would be good to start one for any and all Orchid modifications and issues.

Please post what your are doing with yours!


View attachment 6378

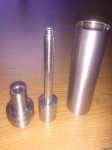
I drilled my air holes to 1/8 my drip tip to 1/16.my brother made my stainless tank and chimney and welded my drip tip on top. polished it up and now it holds about 30ml of juice and I get every nice clouds at 30 watts with my 100 watt sigelie.comes close to my helios RDA with quad coils at 50 watts.
 

Attachments

  • received_750703325016952.jpeg
    received_750703325016952.jpeg
    85.7 KB · Views: 20

TheWestPole

Gold Contributor
Member For 4 Years
Interesting...using this new Orchid v4 from Cigabuye.

I got the KF brass quartz tank to stay on, sorta. Used the better black o-rings on it as well. This Orchid v4 has a brass 510 pin, not copper.


The look is where I'm going with it. But, basically, I need a threaded chim and cap to pull it together tight. As-is, this one fits rather nicely, but only the tank o-rings are holding it together....eep.

Anyone know how to do a threaded chimney and cap so it won't fall off?

The v6 stuff would work, but not with the KF rings....which is why I'm doing it.
Of course, soon as I figure it out, they'll have a brass tank already done in stock.... :p

The v6 stuff:

Replacement Top Cap for Orchid V6 RTA (threaded)
http://www.fasttech.com/products/3023/10009751/2044805

Replacement Chimney for Orchid V6 RTA (threaded - fits v4 base but not the v4 cap, obviously)
http://www.fasttech.com/products/2044803

If there is a top cap that is bottom threaded for the KF rings, AND chimney threaded that would fit the Orchid v6 chimney, I can't find one.

How you, @CaFF?

Is it really worth the trouble? I use those rings all the time, sometimes with very long custom tanks. Never have pulled apart on me unless I made an effort. If you drop it maybe, but you'd break the glass in that case and spill anyway.

I do however always swap the o-rings out for buna-n rubber, which grip really well. :)
 

TheWestPole

Gold Contributor
Member For 4 Years
I drilled my air holes to 1/8 my drip tip to 1/16.my brother made my stainless tank and chimney and welded my drip tip on top. polished it up and now it holds about 30ml of juice and I get every nice clouds at 30 watts with my 100 watt sigelie.comes close to my helios RDA with quad coils at 50 watts.

Nice work, @brianriggs. Just don't drop it on your foot. ;)

Could we see details of the chimney mod?
 

brianriggs

Member For 4 Years
Member For 3 Years
Member For 2 Years
Member For 1 Year
Member For 5 Years
the top of the chimney it is welded and it makes a very nice tight seal the bottom of the chimney is pressed on about an inch or a bit more.
 

Attachments

  • IMG_20150114_124446_120.jpg
    IMG_20150114_124446_120.jpg
    415.9 KB · Views: 32

CaFF

Platinum Contributor
Member For 5 Years
How you, @CaFF?

Is it really worth the trouble? I use those rings all the time, sometimes with very long custom tanks. Never have pulled apart on me unless I made an effort. If you drop it maybe, but you'd break the glass in that case and spill anyway.

I do however always swap the o-rings out for buna-n rubber, which grip really well. :)

Howdy! :)

These are the black o-rings that came with this particular Orchid v4, they smell like rubber, but IDK what kind.

They would have to be a tad larger, I think, to hold the weight of a full glass tank and not come apart. I can easily pull the tank off as-is with two fingers.
 

TheWestPole

Gold Contributor
Member For 4 Years
Last edited:

brianriggs

Member For 4 Years
Member For 3 Years
Member For 2 Years
Member For 1 Year
Member For 5 Years
Now thats modding.
I was going to buy the bigger chimney and tank with the nano kit but I like stainless tanks and those didn't really hold enough juice as this tank does loose juice when I top fill it and the chimney was loose at the o ring so that left out bottom filling.Now I can stand it up on the drip tip all night and no leaks.Going to try to fill it from the bottom next but with my 100% VG and 10 ml syringe is going to take some time so I have just been dumping it in the top covering air holes with 2 fingers and the chimney with another.I only loose about 10 dropps a fill.but I hate the mess.
 

TheWestPole

Gold Contributor
Member For 4 Years
Sweet, THX!

I can even afford them. :D

They'll fit with the KF Quartz glass and rings then without cracking it? The rest fits perfectly, just need the dang thing to hold together. ;)

A little spit when you assemble seems to do it. Haven't broken one yet. :)
 

CaFF

Platinum Contributor
Member For 5 Years
A little spit when you assemble seems to do it. Haven't broken one yet. :)

Awesome. :)

I know my 'mod' isn't as extreme as most of you guys', but I just got this burr to get it matched up with my Jinamod's WF clone AND have capacity and syringe filling. So, far so good.

I'm thinking this particular clone from Cigabye is made better than my first one from FT.
The fill hole through the bottom isn't even near the deck edge like my 1st one is. The brass 510 contact suits me better too and the parts bag has nicer goodies.

Already put one of those spare microscopic o-rings on the fill-port screw. ;)
 

Oggy

Silver Contributor
Member For 4 Years
@Taver13 what did you use for a clear coat after your patina? The last box mod I did had a great paint job but the clear and paint started wearing off with in a week.
 
T

Taver13

Guest
@Taver13 what did you use for a clear coat after your patina? The last box mod I did had a great paint job but the clear and paint started wearing off with in a week.
3 coats crystal clear enamel by rustoleum, wetsand, then three more. then polished with a marine cleaner wax
 
T

Taver13

Guest

Eric DeCastro

Silver Contributor
Member For 4 Years
New on FT. Orchid V6 Style D with full sized bell cap and two-piece chimney. The first non-nano bell cap I have ever seen. Soon to be available a la carte, I expect. :)

View attachment 12605

http://www.fasttech.com/products/1/10009514/2086200-orchid-v6-styled-rta-rebuildable-tank-atomizer
I'm thinking about getting this but I'm on the fence about it. I have converted both my V4s to V3's and put them in bell caps. I have a third base coming in and going to cut down a V4 chimney I have for yet a third V3 and bell cap. I have a V6 for work to have more capacity. hmmmm. I'll wait it out a bit, don't know if I need another full sized tank which will probably hold less liquid than my V6 anyway.
 

sohkis

Member For 4 Years
Member For 3 Years
Member For 2 Years
Member For 1 Year
Member For 5 Years
not sure how i feel about the air inlets on the deck, looks like they went to plastic/nylon from the metal rings that were on the glass chambered v6.

i guess they could just as easily be pulled out
 

TheWestPole

Gold Contributor
Member For 4 Years
not sure how i feel about the air inlets on the deck, looks like they went to plastic/nylon from the metal rings that were on the glass chambered v6.

i guess they could just as easily be pulled out

I've removed my V6's steel air tubes and drilled the holes out like my other Orchids. Will do the same with this one.
 

sohkis

Member For 4 Years
Member For 3 Years
Member For 2 Years
Member For 1 Year
Member For 5 Years
I've removed my V6's steel air tubes and drilled the holes out like my other Orchids. Will do the same with this one.

in the process of removing mine, i actually opened them up so that the diameter at the top of the cylinder (closest to the coil) is wider than the bottom (where it exits the deck). after seeing they got noticeably bigger, i left them in. airflow seems to be improved, but i'll have to get through this tank & pull them out for the next tank to compare.
 

TheWestPole

Gold Contributor
Member For 4 Years
in the process of removing mine, i actually opened them up so that the diameter at the top of the cylinder (closest to the coil) is wider than the bottom (where it exits the deck). after seeing they got noticeably bigger, i left them in. airflow seems to be improved, but i'll have to get through this tank & pull them out for the next tank to compare.

They still choke the diameter down to 2mm in the deck. Even if they prevent a drop or two of leakage in an atty generally not known for leakage problems, still not worth the reduction IMO.
 

EWS111

Bronze Contributor
Member For 4 Years
Member For 3 Years
Member For 2 Years
Member For 1 Year
Member For 5 Years
I'm not so quick to lose the leak prevention that having raised airflow holes provides! Rather than remove them, I drilled them and shortened the set screws that control airflow. I put the setscrews in with locktite for maximum airflow. The result is I have about the same airflow as my V2 & V4 Orchids, a glass tank, and much less prone to leaking out air holes!
 

TheWestPole

Gold Contributor
Member For 4 Years
I'm not so quick to lose the leak prevention that having raised airflow holes provides! Rather than remove them, I drilled them and shortened the set screws that control airflow. I put the setscrews in with locktite for maximum airflow. The result is I have about the same airflow as my V2 & V4 Orchids, a glass tank, and much less prone to leaking out air holes!

How much did you drill them? They're like 2mm ID, 2.5mm OD stock.
 

sohkis

Member For 4 Years
Member For 3 Years
Member For 2 Years
Member For 1 Year
Member For 5 Years
just dropped my v6 glass tank/chimney/lid & the glass shattered, sadface..

luckily i ordered a spare glass tank! gonna have to be extra careful w/this one & get another one ordered... haha
 

TheWestPole

Gold Contributor
Member For 4 Years
Mine were .101" OD and .071" ID. I drilled them with a #44 drillbit (.085")

Hmmm. If .008" wall thickness of the air tubes indeed holds up to the drilling, it may be worth a try before chucking them. I have two of these to play with and might give that a try on one.

It's just that I can't help but favor the ones I've drilled out to 2.8mm. Such effortless lung hitting. :D

pb071902-edit-jpg.8568


pb071888-edit-jpg.8569


http://vapingunderground.com/threads/orchid-modification-thread.20819/page-5#post-177084
 
T

Taver13

Guest
just got another v4, i really wanted to drill the airholes out on this one too, but, one of the airholes is closer to the insulator than normal. looks like a machining fail, and its a tobecco at that. when im done with this tank, ill get a picture up
 

Eric DeCastro

Silver Contributor
Member For 4 Years
Hmmm. If .008" wall thickness of the air tubes indeed holds up to the drilling, it may be worth a try before chucking them. I have two of these to play with and might give that a try on one.

It's just that I can't help but favor the ones I've drilled out to 2.8mm. Such effortless lung hitting. :D

pb071902-edit-jpg.8568


pb071888-edit-jpg.8569


http://vapingunderground.com/threads/orchid-modification-thread.20819/page-5#post-177084
got myself a #35 2.8mm drill bit. going to do some surgery on my V6 maybe tomorrow.
 

Rommel

Silver Contributor
Member For 4 Years
Member For 3 Years
Member For 2 Years
Me too, assuming i can find a 2.8mm bit in a country that uses the metric system. Right now i have two with 2.5mm holes and one bone stock.
 

TheWestPole

Gold Contributor
Member For 4 Years
just got another v4, i really wanted to drill the airholes out on this one too, but, one of the airholes is closer to the insulator than normal. looks like a machining fail, and its a tobecco at that. when im done with this tank, ill get a picture up

I've had a base or two like that. What can you do? o_O

Cut into the insulator. ;):)
 

TheWestPole

Gold Contributor
Member For 4 Years
As promised: Taifun GT Top Cap adapter.


Untitled.jpg

This is the type of aluminum spacer I used. The pic is not the exact part. The size I used was 3/8" OD x 3/16" ID x 1".


P1192174 edit.jpg

Remove stock post by drilling from the DT side. Drill recess for o-ring in the aluminum spacer. I used a 7 mm (9/32") bit for a tight seal, 2 mm deep. Drill through clearance for chimney and cut to length. I used 6 mm length to fit both 40 mm Taifun GT tank (with Orchid V4, V6 chimney) and 30 mm Taifun GT Nano tank (with Orchid V1-3 chimney with chamber shortened by 4 mm). Epoxy in place.


P1192182 edit.jpg

30mm Taifun GT Nano tank and V1-3 chimney with chamber shortened by 4 mm. Same overall height as Orchid V3, but holds 2 ml more juice (1.5 ml with stock chimney).


P1192190 edit.jpg

40 mm Taifun GT tank and stock V4, V6 chimney. Overall height is only 2 mm more than V4, V6, but holds 1.5 ml more juice (more if you shorten the chamber).
 
Last edited:

VU Sponsors

Top