For making spaced claptons I came across another method that's even much easier.I'm going to throw in my 2 cents. I find, for getting good clean stags, force fusing WAY easier than any other method I've seen out there. I leaned this from Mr Devine's (n.devine83) youtube whilst making my way into interlocks. It's and easy way to parallel clap without the hassle of 2 spools (or pulling off a length if you only have 1 spool). Had a private convo with someone today and figured I'd share for others.
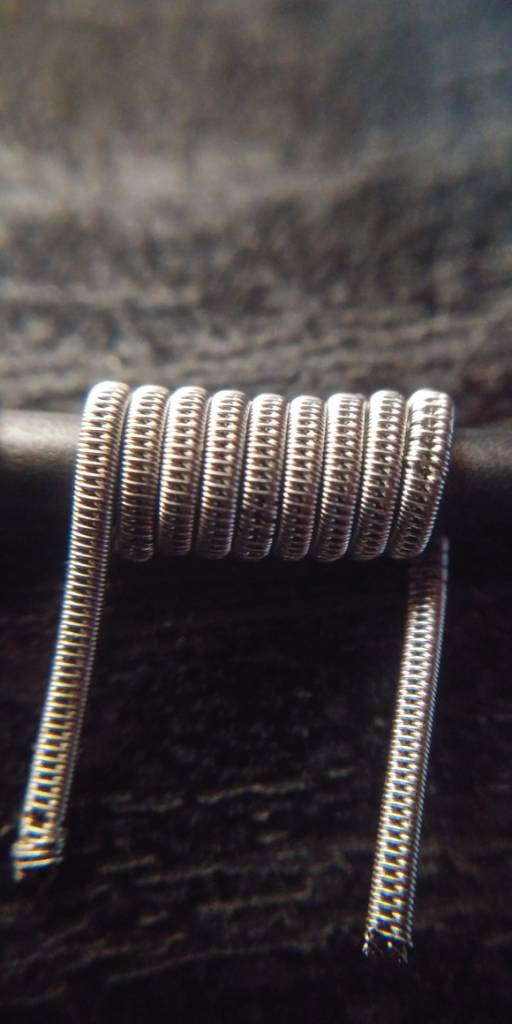
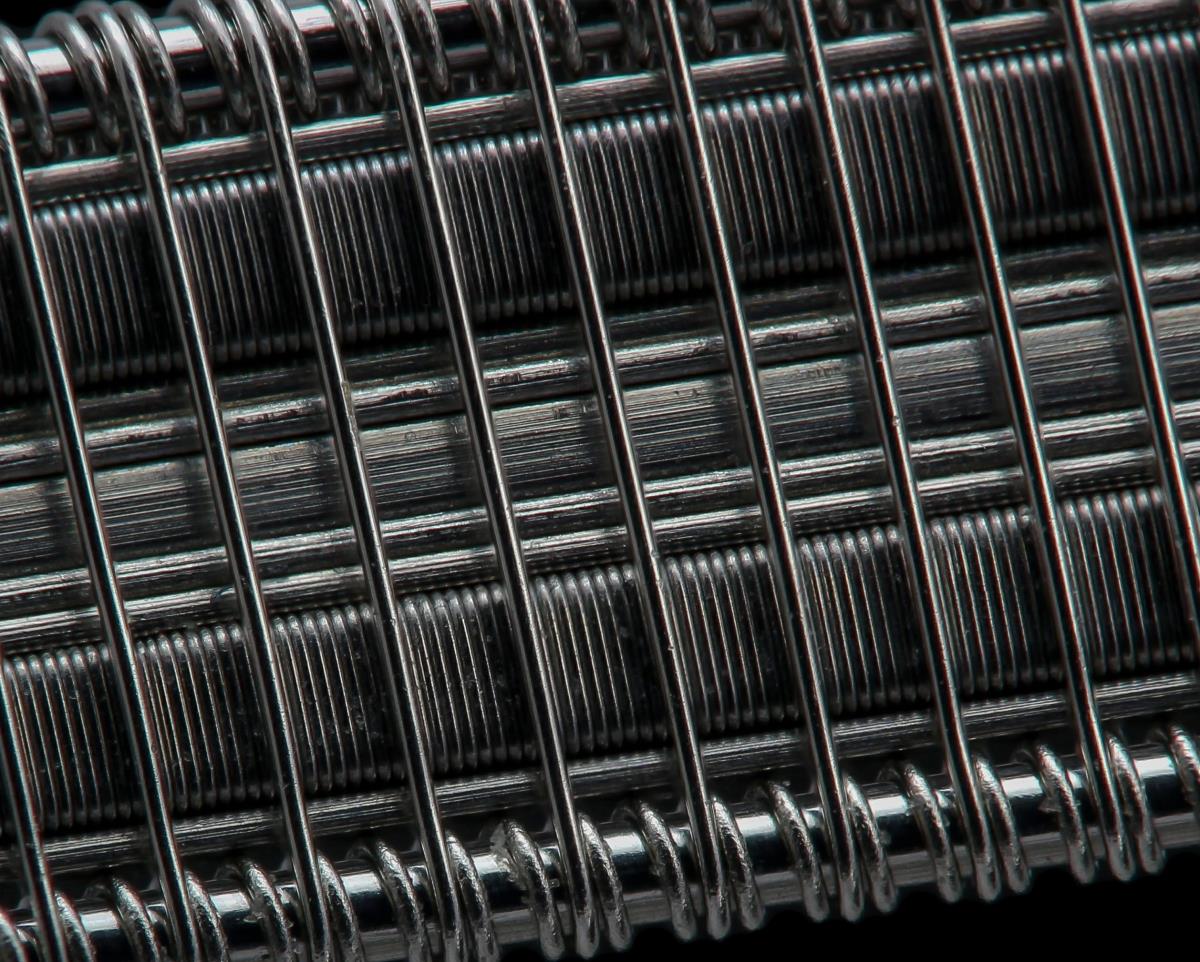
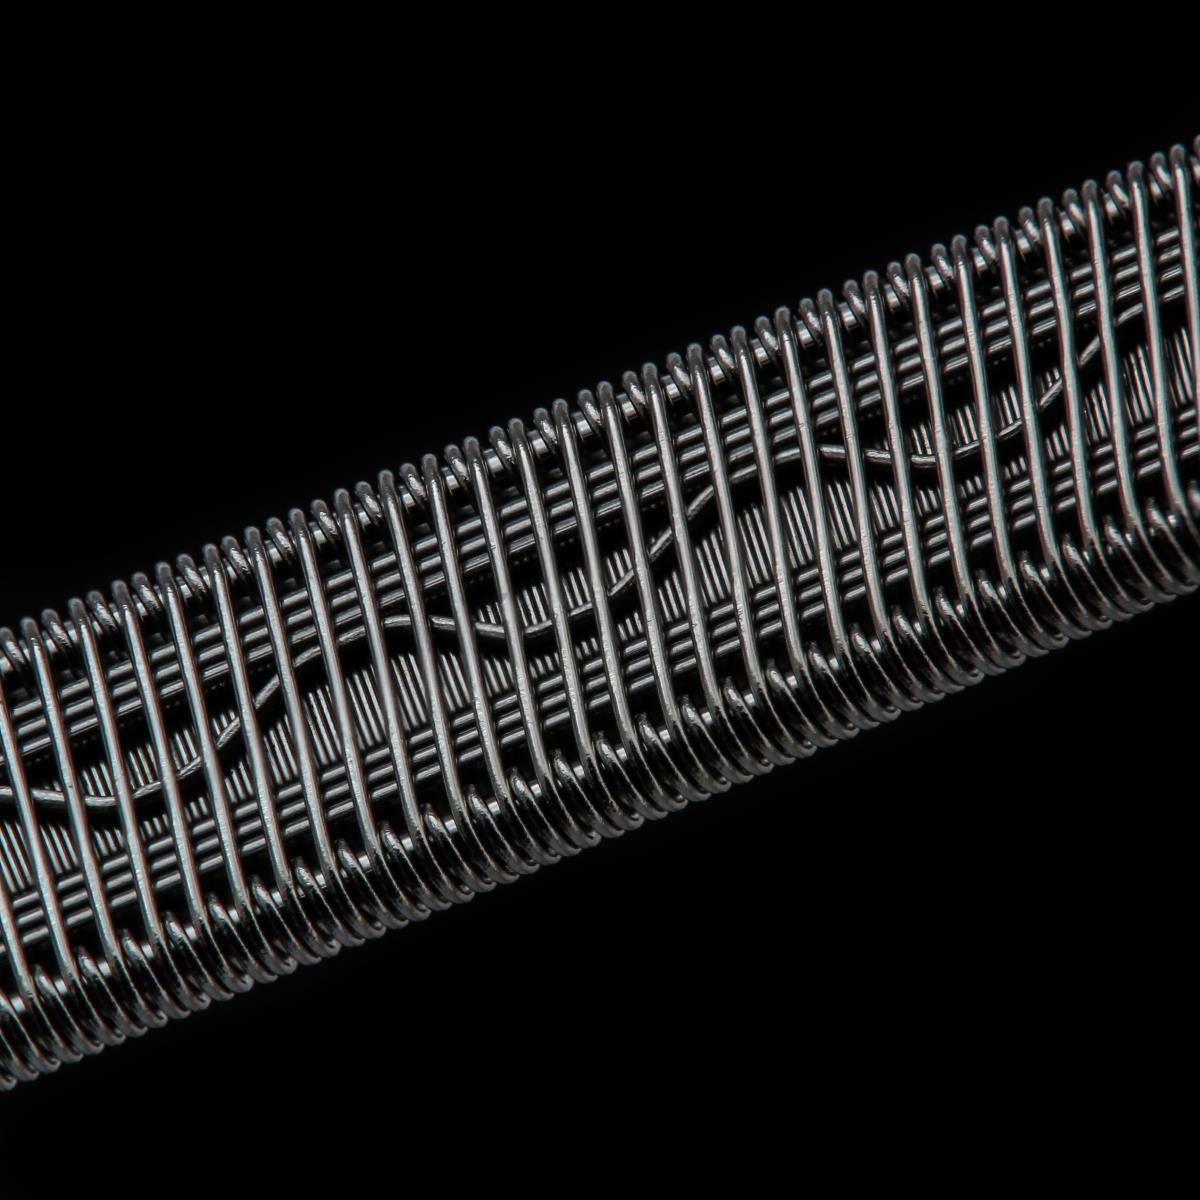
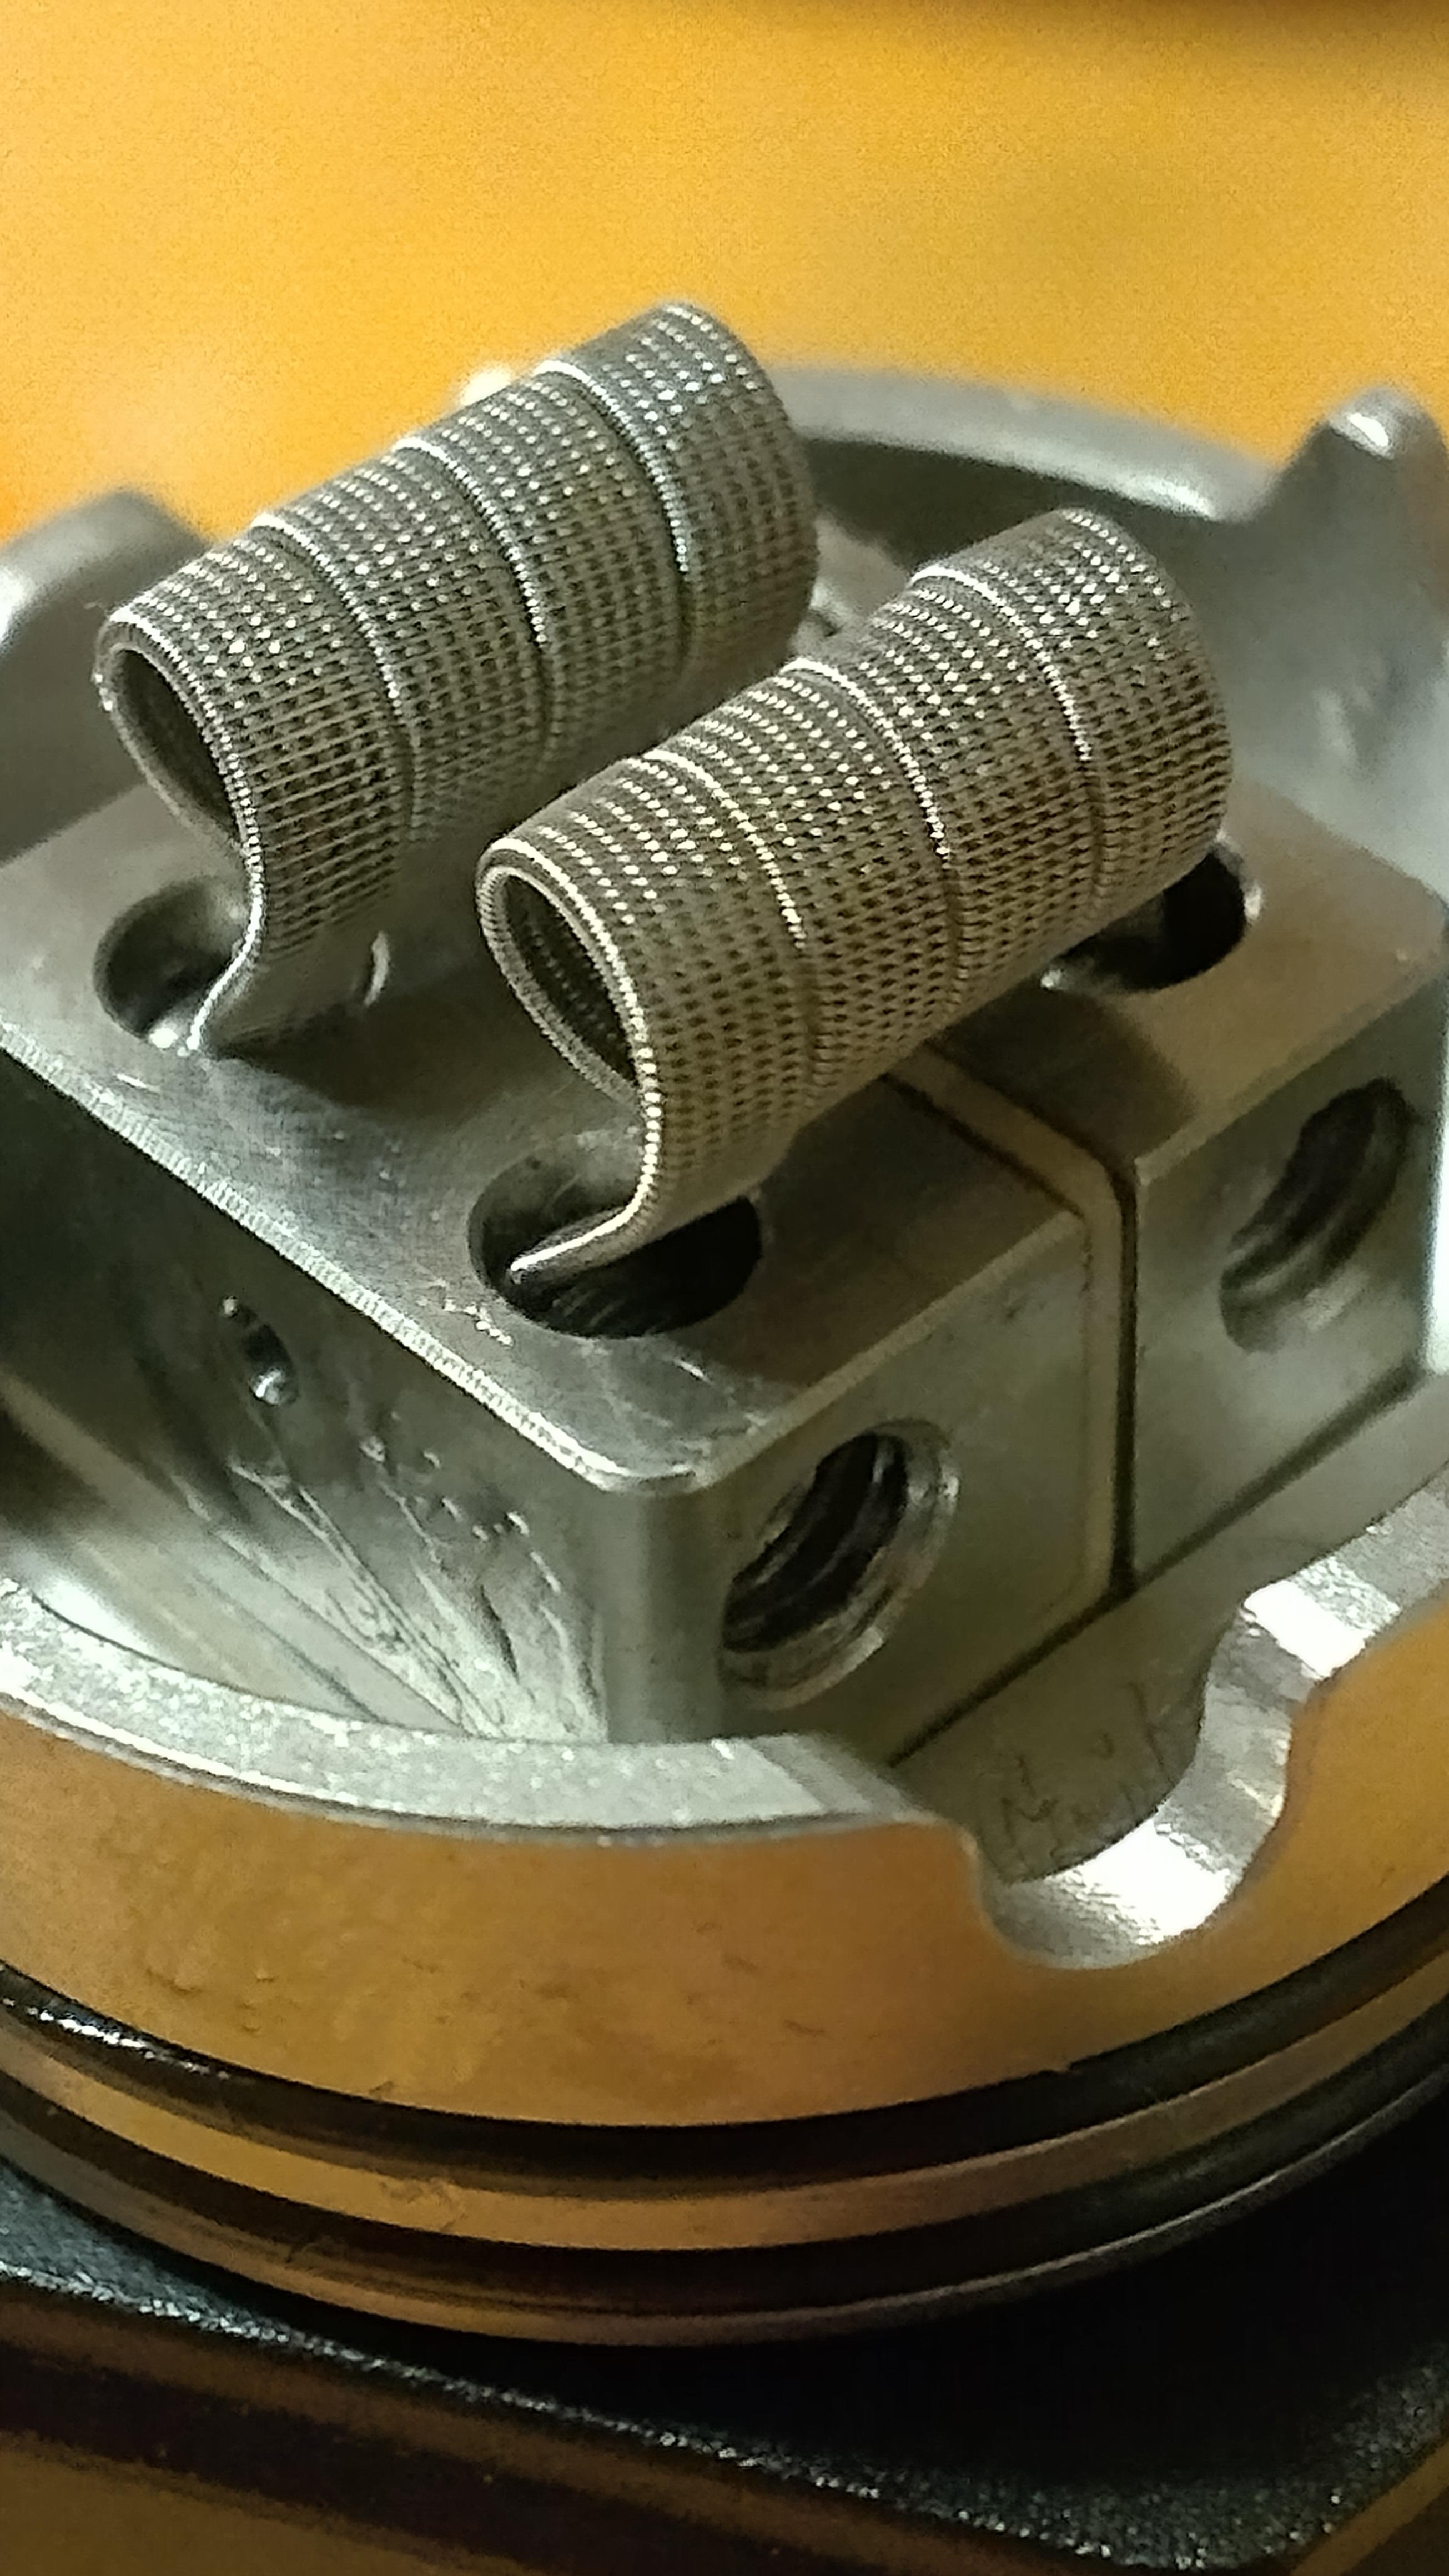
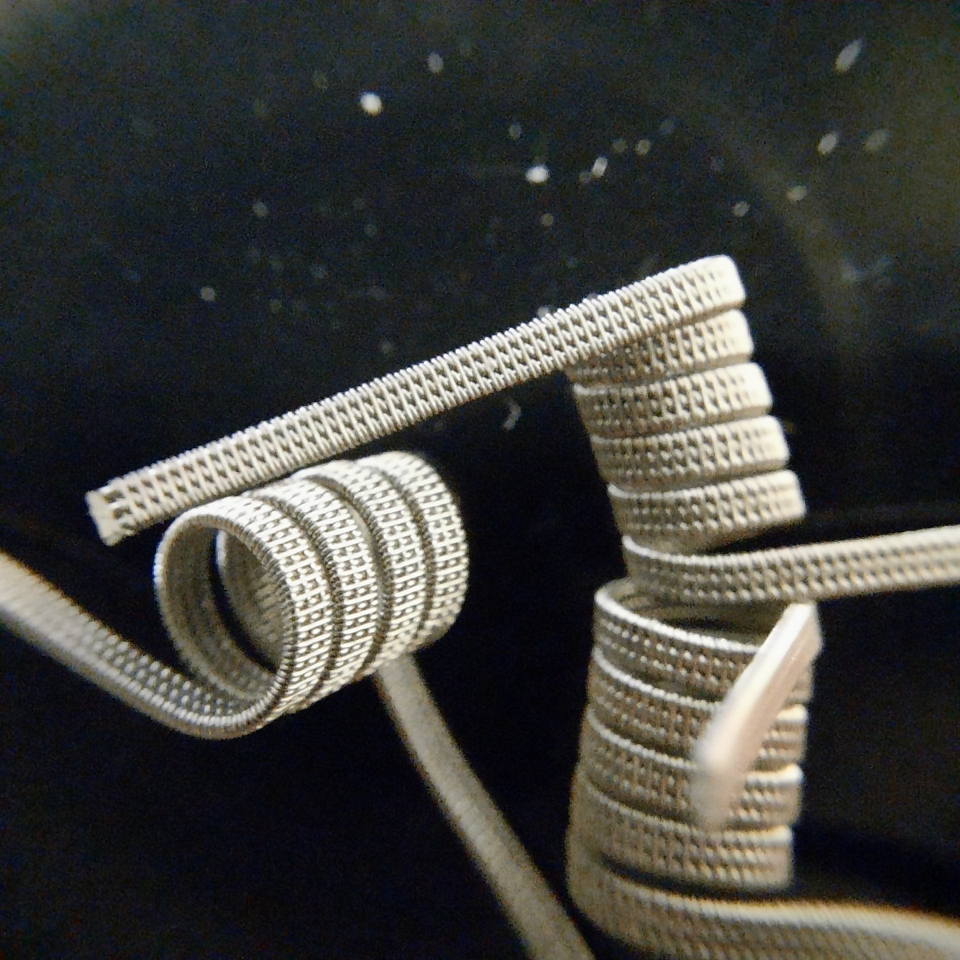
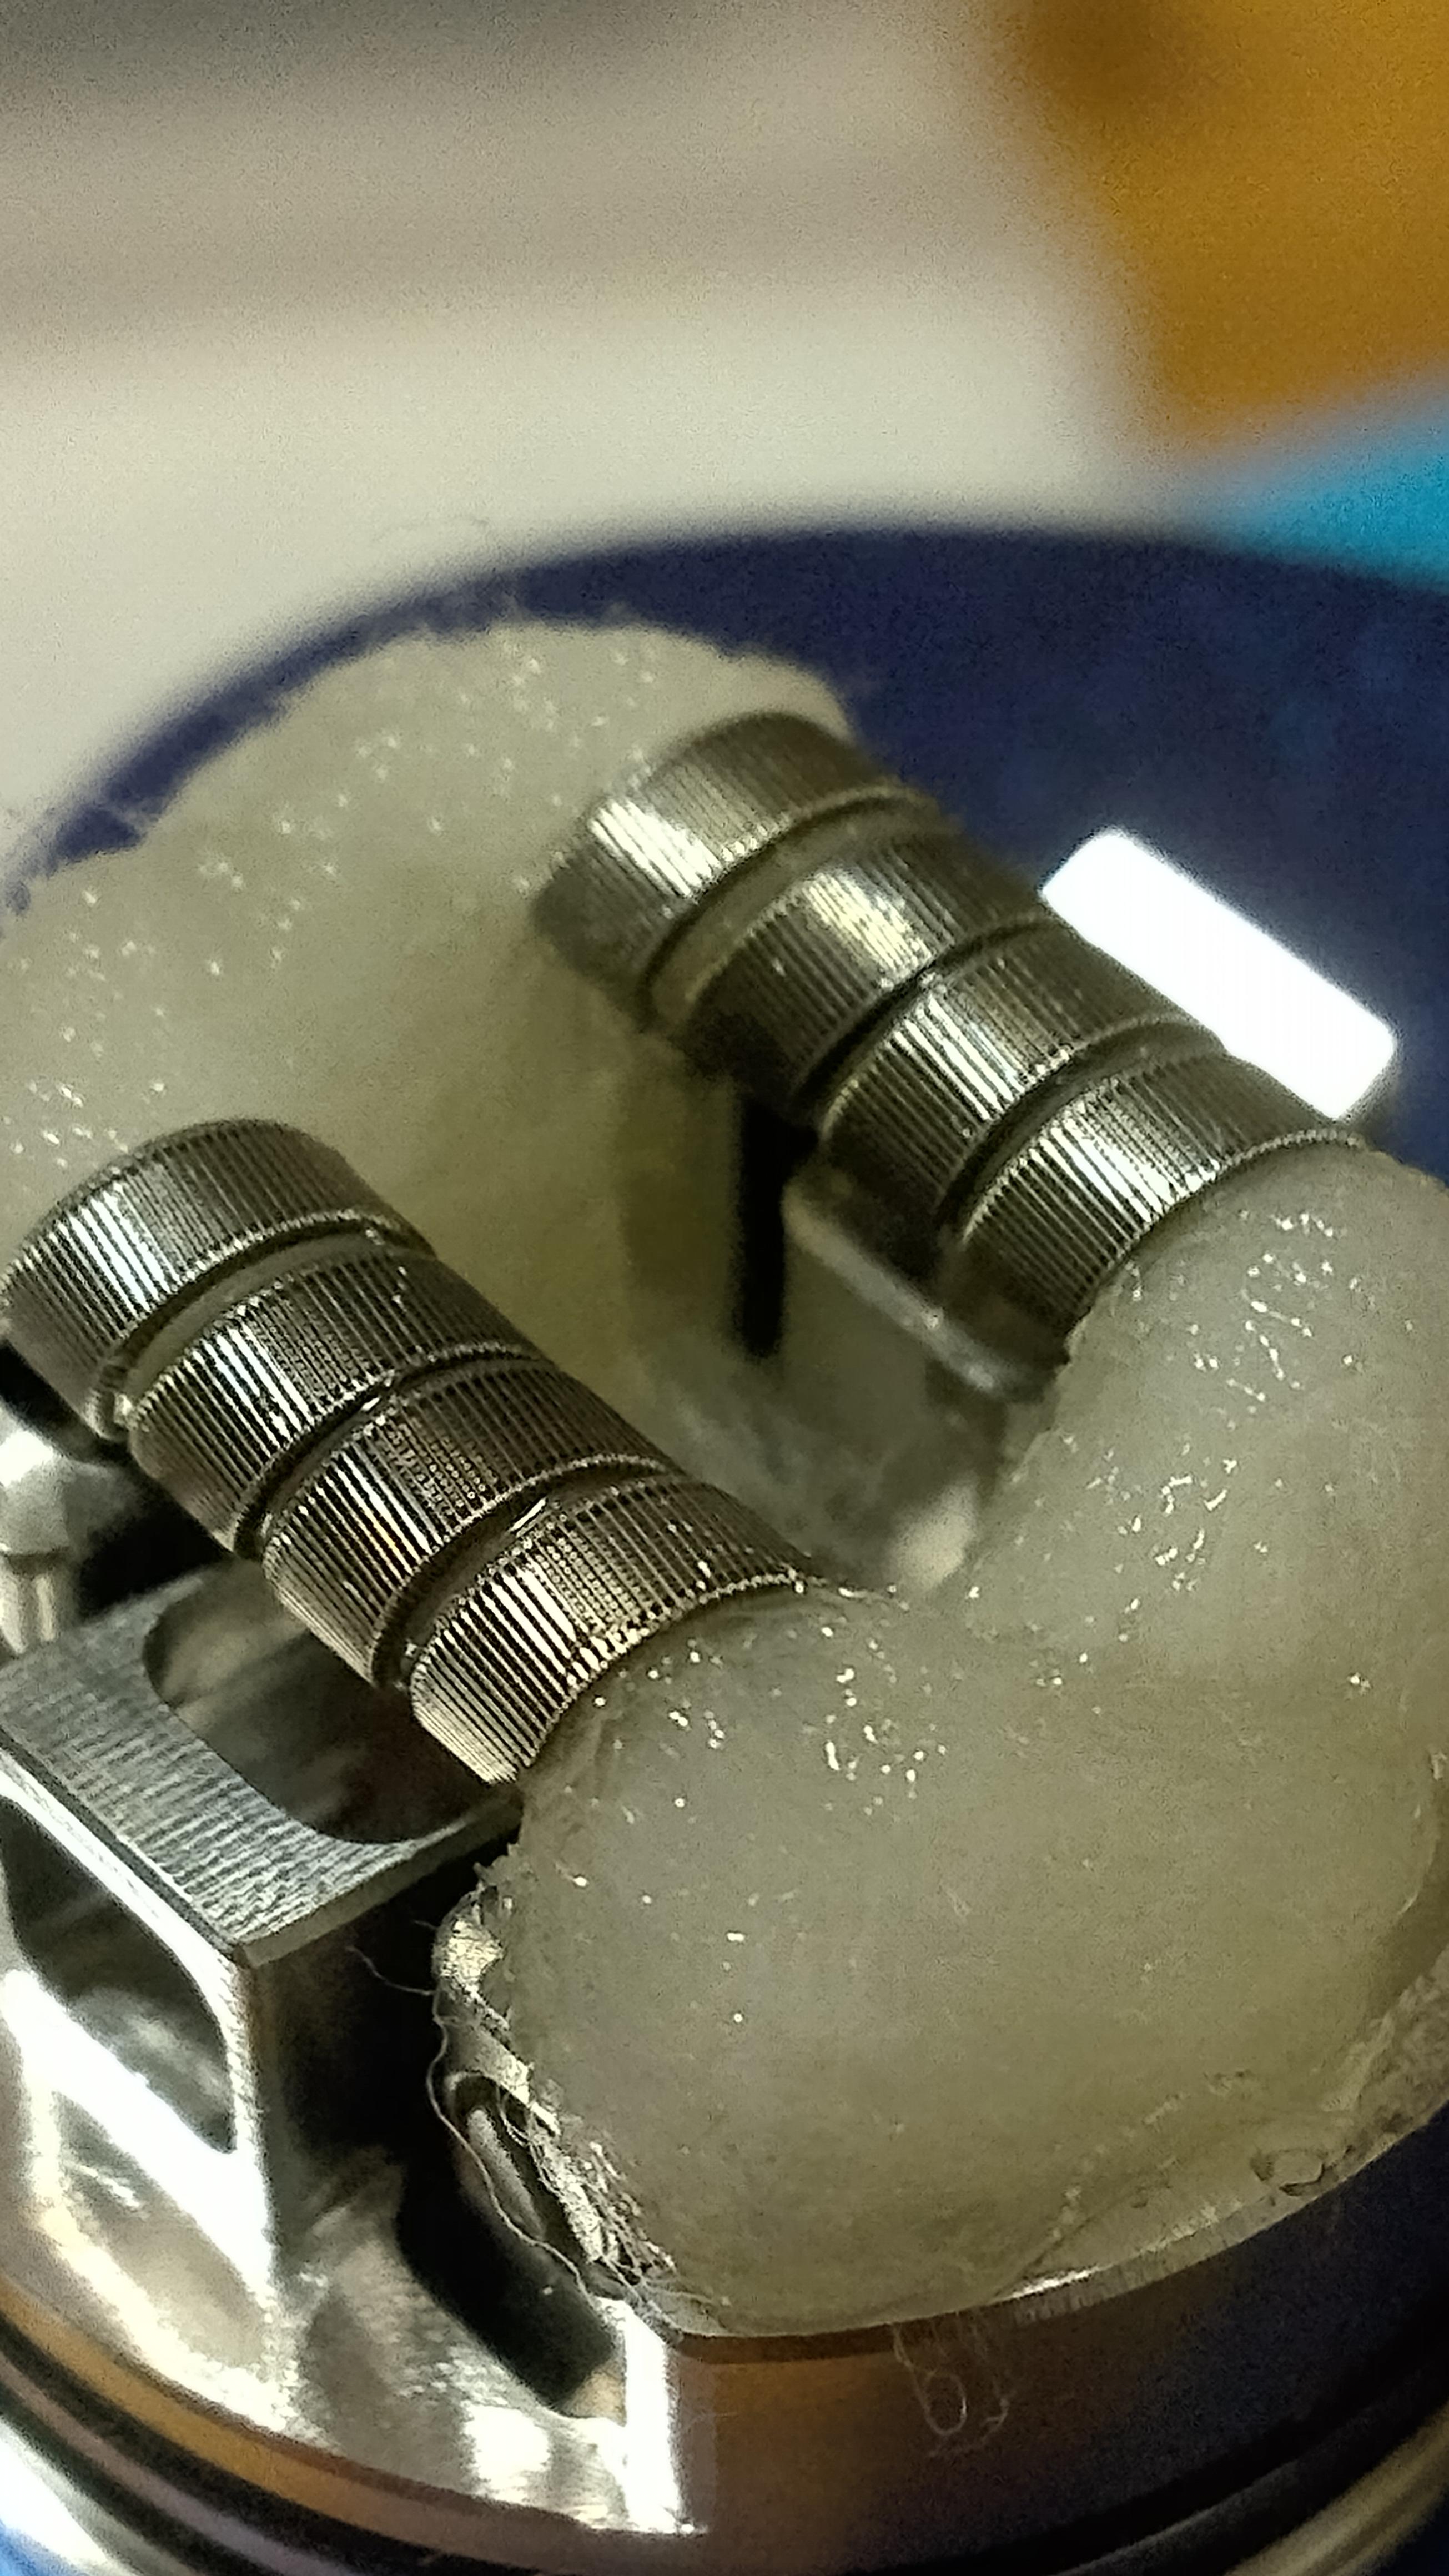
This stag was done with a 32g core and 40g clap
Run a clap 1/2 way down your core and snip it long. Then flip the drill in reverse, grab the snip and run it for a couple of seconds. This loosens up the claps. To be sure they are loose enough just grab them near the chuck and see if they slide back and forth, freely, on the core.
Put your drill back in forward and start another clapton, at the chuck end, between the first clapton.
Using a good amount of fuse tension run the second clapton parallel to the first. If you've loosened the first run well, and are using enough fuse tension, it should slide in without any trouble.
As you run the second set of claps the first one will slow push forawrd. Once you get to the end of the first run you should have some core wire left. At this point you need to slow down to make sure you get past the snipped lead without tangling in it. Once your past it, bare down as hard as you dare (without breaking the wire or your swivels, ect ...) all the way to the end to lock them in place so they don't bounce back.
Now just grab the snipped lead, put your drill in reverse, and pull the lead off. DO NOT let the tnesion go on the wire your pulling untill it's off. Otherwise it may get tangled up and ruin the whole thing. Now you should have a nice staggered wire reade for use!
View attachment 119418 View attachment 119419 View attachment 119420 View attachment 119421 View attachment 119422
Become a Patron!
You are using an out of date browser. It may not display this or other websites correctly.
You should upgrade or use an alternative browser.
You should upgrade or use an alternative browser.
The Official Stagger/Fuse Thread
- Thread starter mach1ne
- Start date
OOOOHHHHH!!!! That's a new one. I'll have to try it!!For making spaced claptons I came across another method that's even much easier.
ok Color me impressed!!!For making spaced claptons I came across another method that's even much easier.
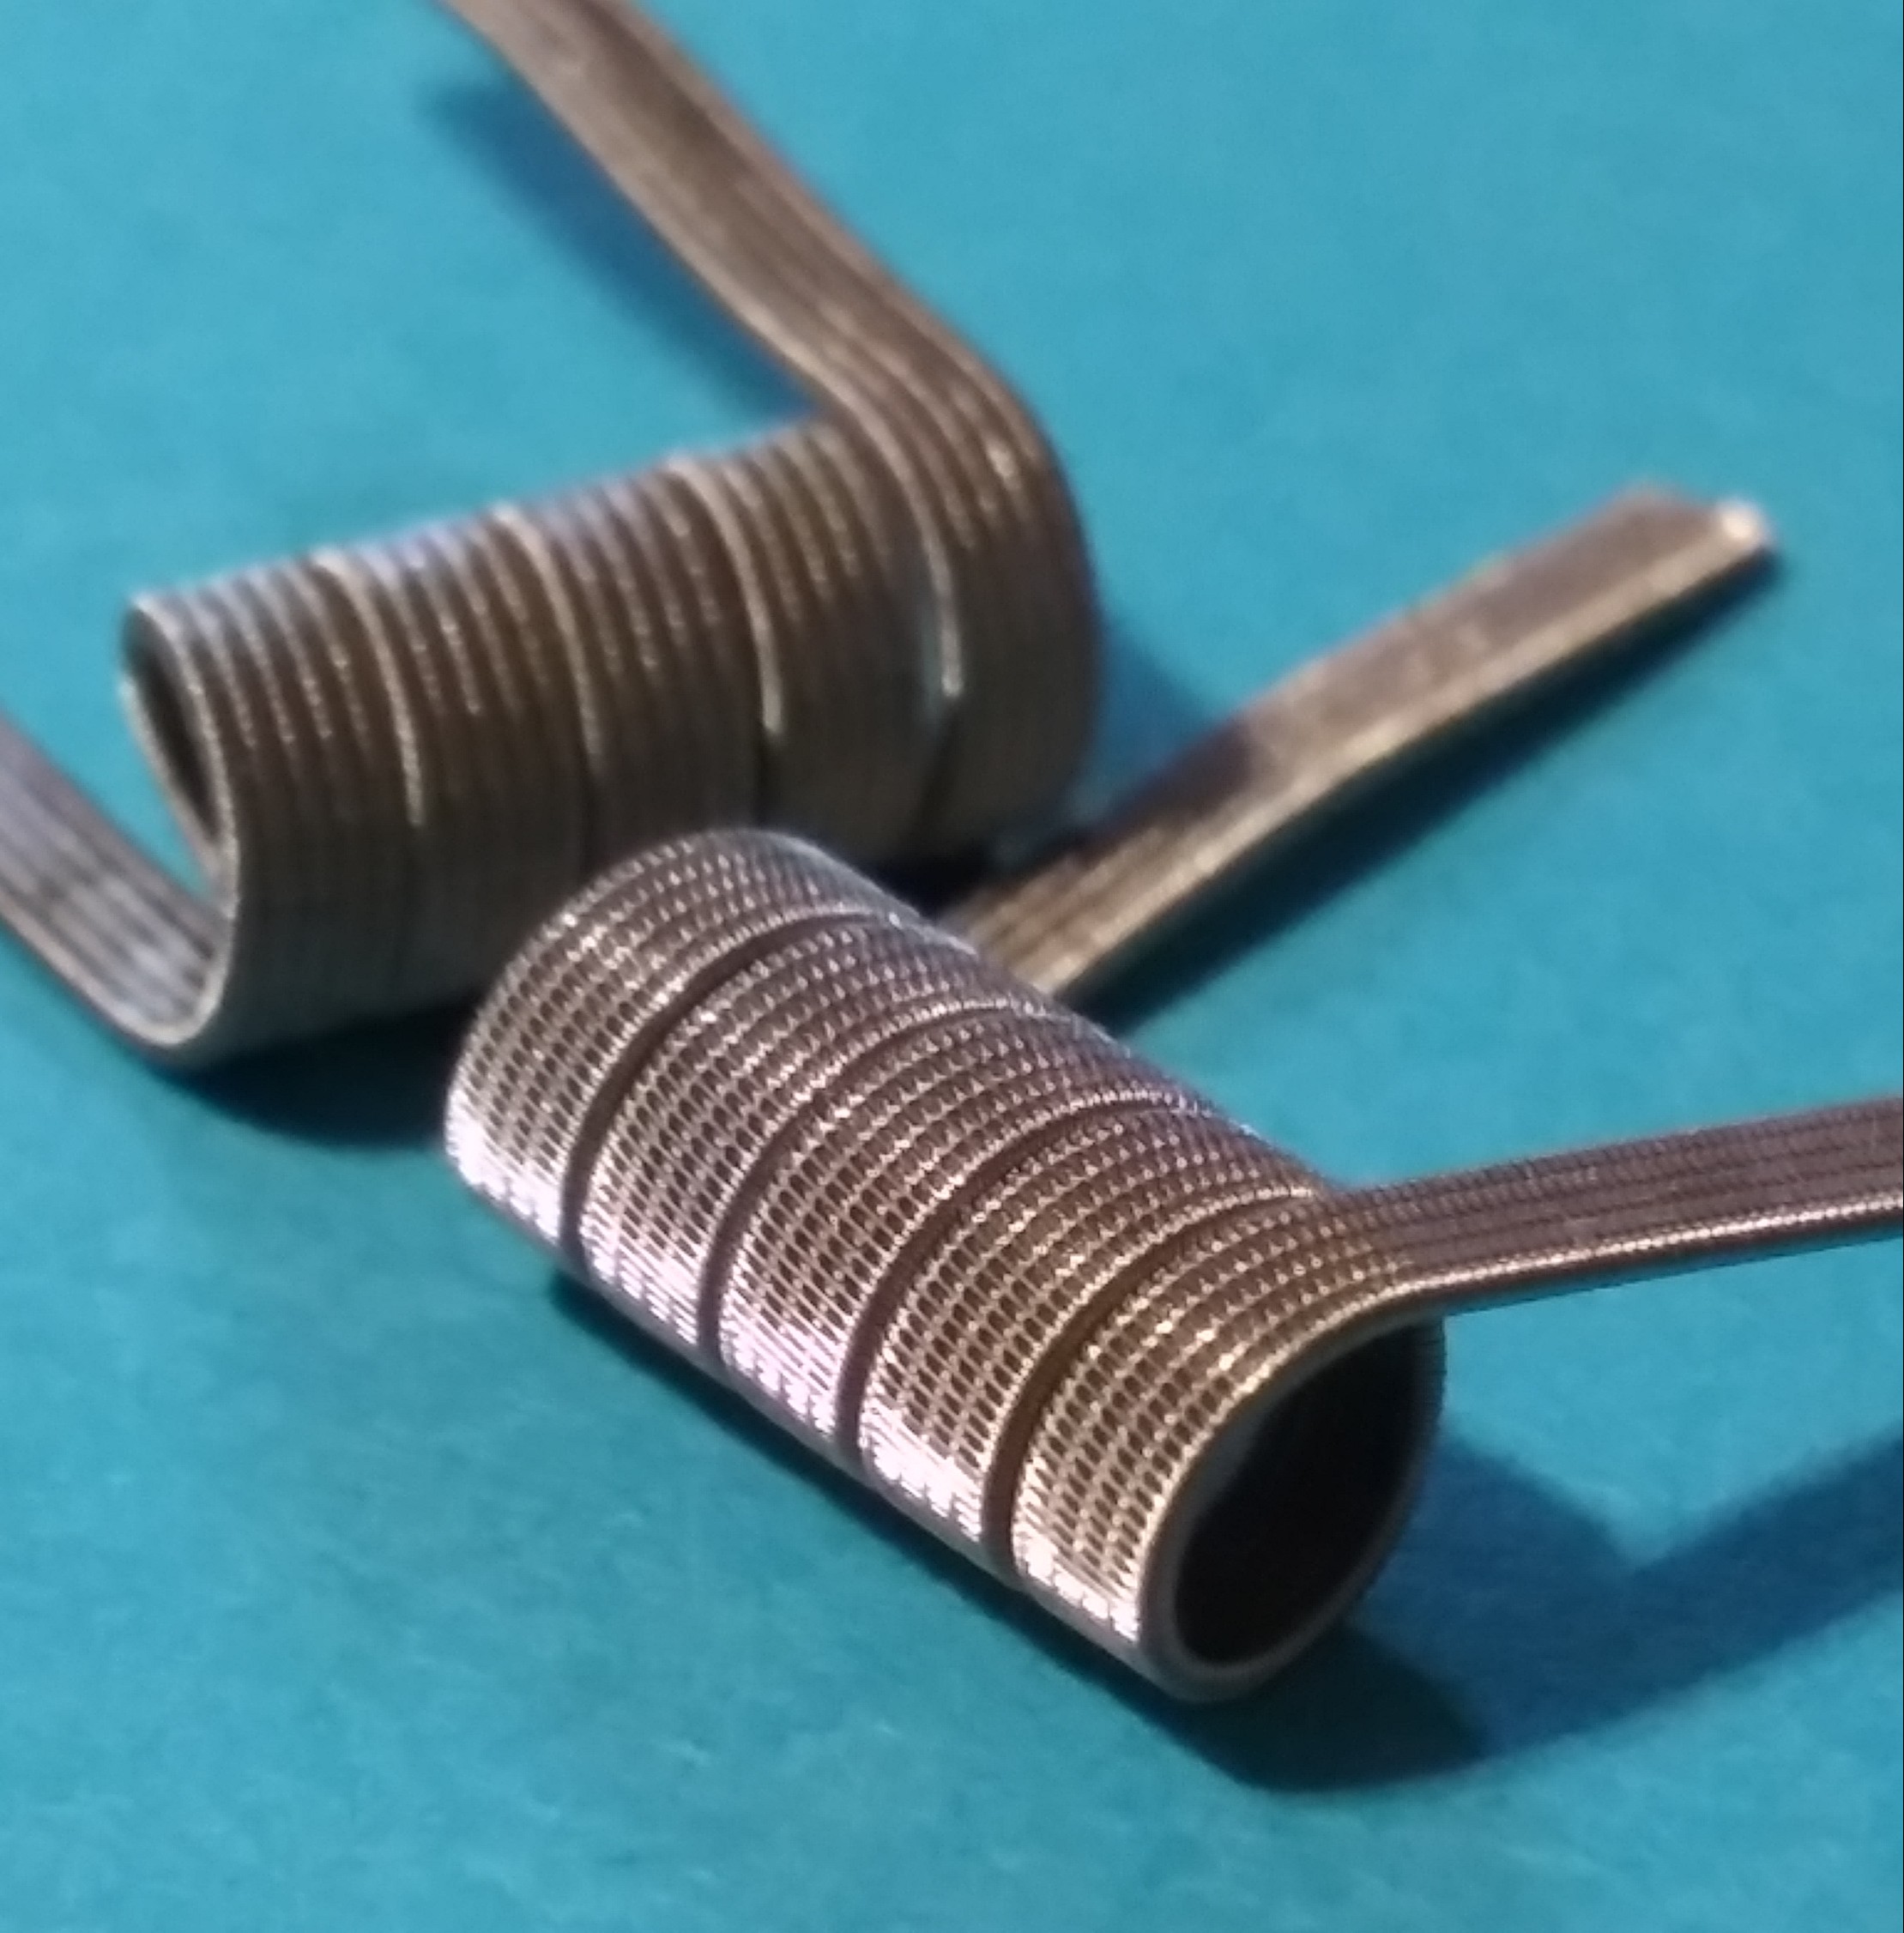
25 inches perfectly staggered
$1.69 for a 3 pack at walmart


Works pretty good then huhok Color me impressed!!!
25 inches perfectly staggered
$1.69 for a 3 pack at walmart
View attachment 121627 View attachment 121628
Sent from my LM-Q610(FGN) using Tapatalk
You should always stagger 1 piece per coil. More consistency that way.I usually make my sfc with one piece. Cut it and did like a multi core and worked a lot better today
Sent from my LM-Q610(FGN) using Tapatalk
I usually stagger one then fold it to fuse. Was a lot better cutting in half and fusing.You should always stagger 1 piece per coil. More consistency that way.
Sent from my LM-Q610(FGN) using Tapatalk
Hair grip solves the problem of folding.I usually stagger one then fold it to fuse. Was a lot better cutting in half and fusing.
Sent from my LM-Q610(FGN) using Tapatalk
Well actually I forgot @Pegleg Meg already linked that video on page 1.OOOOHHHHH!!!! That's a new one. I'll have to try it!!

I have no issue staggering. I just usually loop a long staggered clapton and fuse it. This time I cut it instead if looping through my swivelHair grip solves the problem of folding.
Sent from my LM-Q610(FGN) using Tapatalk
I have no issue staggering. I just usually loop a long staggered clapton and fuse it. This time I cut it instead if looping through my swivel
Sent from my LM-Q610(FGN) using Tapatalk
Yeah, do that, don't fold - folding will change the direction of the stagger's "lean" on one side which makes fusing harder
Well that's been my issue then. I didn't think about that until I watch one of the videos further up. Was a lot easier to cut in two and match it upYeah, do that, don't fold - folding will change the direction of the stagger's "lean" on one side which makes fusing harder
Sent from my LM-Q610(FGN) using Tapatalk
I was referring to the fact you can loop it around a hair grip that you simply insert into the chuck of your drill like shown in the video I linked. Looping your spaced clapton around your swivel is what causes hiccups in the fusing the two halves together part, as the spaces need to slide freely over the cores like shown also in that same video I linked.I have no issue staggering. I just usually loop a long staggered clapton and fuse it. This time I cut it instead if looping through my swivel
Sent from my LM-Q610(FGN) using Tapatalk
It doesn't change the direction in any way at all. The real problem is when people talk about folding it in half, other people assume just looping it around the swivel won't hurt, but it WILL hurt because it locks the spaces in place at the swivel end, which is precisely what you don't want, as you need the spaces to slide freely over both cores everywhere excepting only at the chuck of the drill because at the chuck of the drill is where fusing the spaces together will lock the spaces in place.Yeah, do that, don't fold - folding will change the direction of the stagger's "lean" on one side which makes fusing harder
It does change but depending on the amount of gap and how you stagger the lean may not be exaggerated.
Normal Staggering and cutting for 2 cores:
/////////////////////////
////////////////////////
Looping one staggered core around your swivel:
////////////////////////
\\\\\\\\\\\\\\\\\\\\\\\\
You can see the lean/angle in the pictures below:
Normal Staggering and cutting for 2 cores:
/////////////////////////
////////////////////////
Looping one staggered core around your swivel:
////////////////////////
\\\\\\\\\\\\\\\\\\\\\\\\
You can see the lean/angle in the pictures below:
KingPin!
In my defence, I was left unsupervised ^^
VU Donator
Platinum Contributor
Member For 4 Years
VU Challenge Team
Reviewer
It does change but depending on the amount of gap and how you stagger the lean may not be exaggerated.
Normal Staggering and cutting for 2 cores:
/////////////////////////
////////////////////////
Looping one staggered core around your swivel:
////////////////////////
\\\\\\\\\\\\\\\\\\\\\\\\
You can see the lean/angle in the pictures below:
When you align 3 or more ramo do you offset them each time?
I personally dont purposefully, I just set them next to each other and then bind them and start fusing but I use such a small wire that the wire could all be offset and it ends up working out. If you have a macro lens you can inspect the wire and try your best at sitting them side by side to make it easier on yourself.When you align 3 or more ramo do you offset them each time?
Nope.Looping one staggered core around your swivel:
////////////////////////
\\\\\\\\\\\\\\\\\\\\\\\\

I will have to take a few shots under macro as the reason I stopped looping staggered wire was from the issues of it not following the same angle, but I will have to check and see with the wire itself as your diagram makes me second guess it.
KingPin!
In my defence, I was left unsupervised ^^
VU Donator
Platinum Contributor
Member For 4 Years
VU Challenge Team
Reviewer
Been a few months since I’ve been able to put some build time in damn I miss the build bug
Still used the button technique for me it works
I loop it over and twist the button round once
then instead of tying it off and fannying about I use a clothes peg to hold it tight ....this doubles as a weight ....just nice an easy on the drill take my time

Get 21 inches out of just fine

Spacing is nice and even

When finished ...remove the loop and snip the wrap away ....reverse the drill so it’s nice and springy
cut the length into equal parts make sure they are facing the same way ....then like the vid at the top of this page went slow ......very slow and bound about 5 inches together before it started going janky

Got a nice coil out of it ...5 and half wrap 26g core 35g wrap all 316L

Still used the button technique for me it works
I loop it over and twist the button round once
then instead of tying it off and fannying about I use a clothes peg to hold it tight ....this doubles as a weight ....just nice an easy on the drill take my time
Get 21 inches out of just fine
Spacing is nice and even
When finished ...remove the loop and snip the wrap away ....reverse the drill so it’s nice and springy
cut the length into equal parts make sure they are facing the same way ....then like the vid at the top of this page went slow ......very slow and bound about 5 inches together before it started going janky
Got a nice coil out of it ...5 and half wrap 26g core 35g wrap all 316L
Sweet build dude. I haven't really built anything besides fused claps in a while either. Those look stunning. I've never tried a 3 coreBeen a few months since I’ve been able to put some build time in damn I miss the build bug
Still used the button technique for me it works
I loop it over and twist the button round once
then instead of tying it off and fannying about I use a clothes peg to hold it tight ....this doubles as a weight ....just nice an easy on the drill take my time
View attachment 130581
Get 21 inches out of just fine
View attachment 130582
Spacing is nice and even
View attachment 130583
When finished ...remove the loop and snip the wrap away ....reverse the drill so it’s nice and springy
cut the length into equal parts make sure they are facing the same way ....then like the vid at the top of this page went slow ......very slow and bound about 5 inches together before it started going janky
View attachment 130585
Got a nice coil out of it ...5 and half wrap 26g core 35g wrap all 316L
View attachment 130584
KingPin!
In my defence, I was left unsupervised ^^
VU Donator
Platinum Contributor
Member For 4 Years
VU Challenge Team
Reviewer
Sweet build dude. I haven't really built anything besides fused claps in a while either. Those look stunning. I've never tried a 3 core
thanks matey ....I haven’t either I ran out of every single coil I built months back so spent yesterday knocking out my favourite workhorse builds to stock up again and get the feel back (Flapton’s) this evening wanted to do something fun
it’s a pain in the fucking ass mate ...so happy I pulled it off though especially being rusty
KingPin!
In my defence, I was left unsupervised ^^
VU Donator
Platinum Contributor
Member For 4 Years
VU Challenge Team
Reviewer
I tried following that straw vid caram posted and it does work really well for the first couple of inches but with this thicker gauge it goes off piste after that ....slapped on raymos clamp on the swivel end and went super slow to finish up the rest
I could never get the button trick to work. But the clothespin would make it super easy I bet. I'll have to give that a shot. I was just explaining the stagger to my wife. Then showed her a half stag. Like I was talking fusing atoms. Lolthanks matey ....I haven’t either I ran out of every single coil I built months back so spent yesterday knocking out my favourite workhorse builds to stock up again and get the feel back (Flapton’s) this evening wanted to do something fun
it’s a pain in the fucking ass mate ...so happy I pulled it off though especially being rusty
I love those clamps. I use them for anything larger than a fusedI tried following that straw vid caram posted and it does work really well for the first couple of inches but with this thicker gauge it goes off piste after that ....slapped on raymos clamp on the swivel end and went super slow to finish up the rest
KingPin!
In my defence, I was left unsupervised ^^
VU Donator
Platinum Contributor
Member For 4 Years
VU Challenge Team
Reviewer
I could never get the button trick to work. But the clothespin would make it super easy I bet. I'll have to give that a shot. I was just explaining the stagger to my wife. Then showed her a half stag. Like I was talking fusing atoms. Lol
I’m gonna do something like that next ....half framed staggered staple
4 0.4 x0.1 ...a single 26g stagger and bind it all together after that makes for a nice vape
Might even try and space it so I can try a pitchfork ...still I’m rusty so don’t wanna run before I get a feel for it again
The difficulty in pitchforks is getting 2 lengths of perfect 1/2 forks. If your first 2 fuses aren't right on you will end up not being able to get the final fuse in places because the stags will be to tight in areas.Might even try and space it so I can try a pitchfork ...still I’m rusty so don’t wanna run before I get a feel for it again
There are a number of variations on a pitchfork. But, imho, the best looking ones are skip 2 with perpendicular lines. These are extremely time consuming as you have to adjust the fuse angle every 1/2 turn. The easiest option is to lock in an angle. This will give you slanted lines. And as long as your angle is true on all 3 fusings then it still looks good.
A half fork is supper easy if your proficient in stagger fusing. Skip fuse the first stack of ribbon on to the staggered core. Then I don't even remove the stick. I just use cloths pins and pin the second stack while it's still in the chuck.
Pitchforks are such an astronomical pain in the ass I hate whenever I have to take my magnifying glasses out to do a build lol. I feel like a coal miner or a laboratory scientist. I have bad flashbacks from chemistry class. Pitchforks have never been the most appetizing build honestly. It's a lot of work. It is a brilliant idea for a coil, it's just crazy. I know you do some crazy stuff in fact you're one of the best builders to ever post on this forum but even you have to find pitchforks tedious to a certain degree... at least I'd have to imagine so.The difficulty in pitchforks is getting 2 lengths of perfect 1/2 forks. If your first 2 fuses aren't right on you will end up not being able to get the final fuse in places because the stags will be to tight in areas.
There are a number of variations on a pitchfork. But, imho, the best looking ones are skip 2 with perpendicular lines. These are extremely time consuming as you have to adjust the fuse angle every 1/2 turn. The easiest option is to lock in an angle. This will give you slanted lines. And as long as your angle is true on all 3 fusings then it still looks good.
A half fork is supper easy if your proficient in stagger fusing. Skip fuse the first stack of ribbon on to the staggered core. Then I don't even remove the stick. I just use cloths pins and pin the second stack while it's still in the chuck.

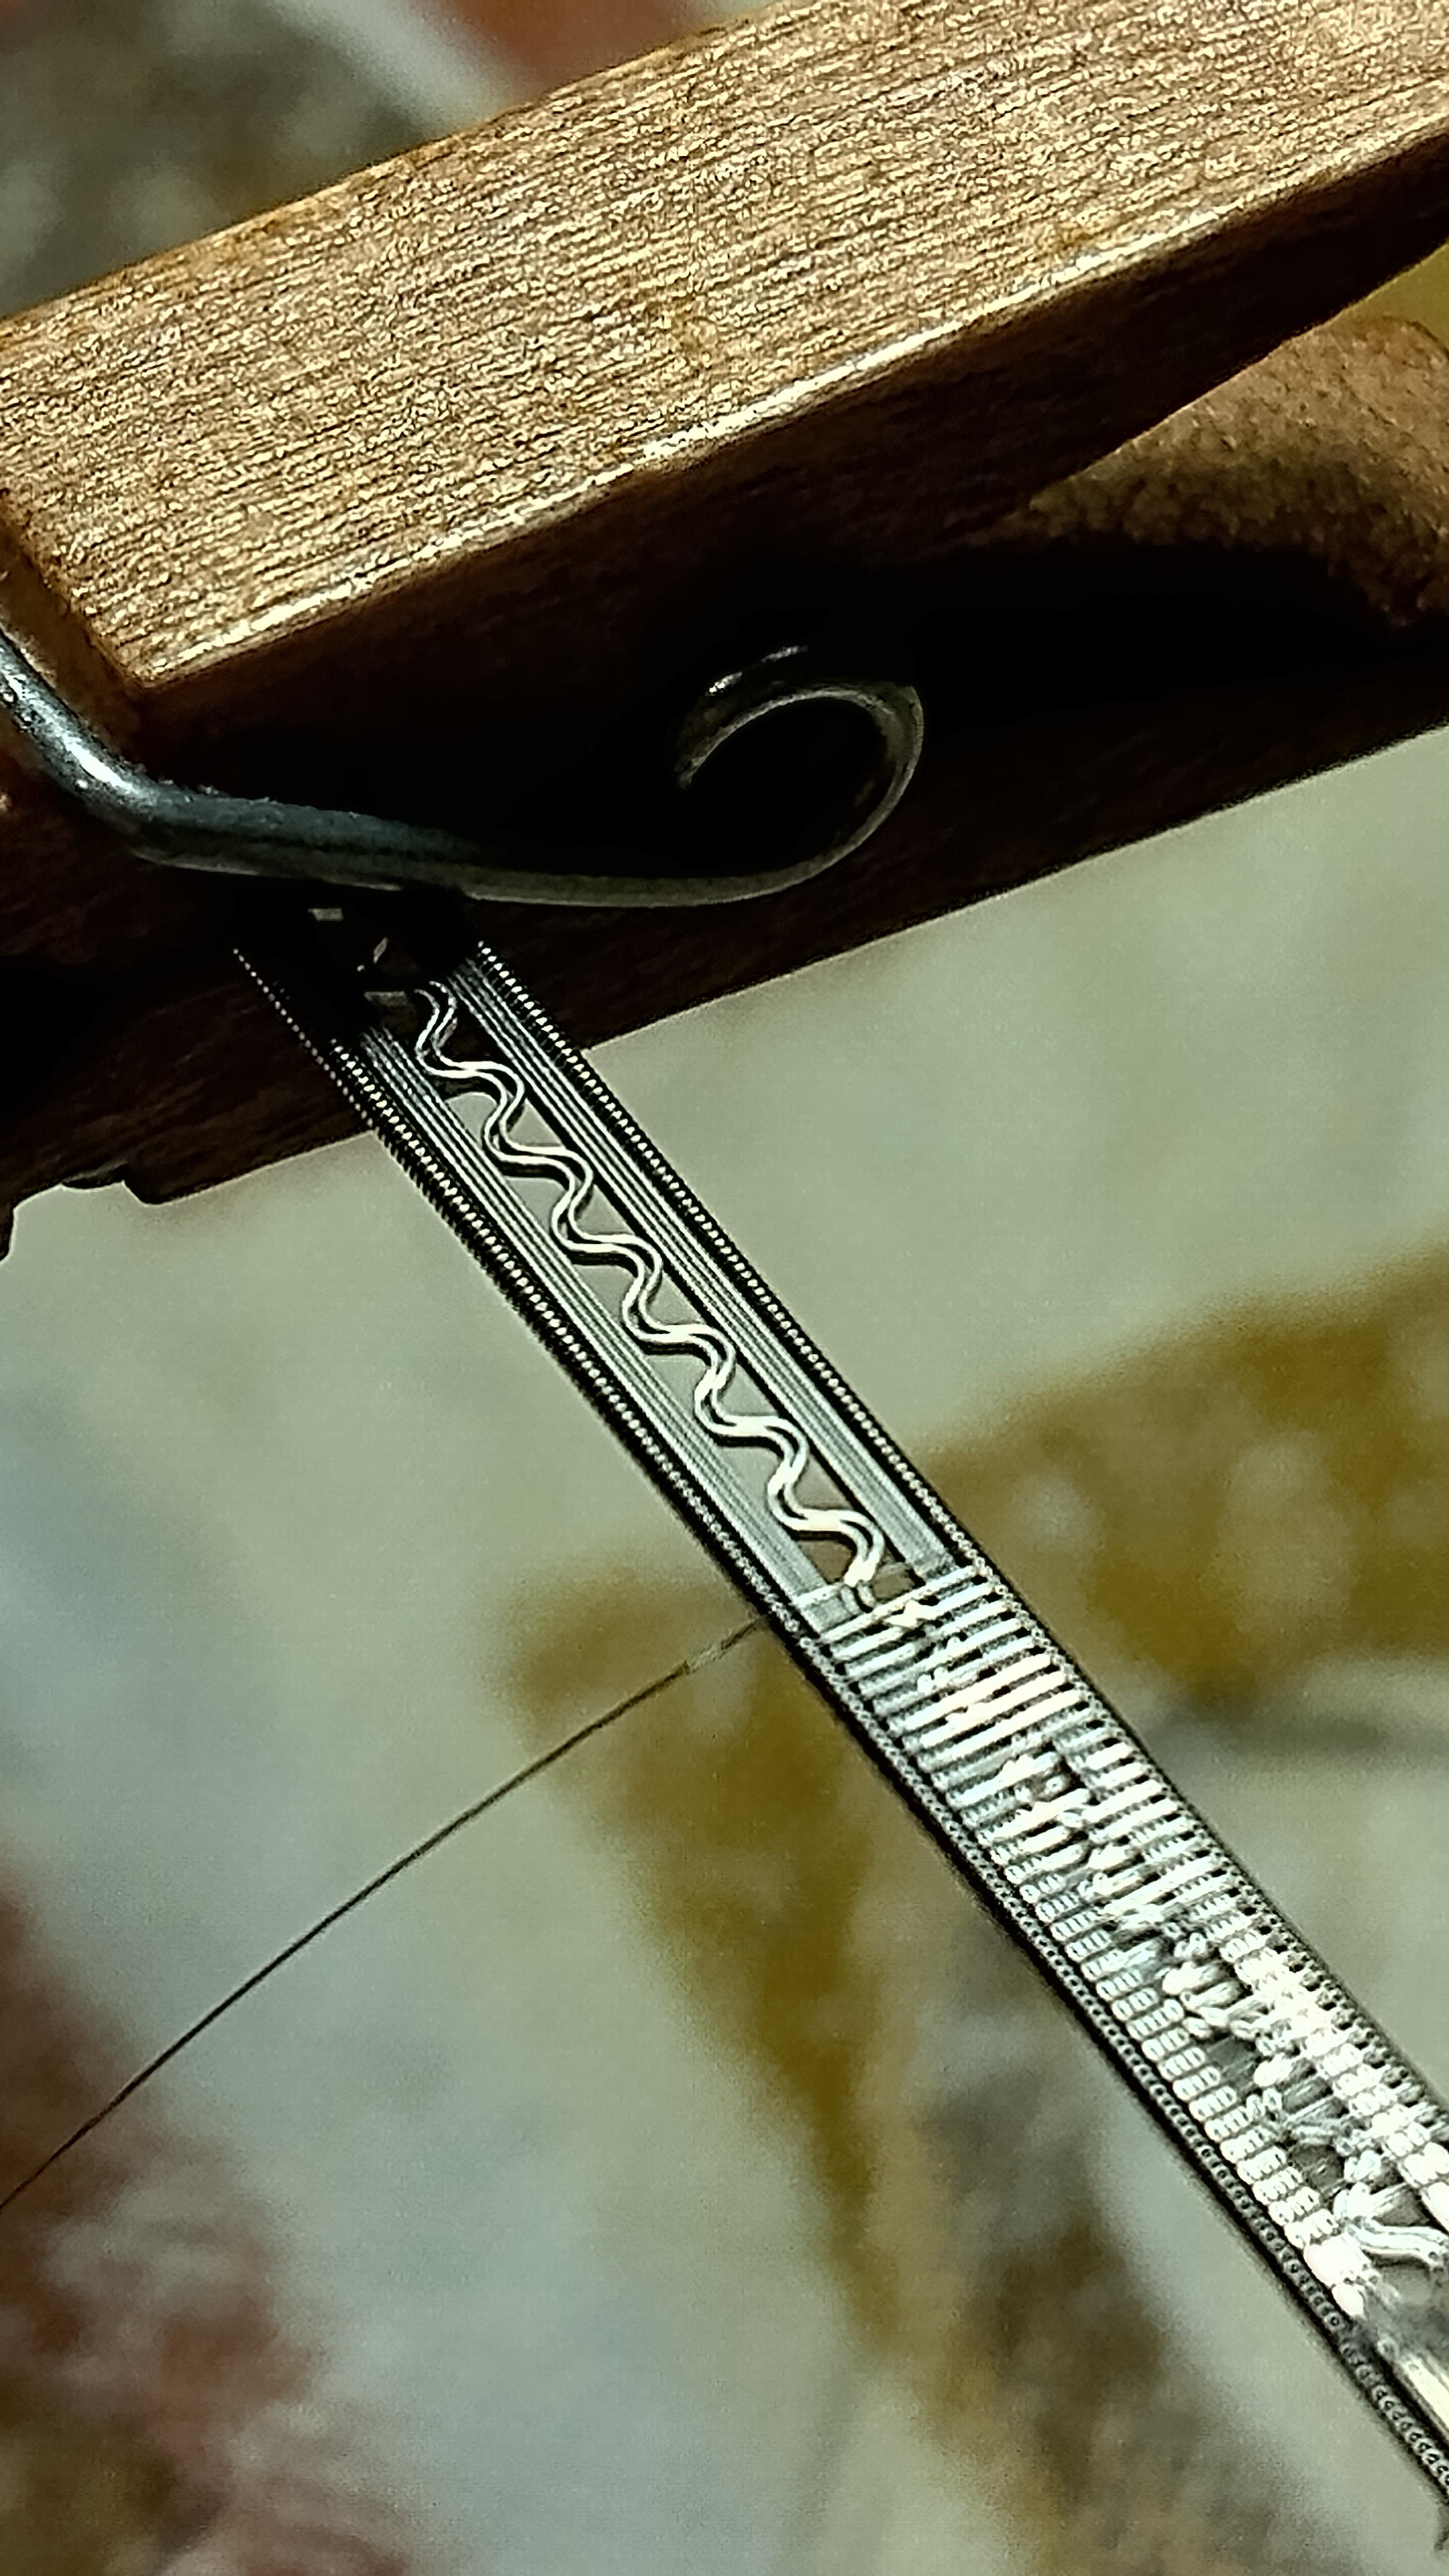
This thread feels like home for me. Since the end of January staggered coils are pretty much all I've wanted to make. @FlavorOverClouds , you might find some of this stuff interesting.
I just saw some staggerton type thing Meg made with 46ga. I'm still in awe. Here I am thinking 42ga around 3 to 5 cores is tough. I gotta to keep challenging myself.
Here's my last moment of triumph:
N80 5x30/42
I've done 5x30 lots before mostly with 38 or 40ga. I didn't think I could do 42ga cleanly, ever. We're talking about a lot of thin wire. It's way more revolutions and way more chances for error than using 38ga. It's also tougher to see what's going on but I mostly just use feel anyways until or if I ever have a mistake. Perfect spacing is always nice but it's super critical with thinner clapton wires
Last edited:
FlavorOverClouds
Member For 1 Year
Thanks for tagging me. You know my favorite style is the sfc.
I only want it to taste amazing. Is that too much to ask?
I only want it to taste amazing. Is that too much to ask?
N90: 6x32/42ga
N80: 6x31/42ga:
N80: 6x31/42ga:
FlavorOverClouds
Member For 1 Year
WowN90: 6x32/42ga
N80: 6x31/42ga:
 . Stunning build man!!
I only want it to taste amazing. Is that too much to ask?
FlavorOverClouds
Member For 1 Year
I'm halfway there JustFrank, finally got my 3×32/40 sfc built.
I only want it to taste amazing. Is that too much to ask?
I only want it to taste amazing. Is that too much to ask?
Woot woot! Lookin' good!I'm halfway there JustFrank, finally got my 3×32/40 sfc built.
I only want it to taste amazing. Is that too much to ask?
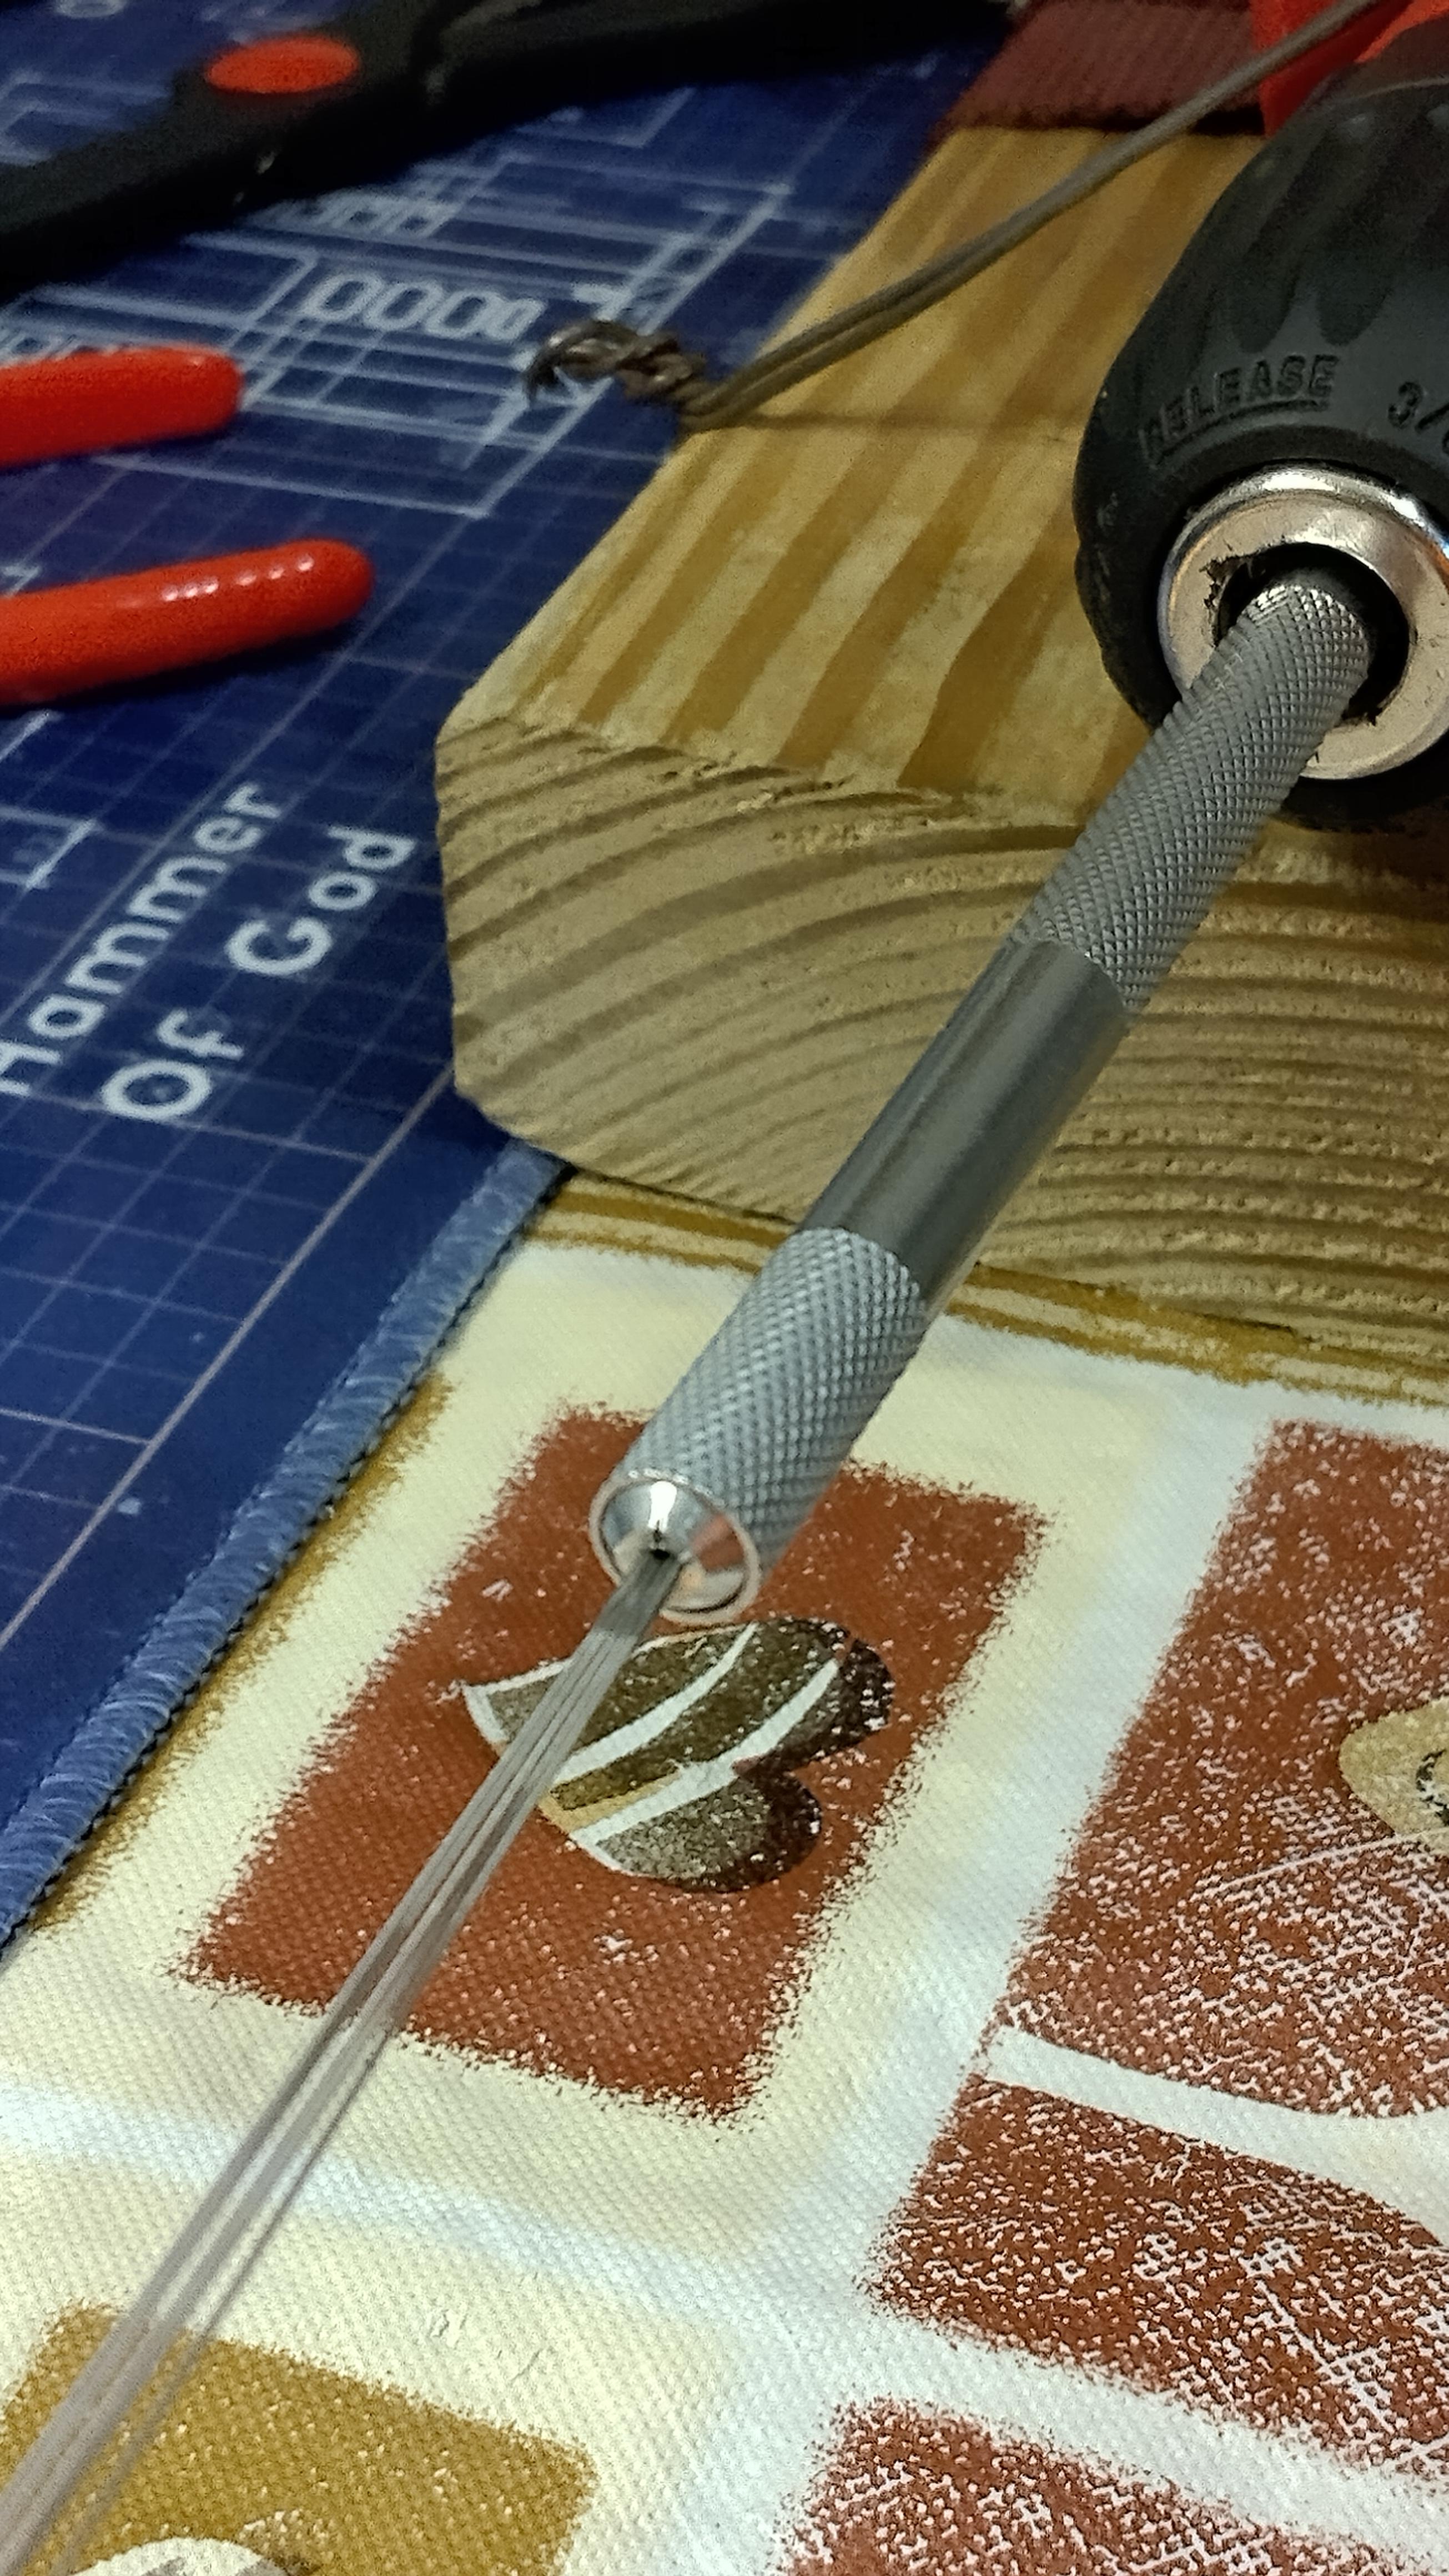
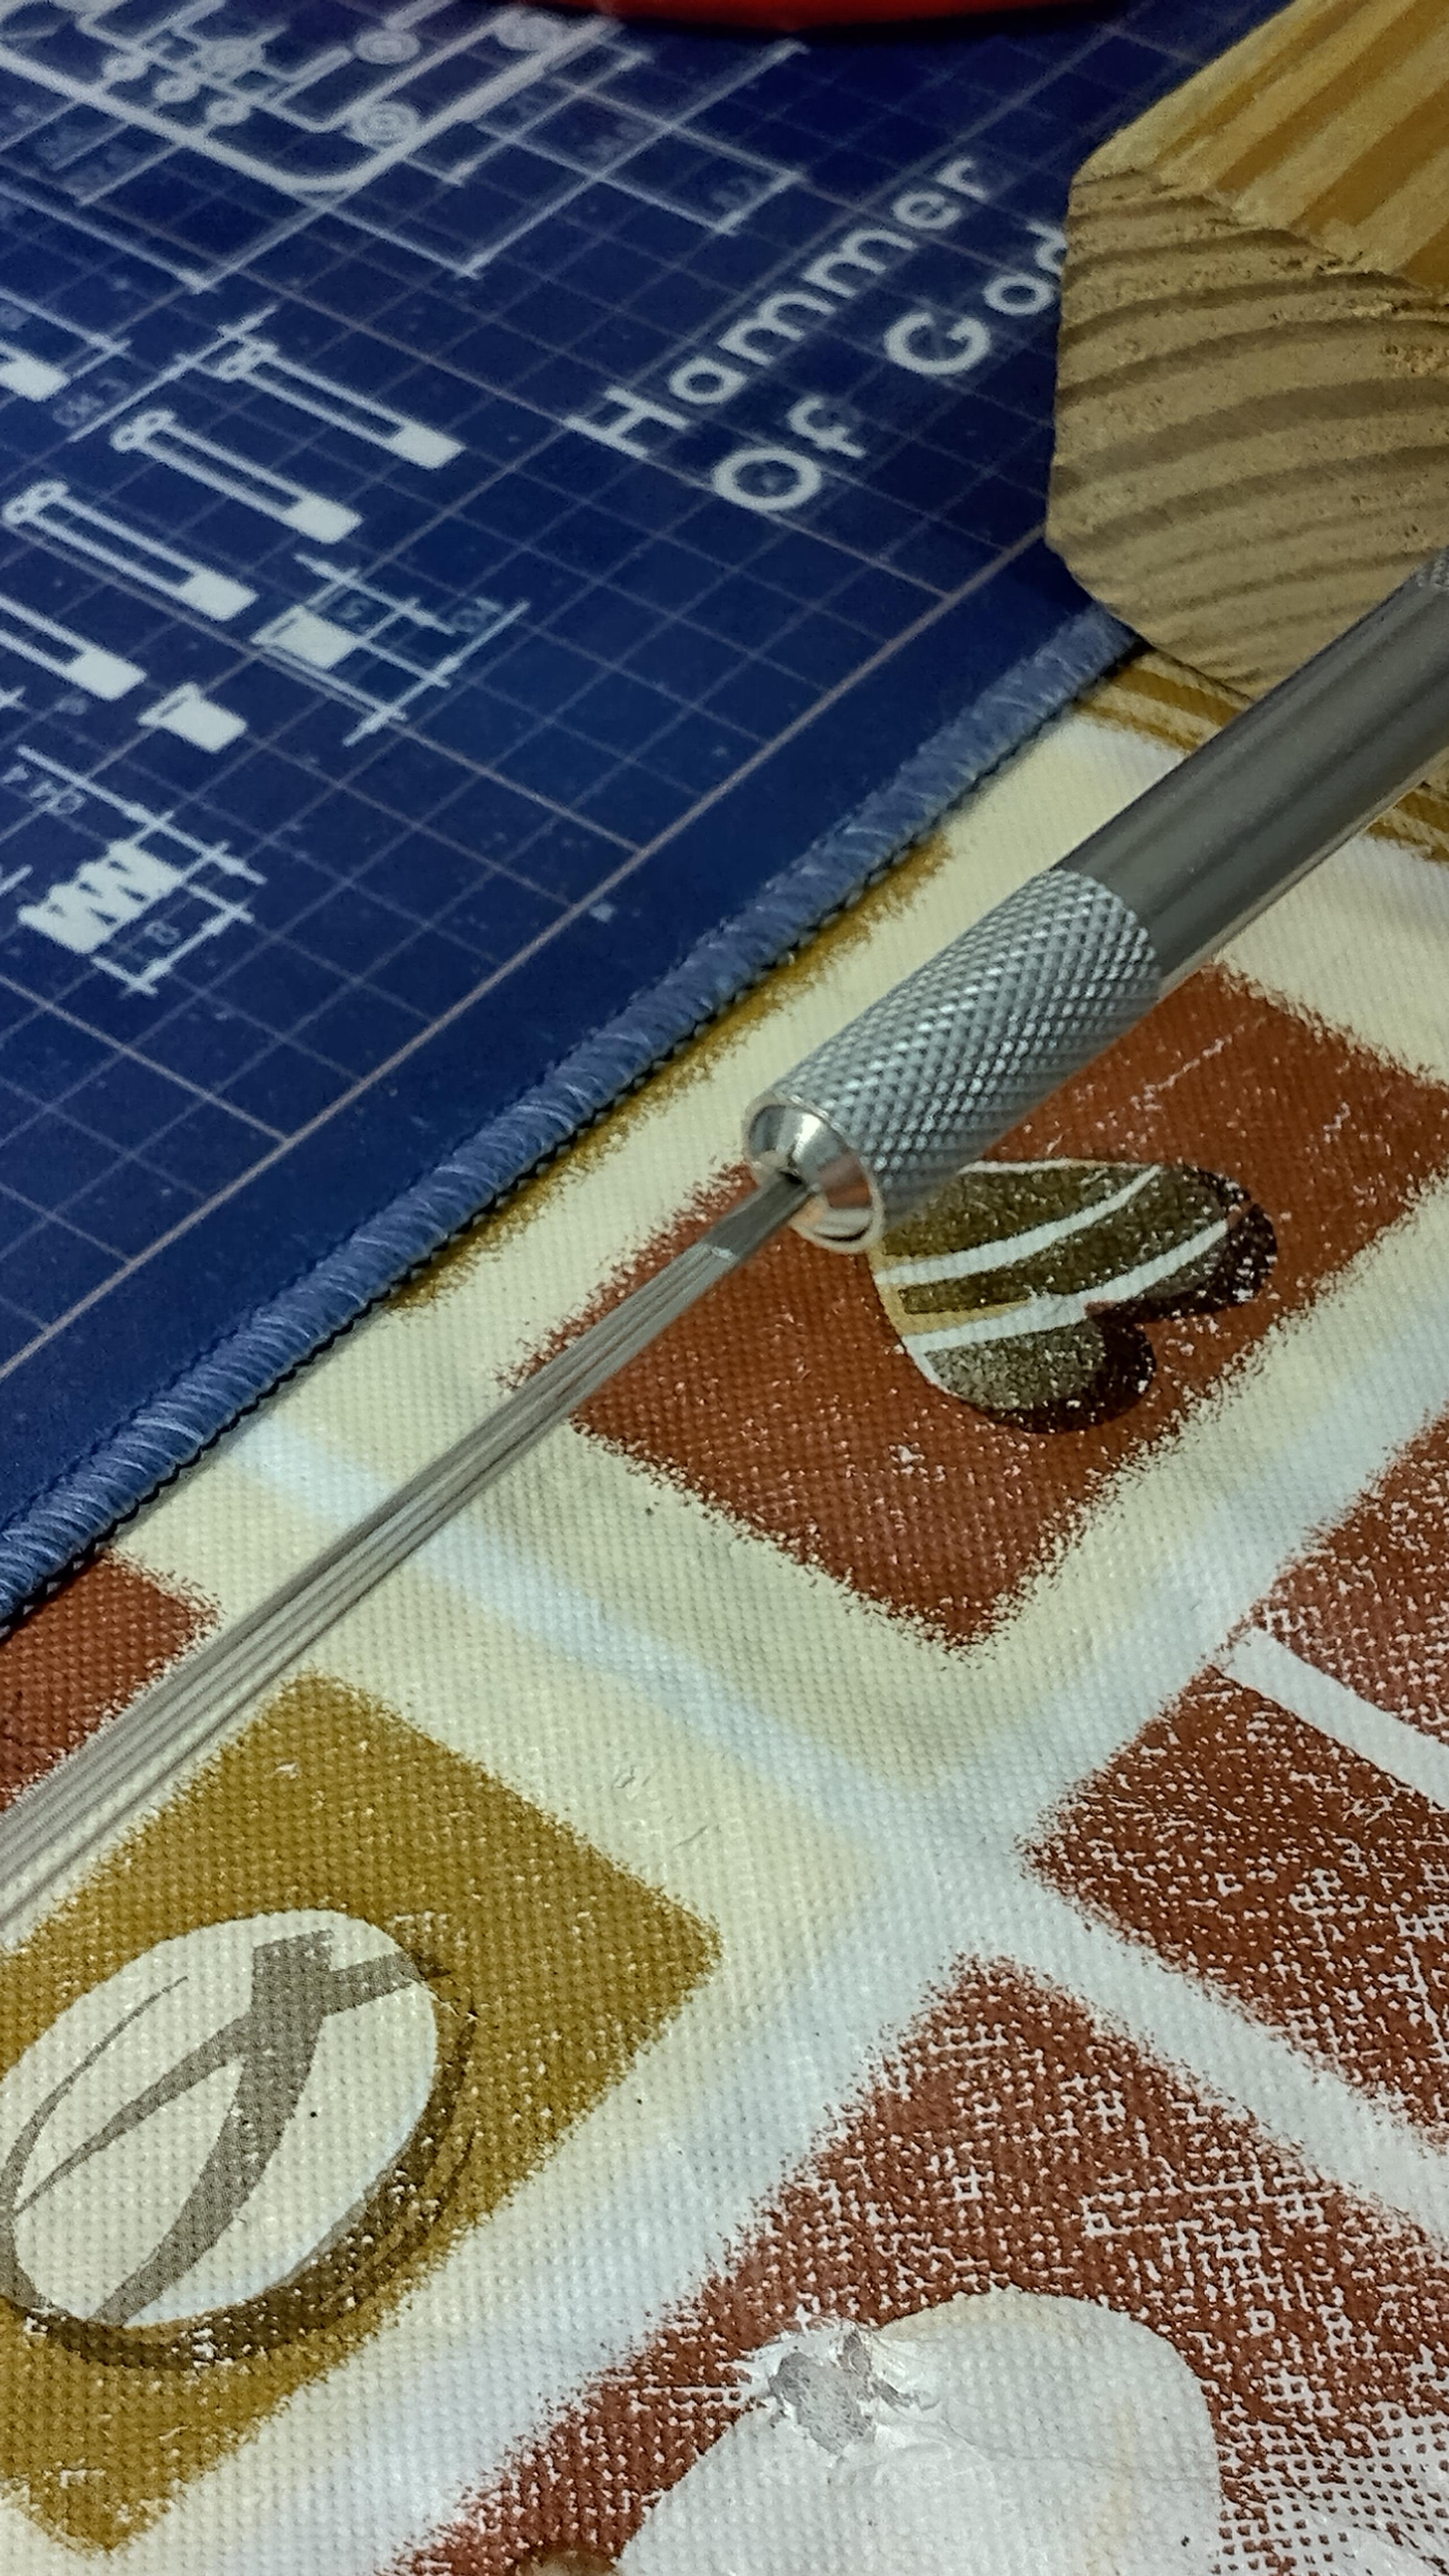
Yesterday I was convinced that I needed a tool to center my stag wires. I was sick of my wires spinning off center in my chuck. There's a place in the UK that has these flat things that go into your chuck. Then there's Raymo clamps and the russian ones. I looked at all kinds of different things. Instead of spending all that money, I thought maybe I could make something.
Then I had a lightbulb moment and thought about a hobby knife. I checked it out, and thought it just might work. Today I put it to use and gave it a couple of goes. Turns out it works great and I only spent one dollar for it . Here's a few photos:
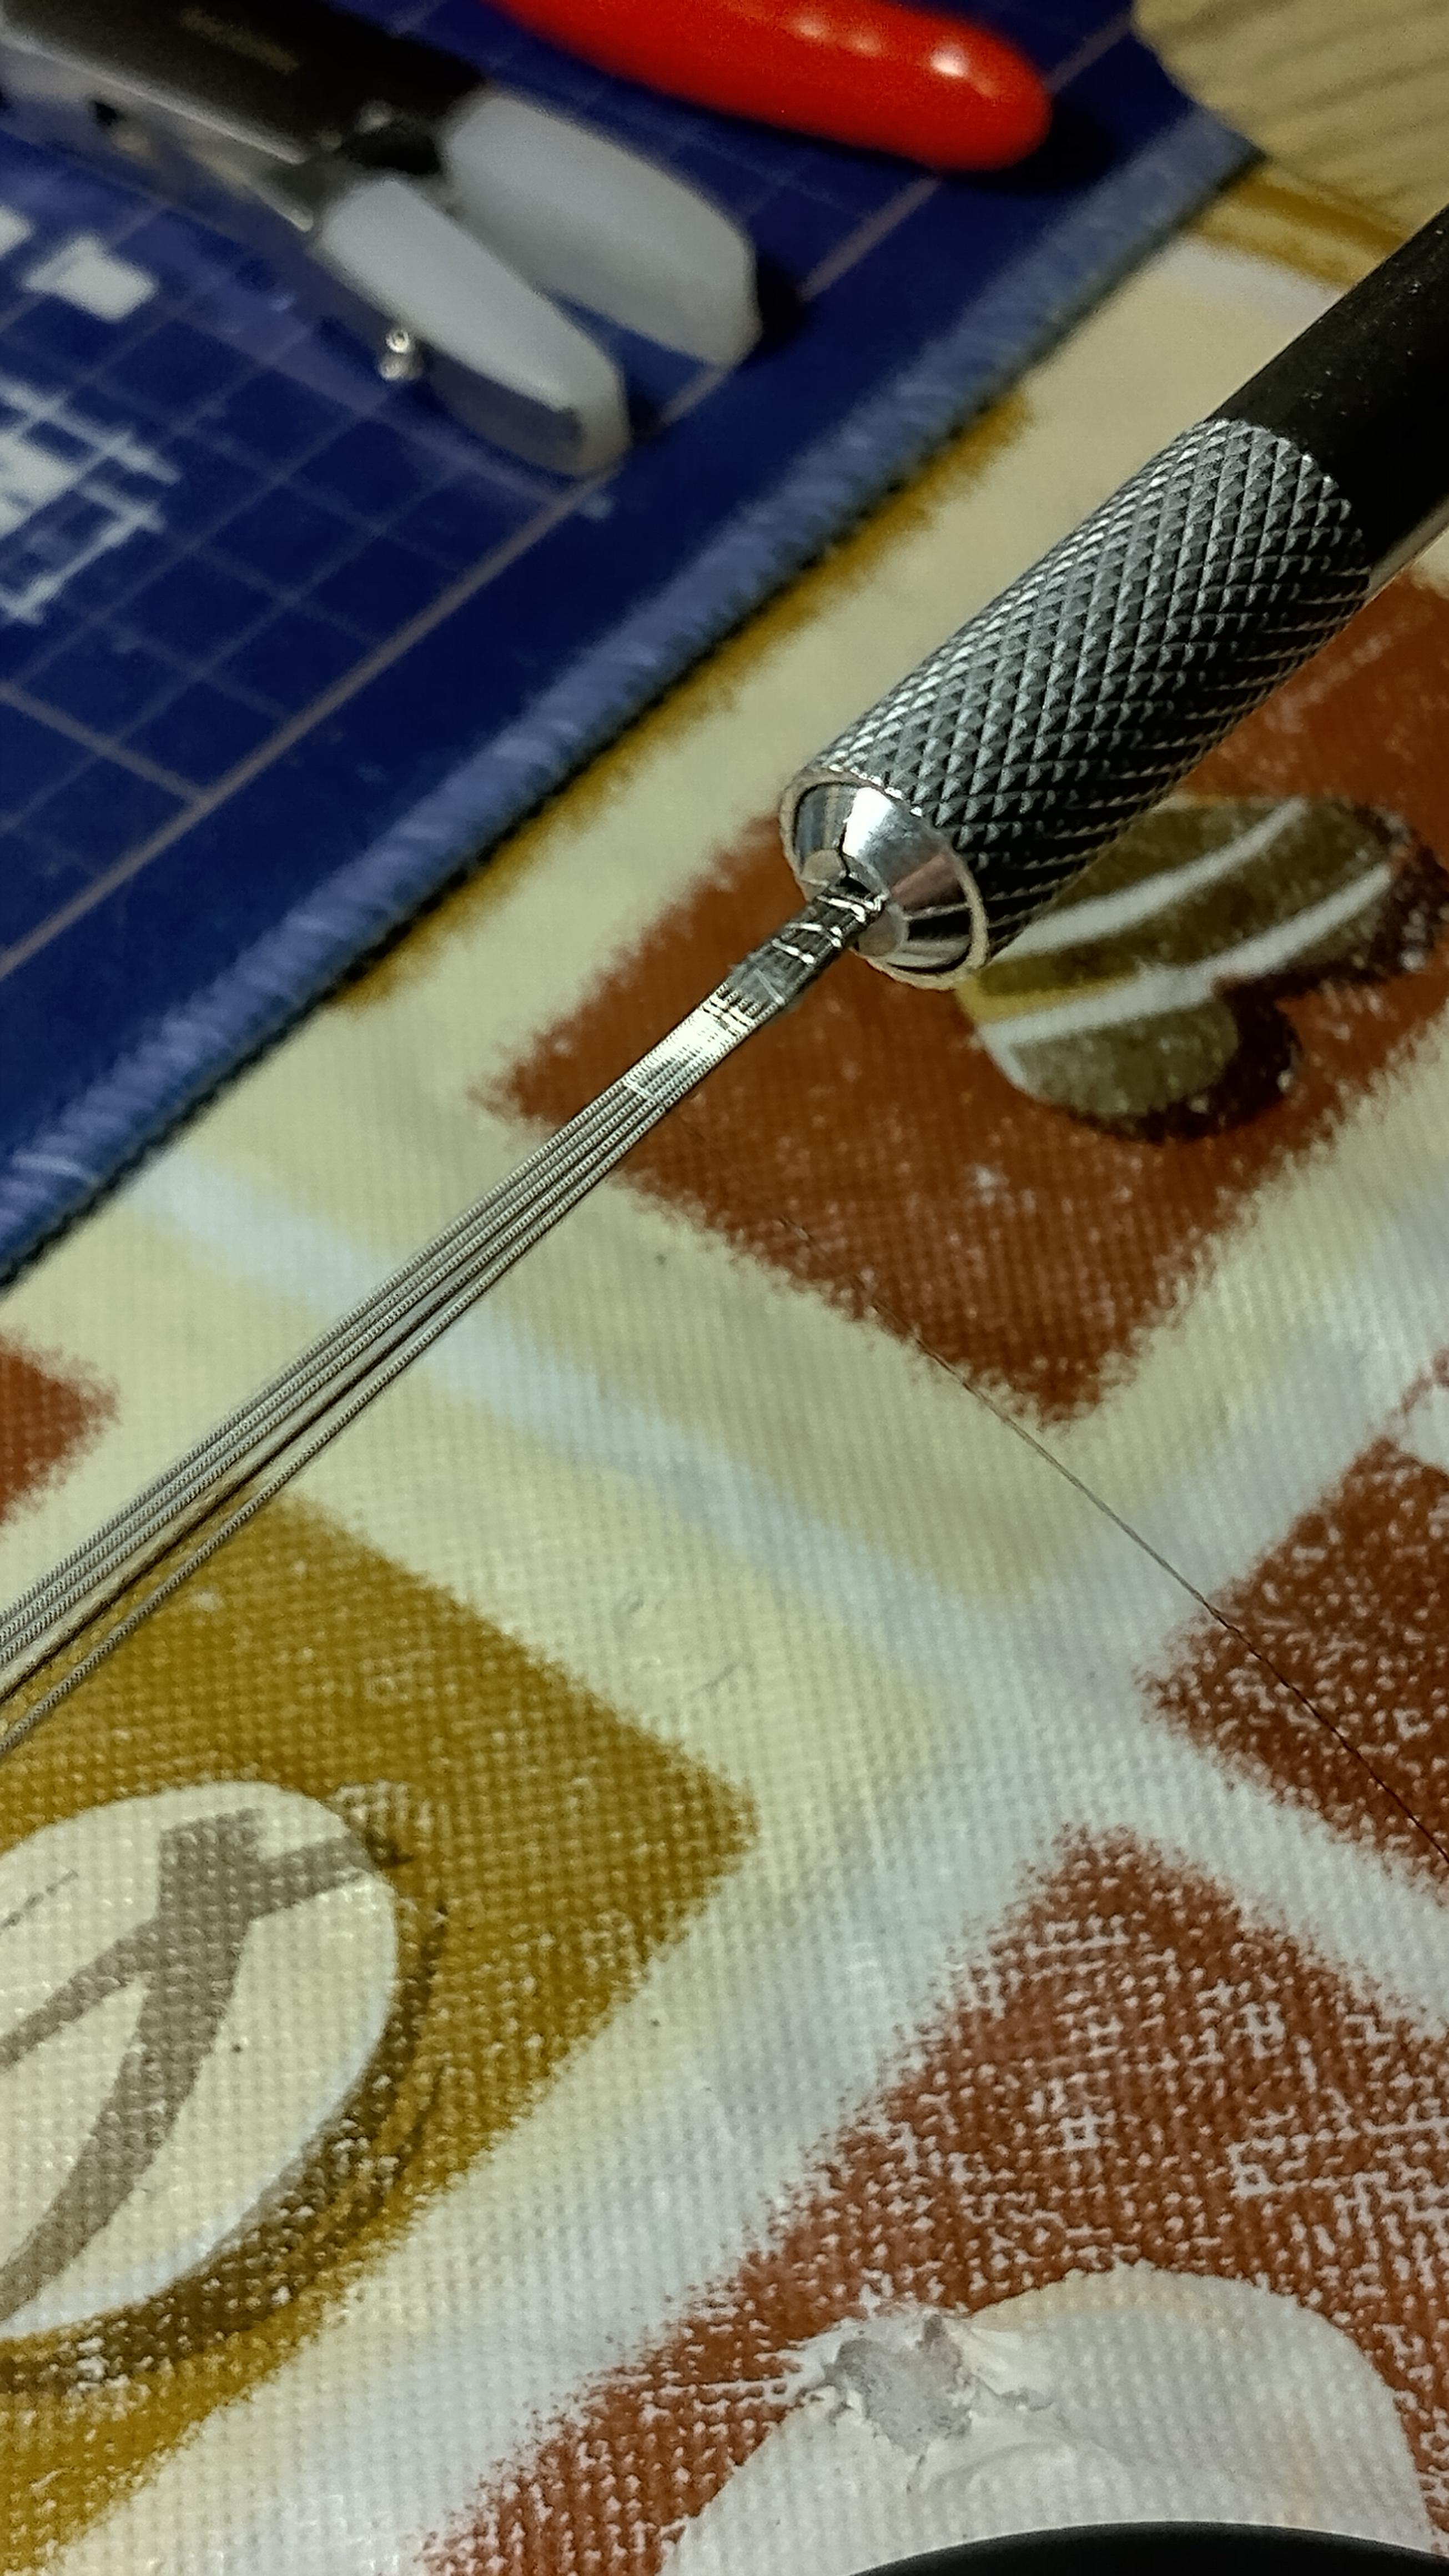
I'm not saying it's better than those things, it's just a cheap alternative that's available all over. Sometimes trying to find and get those specialty tools is a pain in the ass. Hopefully this post can help others.
I use a little bit of hot glue on my cores every time. This idea might not work if you don't. It probably wouldn't work well for smaller wires and such. My main coils are over three cores and up to 6 or 7 so flat wires.
Then I had a lightbulb moment and thought about a hobby knife. I checked it out, and thought it just might work. Today I put it to use and gave it a couple of goes. Turns out it works great and I only spent one dollar for it
. Here's a few photos:
I'm not saying it's better than those things, it's just a cheap alternative that's available all over. Sometimes trying to find and get those specialty tools is a pain in the ass. Hopefully this post can help others.
I use a little bit of hot glue on my cores every time. This idea might not work if you don't. It probably wouldn't work well for smaller wires and such. My main coils are over three cores and up to 6 or 7 so flat wires.
FlavorOverClouds
Member For 1 Year
I know a couple of people that use those. I got me a chuck holder from Atom Customs and love it.Yesterday I was convinced that I needed a tool to center my stag wires. I was sick of my wires spinning off center in my chuck. There's a place in the UK that has these flat things that go into your chuck. Then there's Raymo clamps and the russian ones. I looked at all kinds of different things. Instead of spending all that money, I thought maybe I could make something.
Then I had a lightbulb moment and thought about a hobby knife. I checked it out, and thought it just might work. Today I put it to use and gave it a couple of goes. Turns out it works great and I only spent one dollar for it. Here's a few photos:
I'm not saying it's better than those things, it's just a cheap alternative that's available all over. Sometimes trying to find and get those specialty tools is a pain in the ass. Hopefully this post can help others.
 . Here's a few photos:
I only want it to taste amazing. Is that too much to ask?
Really? Here I thought I was the first to think of thisI know a couple of people that use those. I got me a chuck holder from Atom Customs and love it.
I only want it to taste amazing. Is that too much to ask?
 lol. Well I wish I would've known about this "hack" earlier .
FlavorOverClouds
Member For 1 Year
I thought the same thing after someone showed me. Could have saved a few bucks, but I'm pretty happy with the AtomReally? Here I thought I was the first to think of this
I only want it to taste amazing. Is that too much to ask?
I just ordered one of those atom customs to check out as well. Looks awesome. Thanks for the recommendation.I thought the same thing after someone showed me. Could have saved a few bucks, but I'm pretty happy with the Atom
I only want it to taste amazing. Is that too much to ask?
FlavorOverClouds
Member For 1 Year
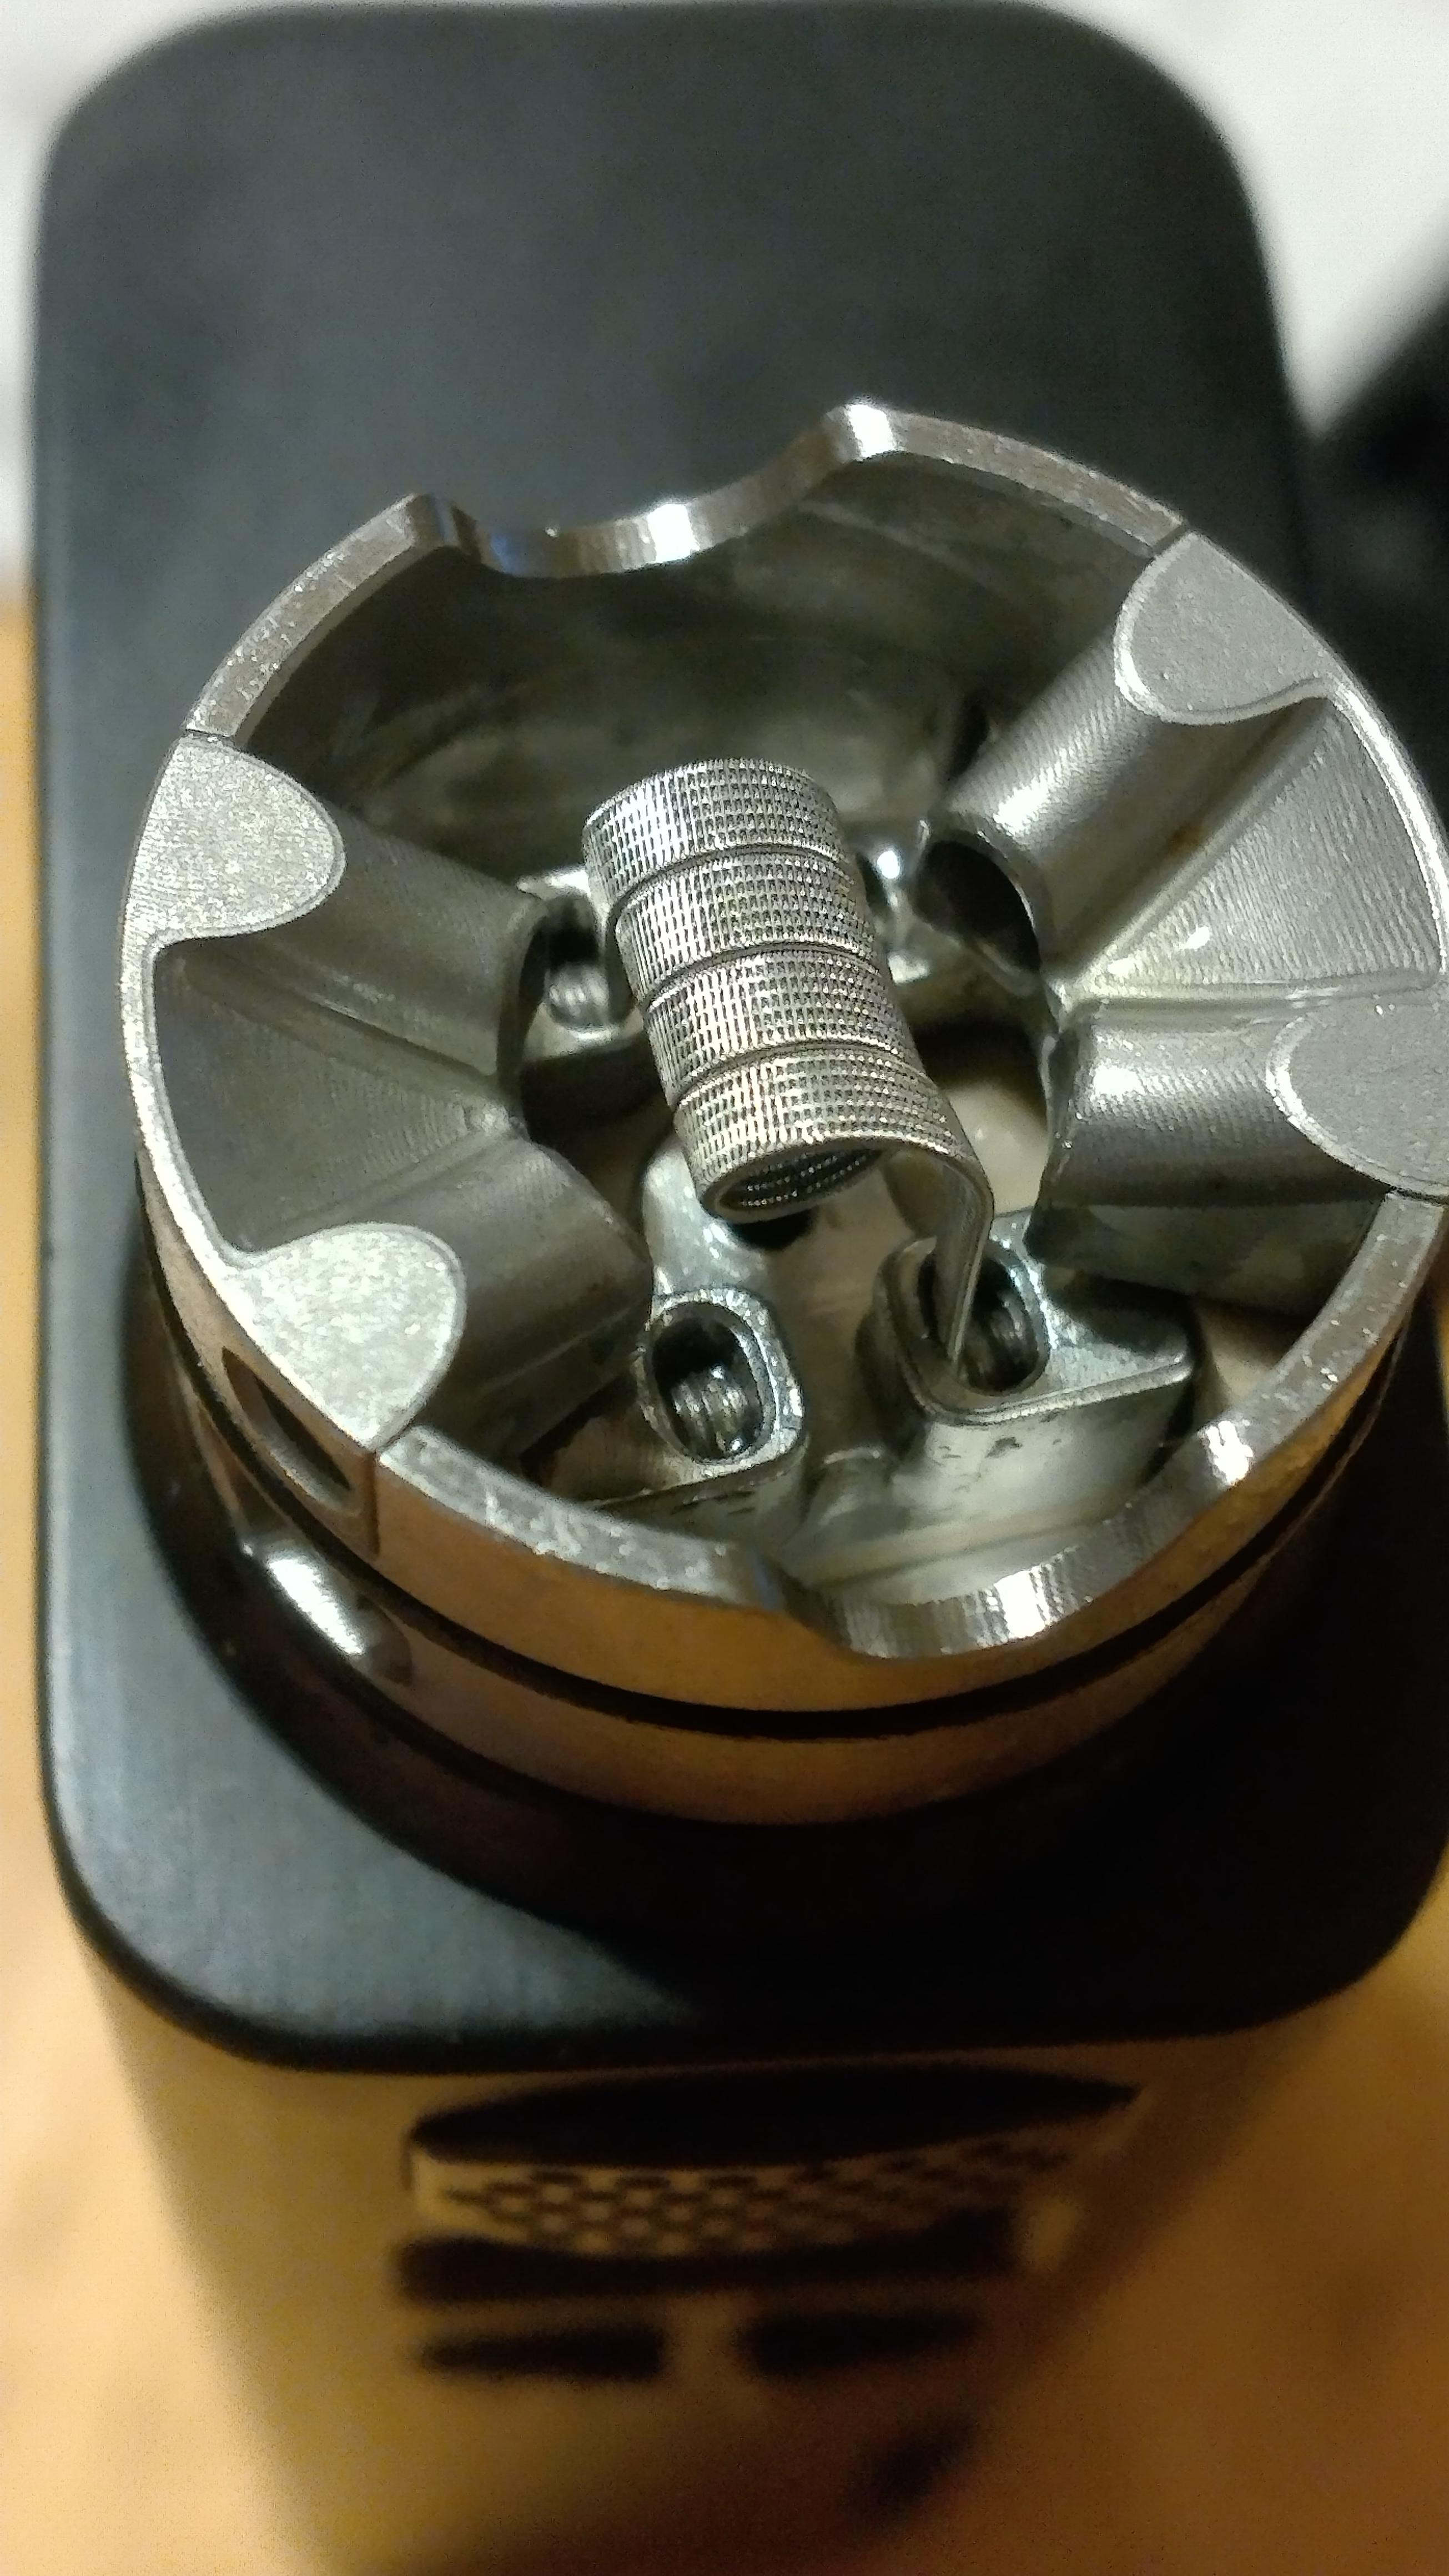
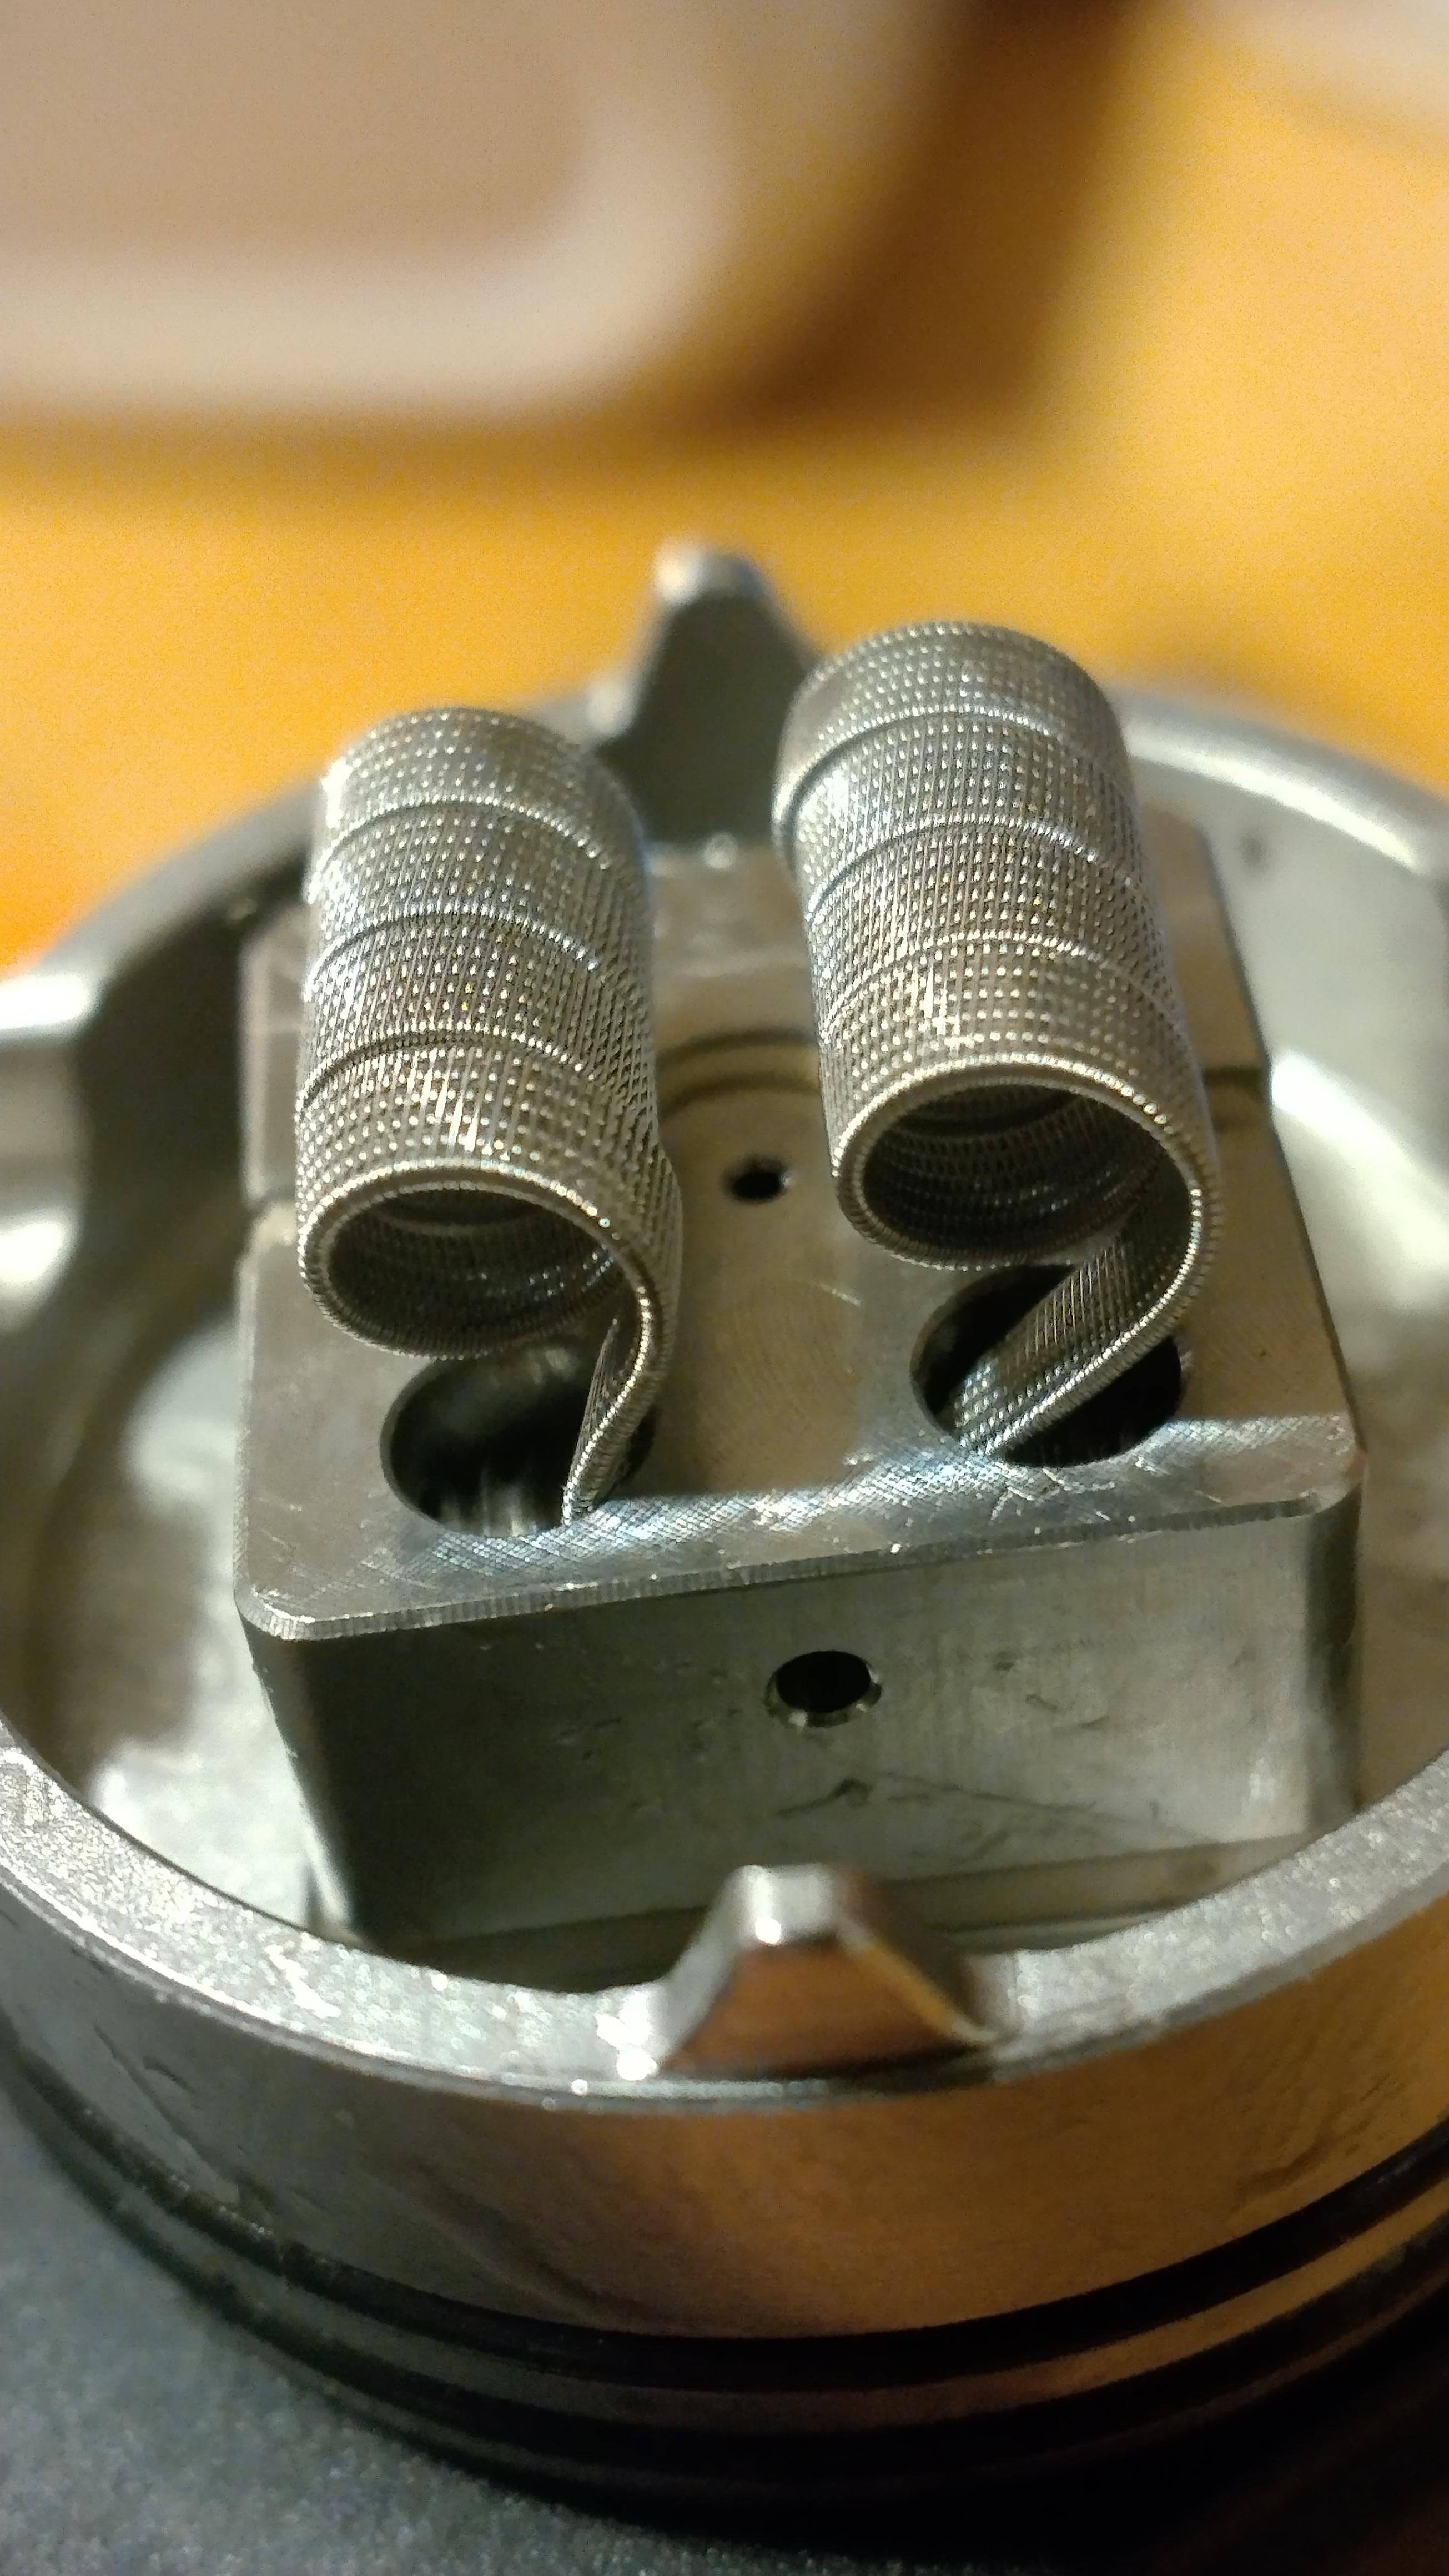
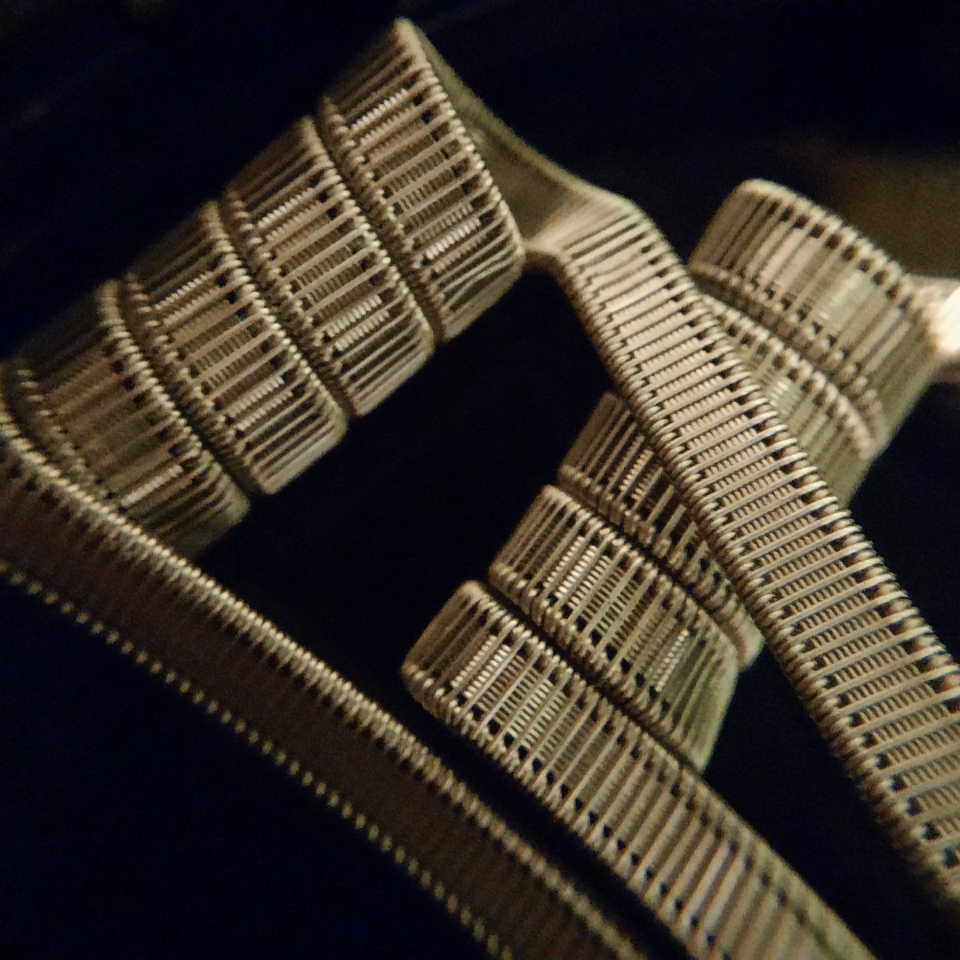
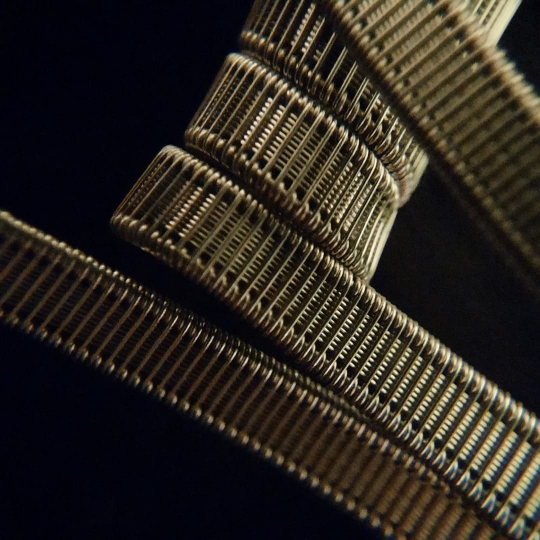
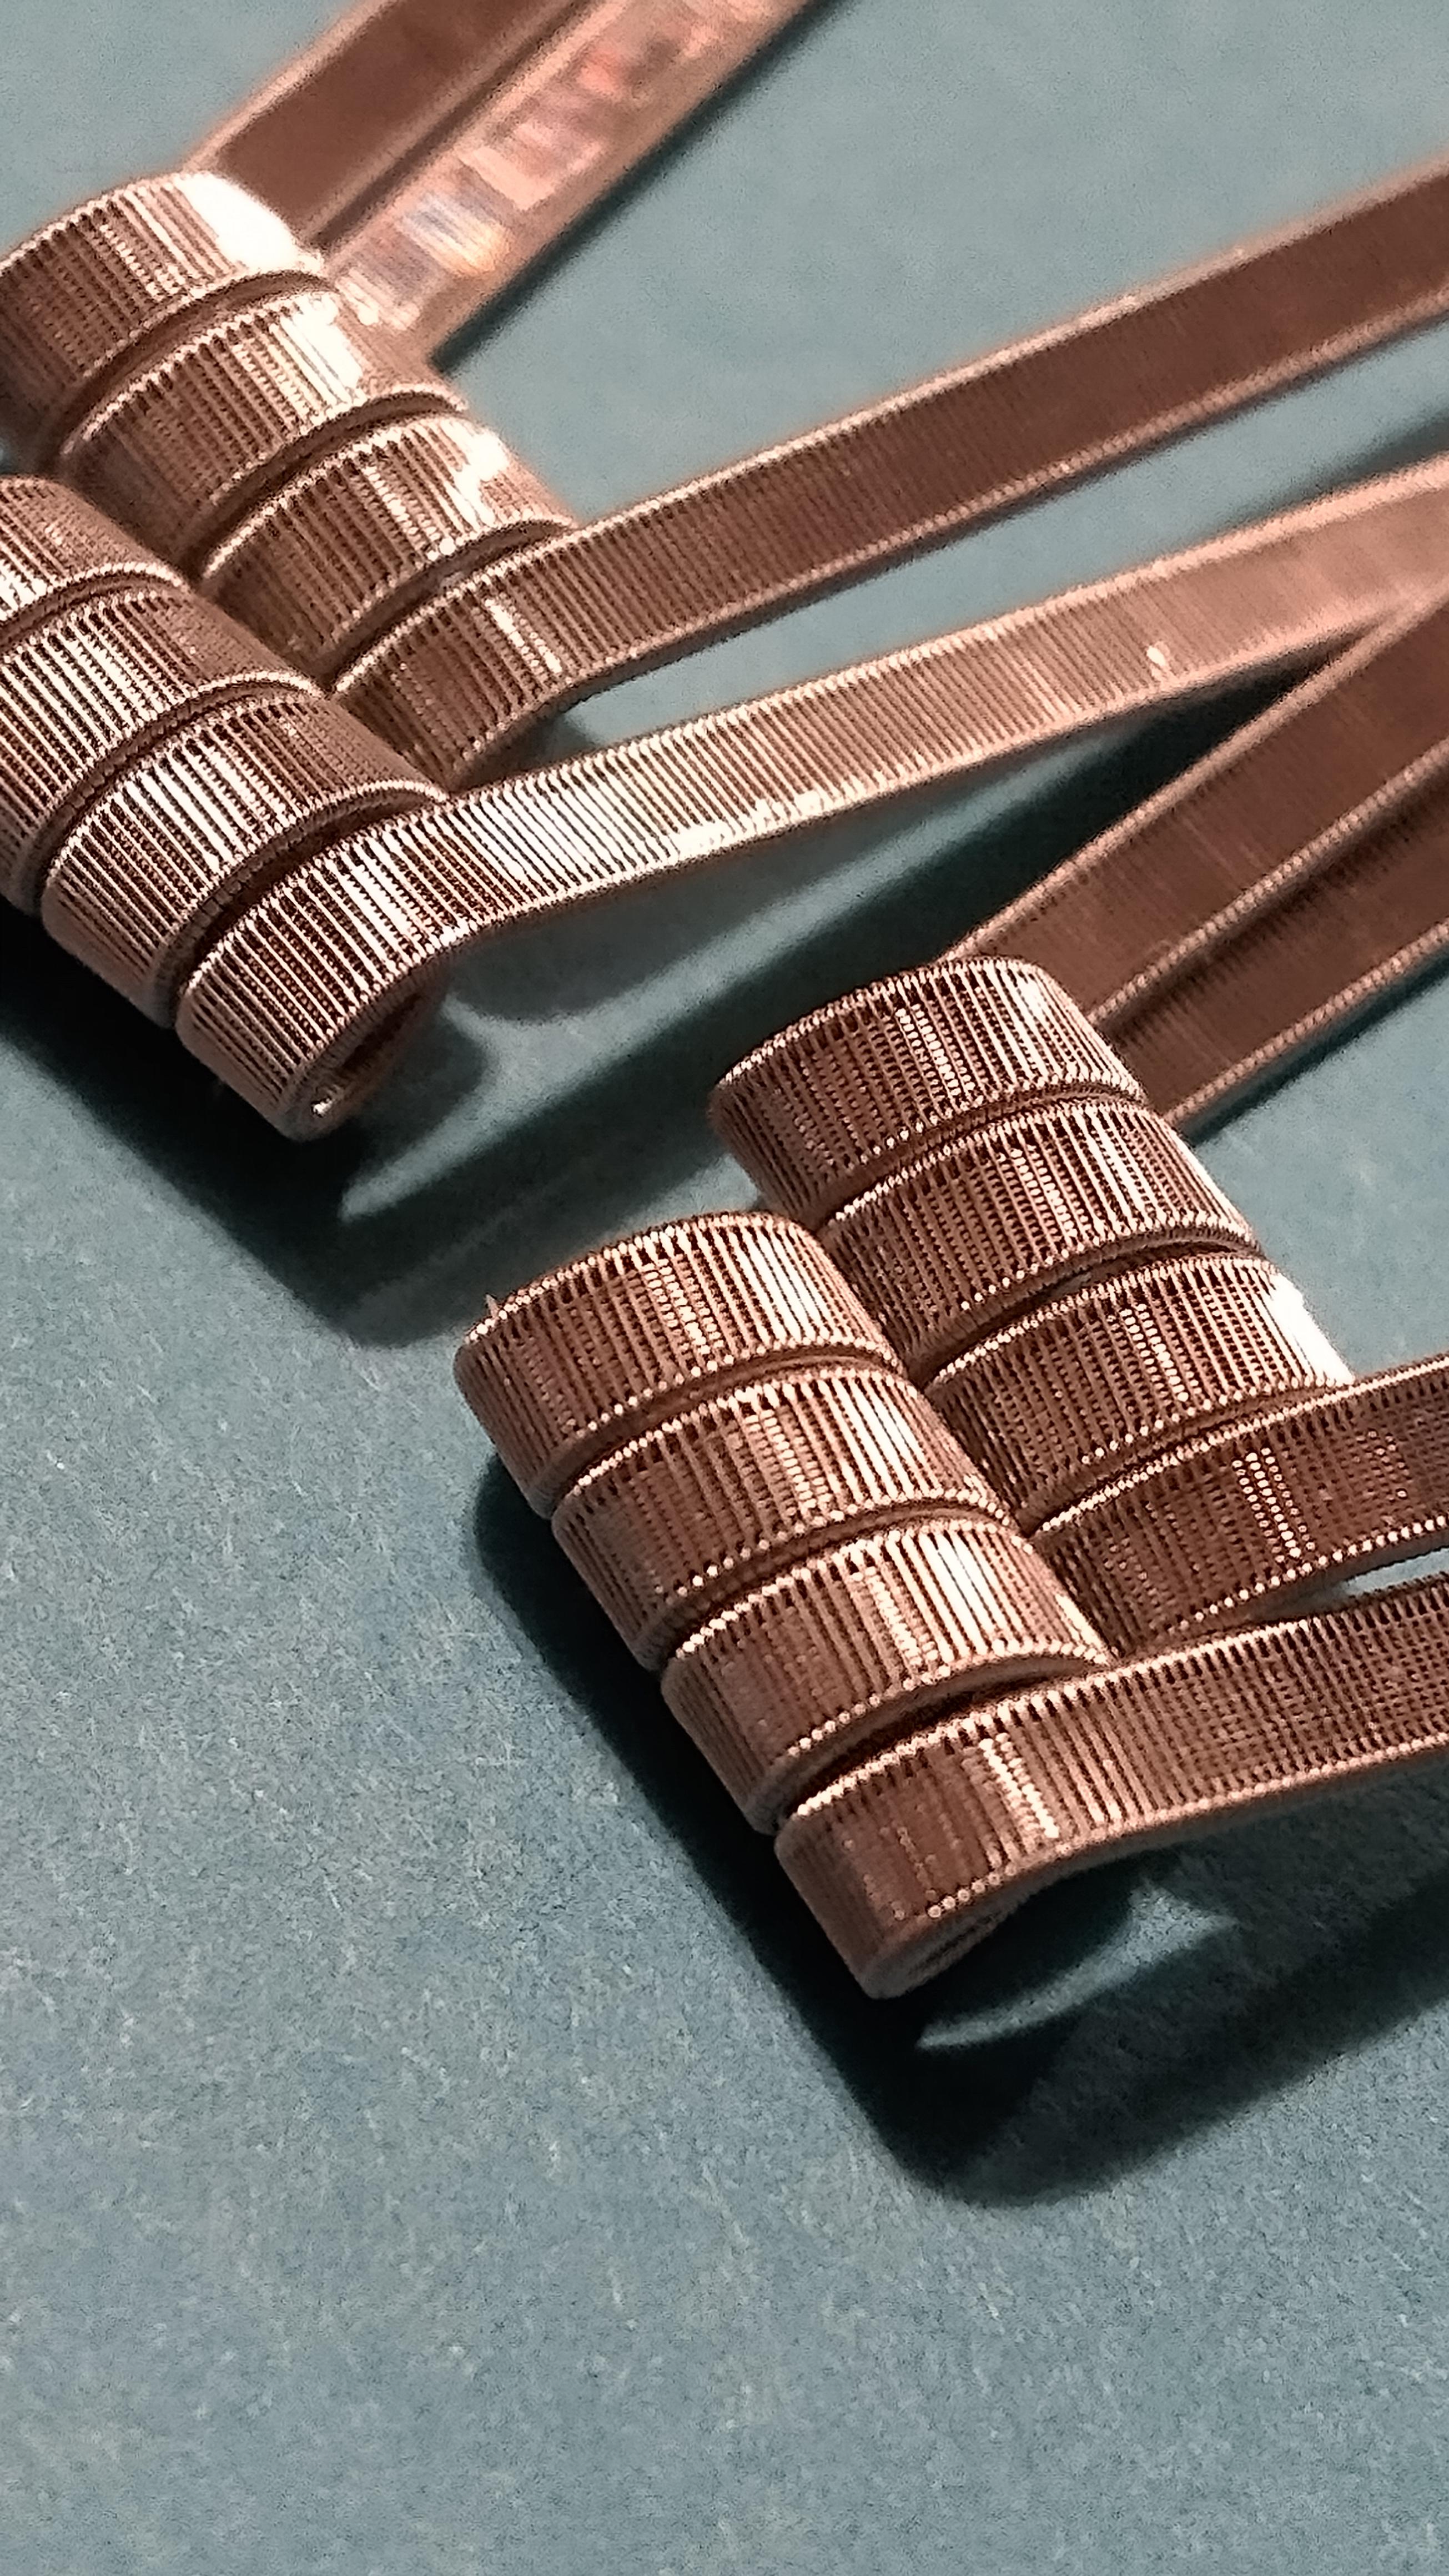
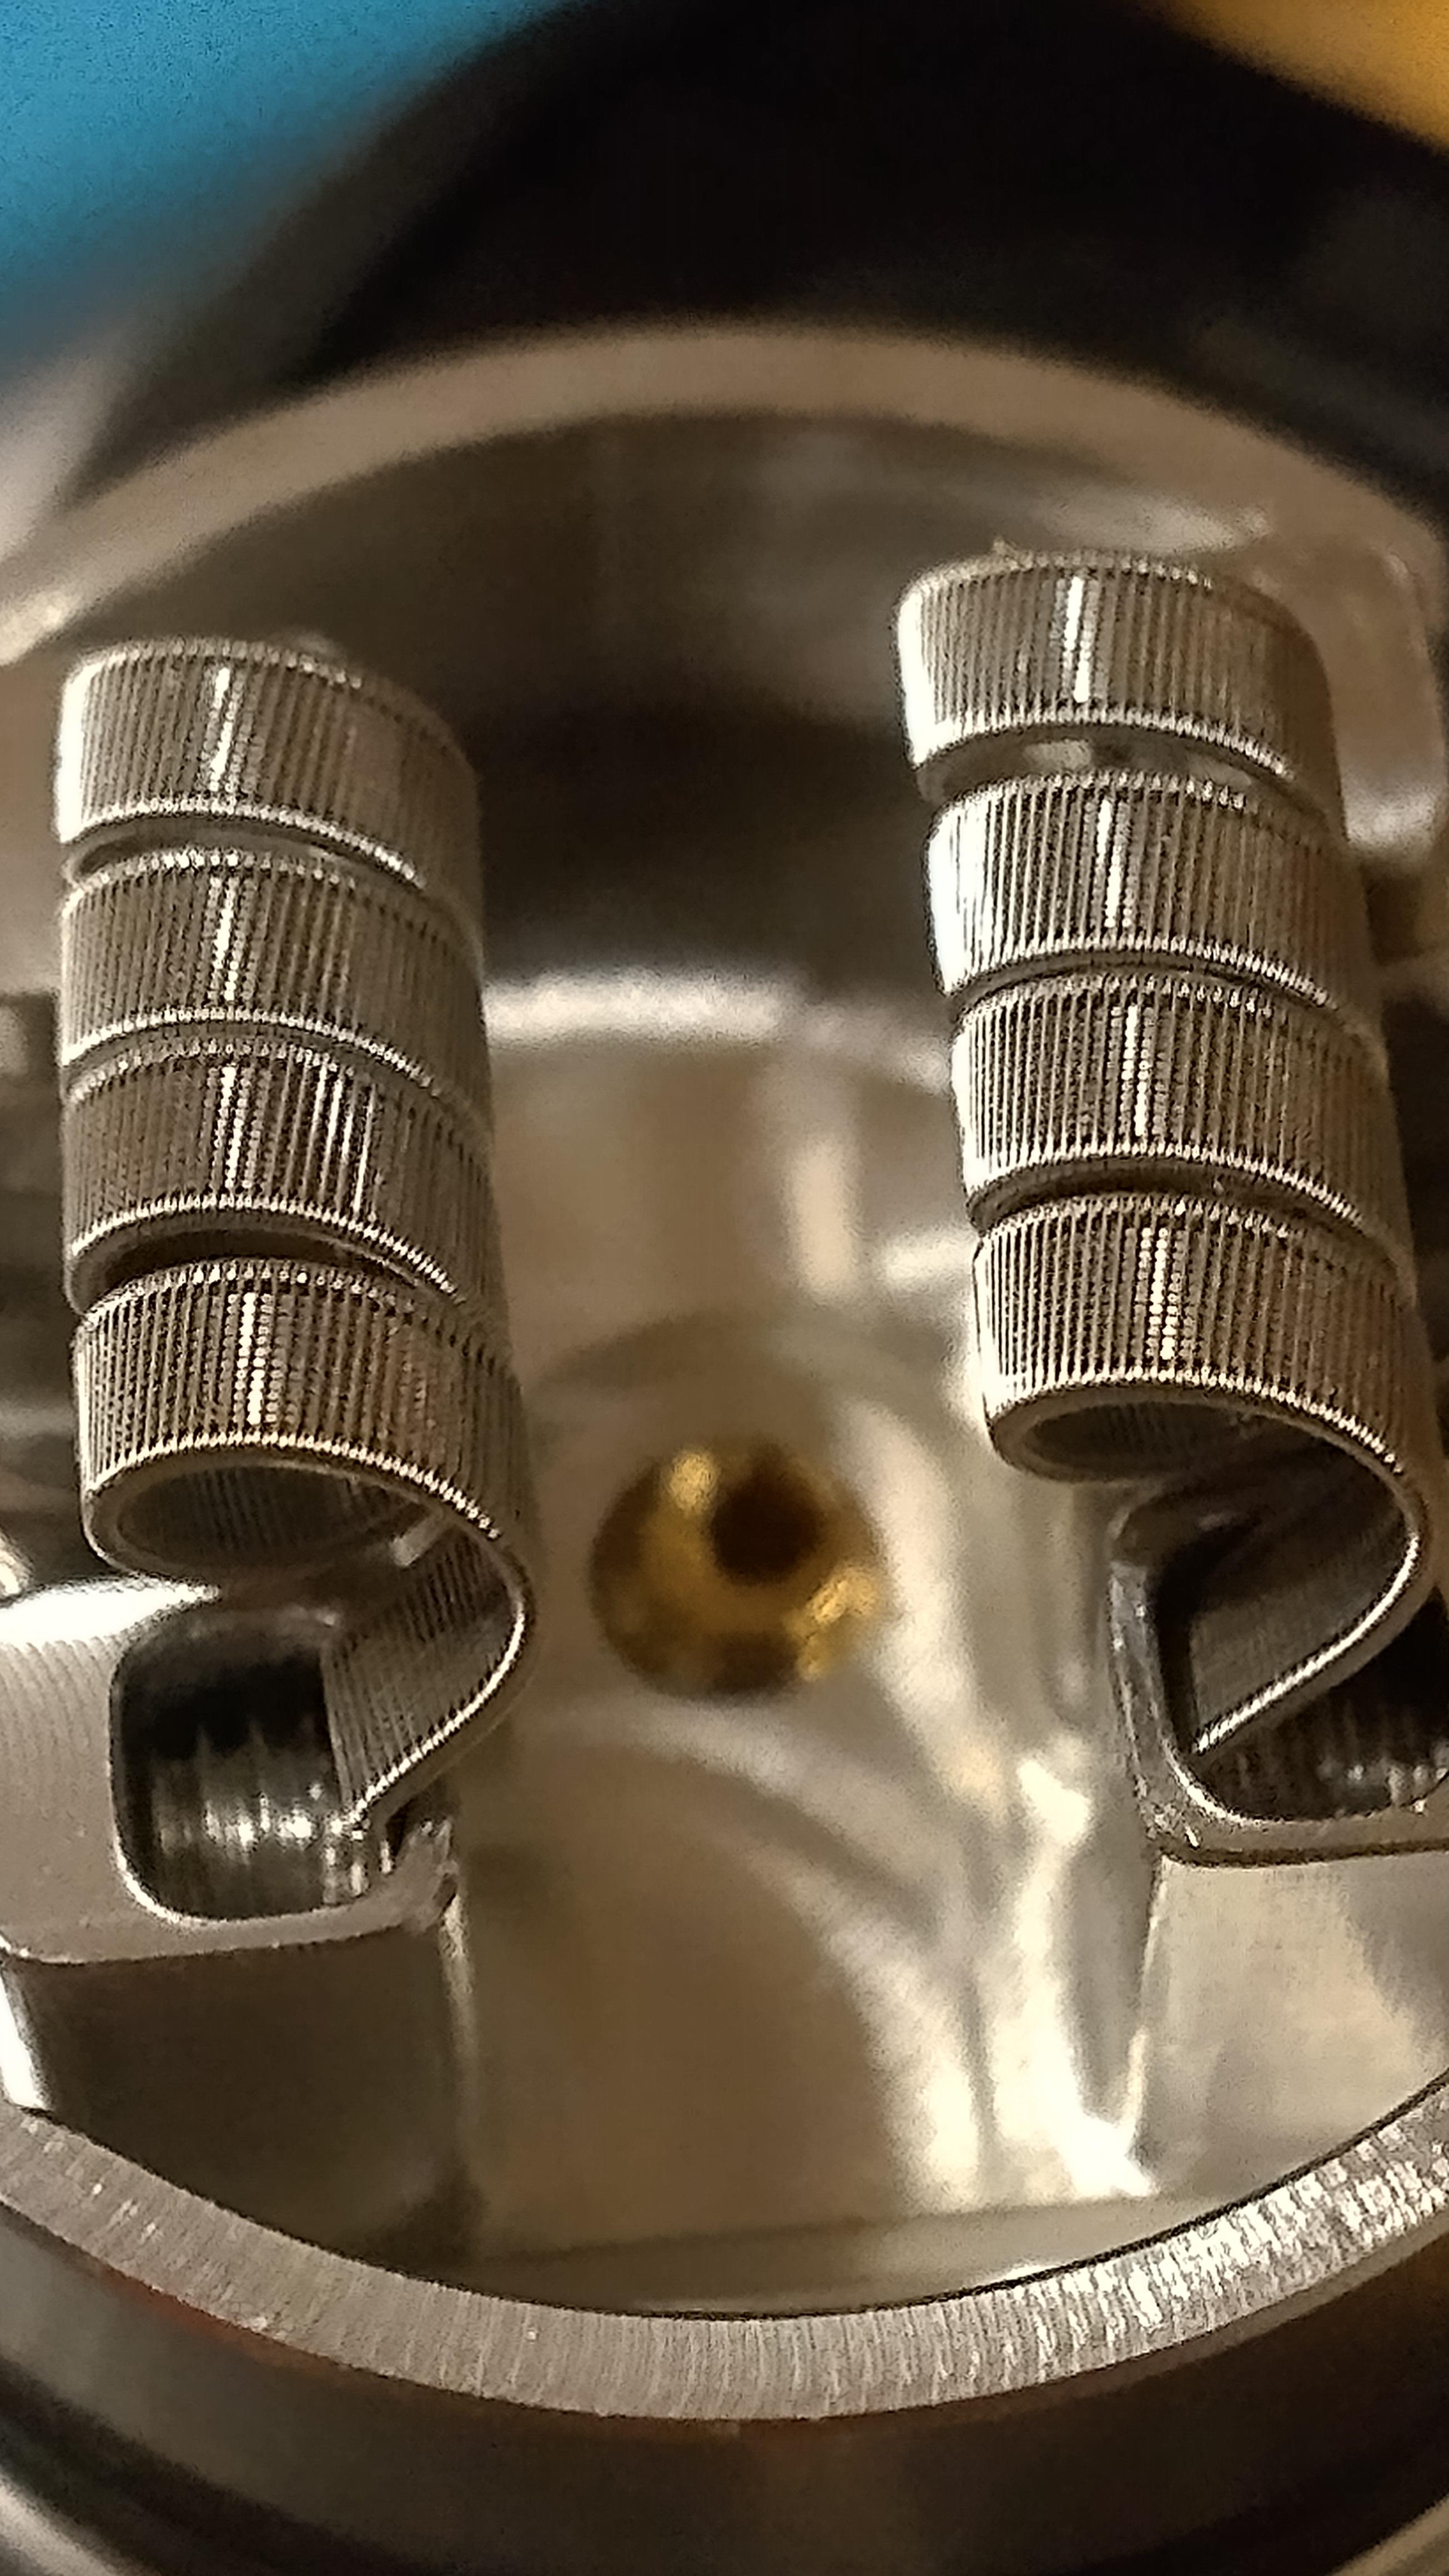
Is this the correct thread for these? My first solid ssfc pair. 2×29+10×.4/38 all n80+SS Outer fuse
I only want it to taste amazing. Is that too much to ask?
I only want it to taste amazing. Is that too much to ask?
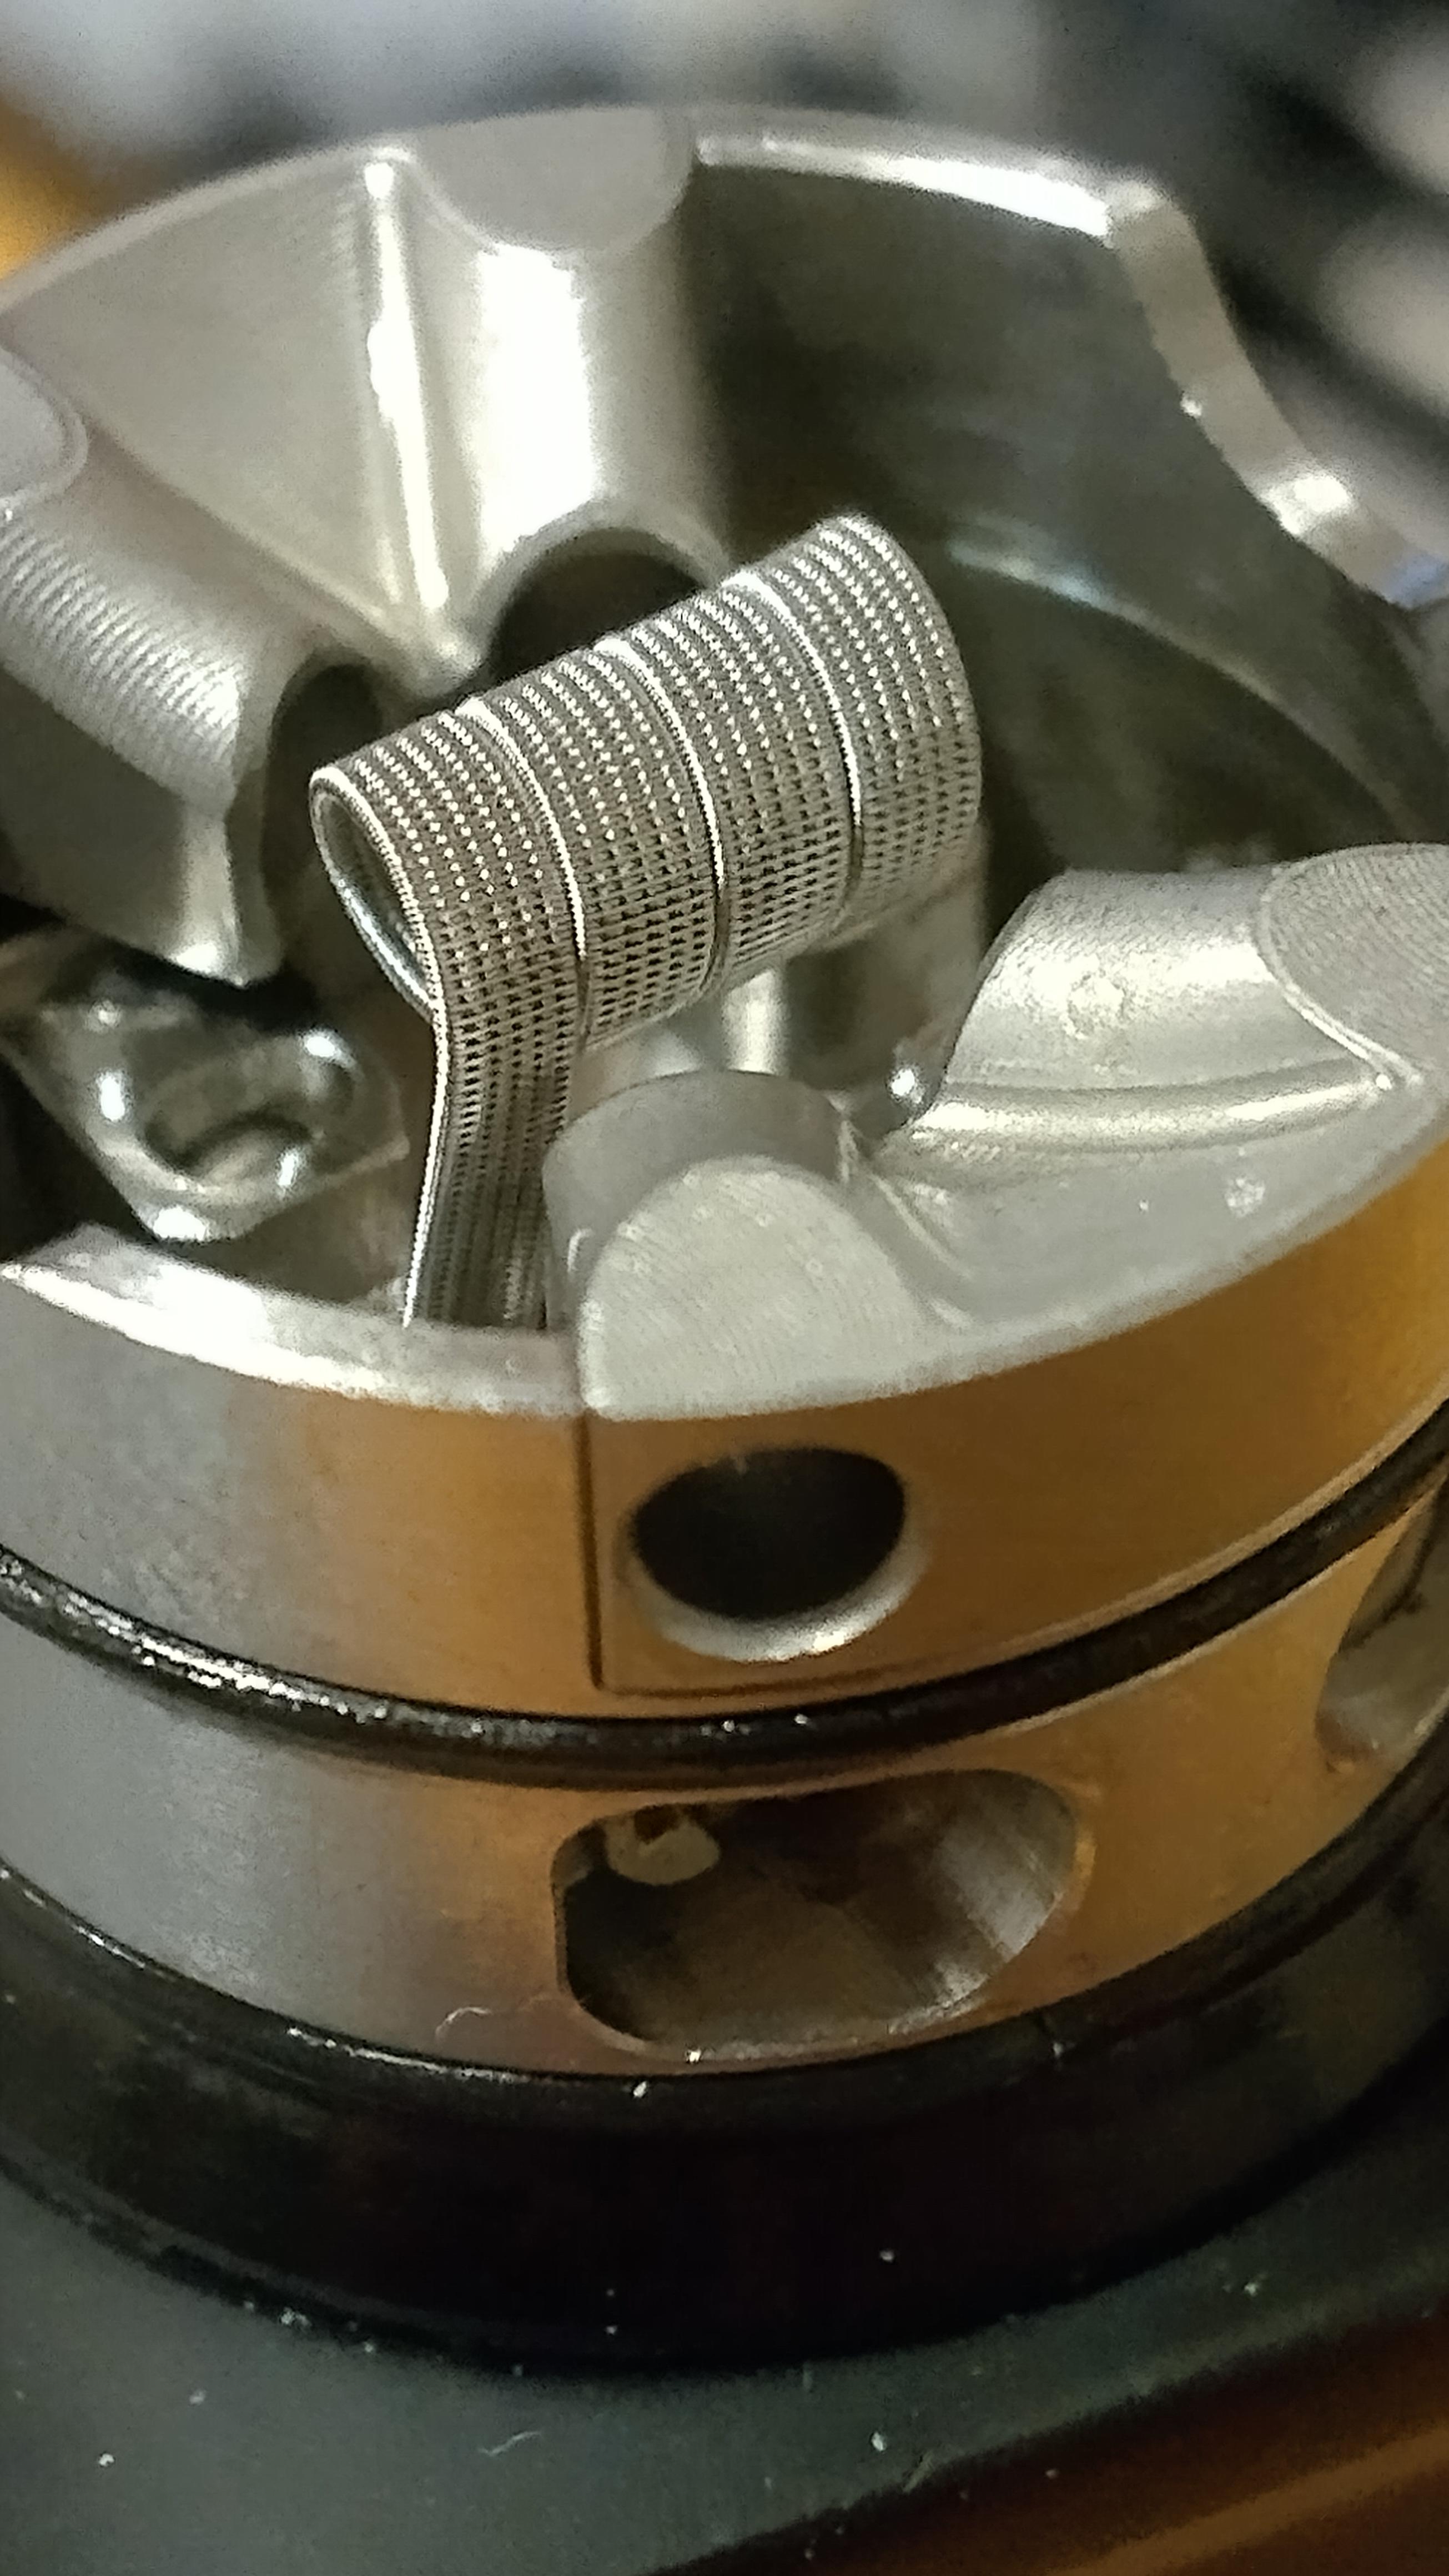
I made a bunch of corrugated SSFC coils about a month ago. N80: 2x30+(8x.3)/40ga (skip staggered)
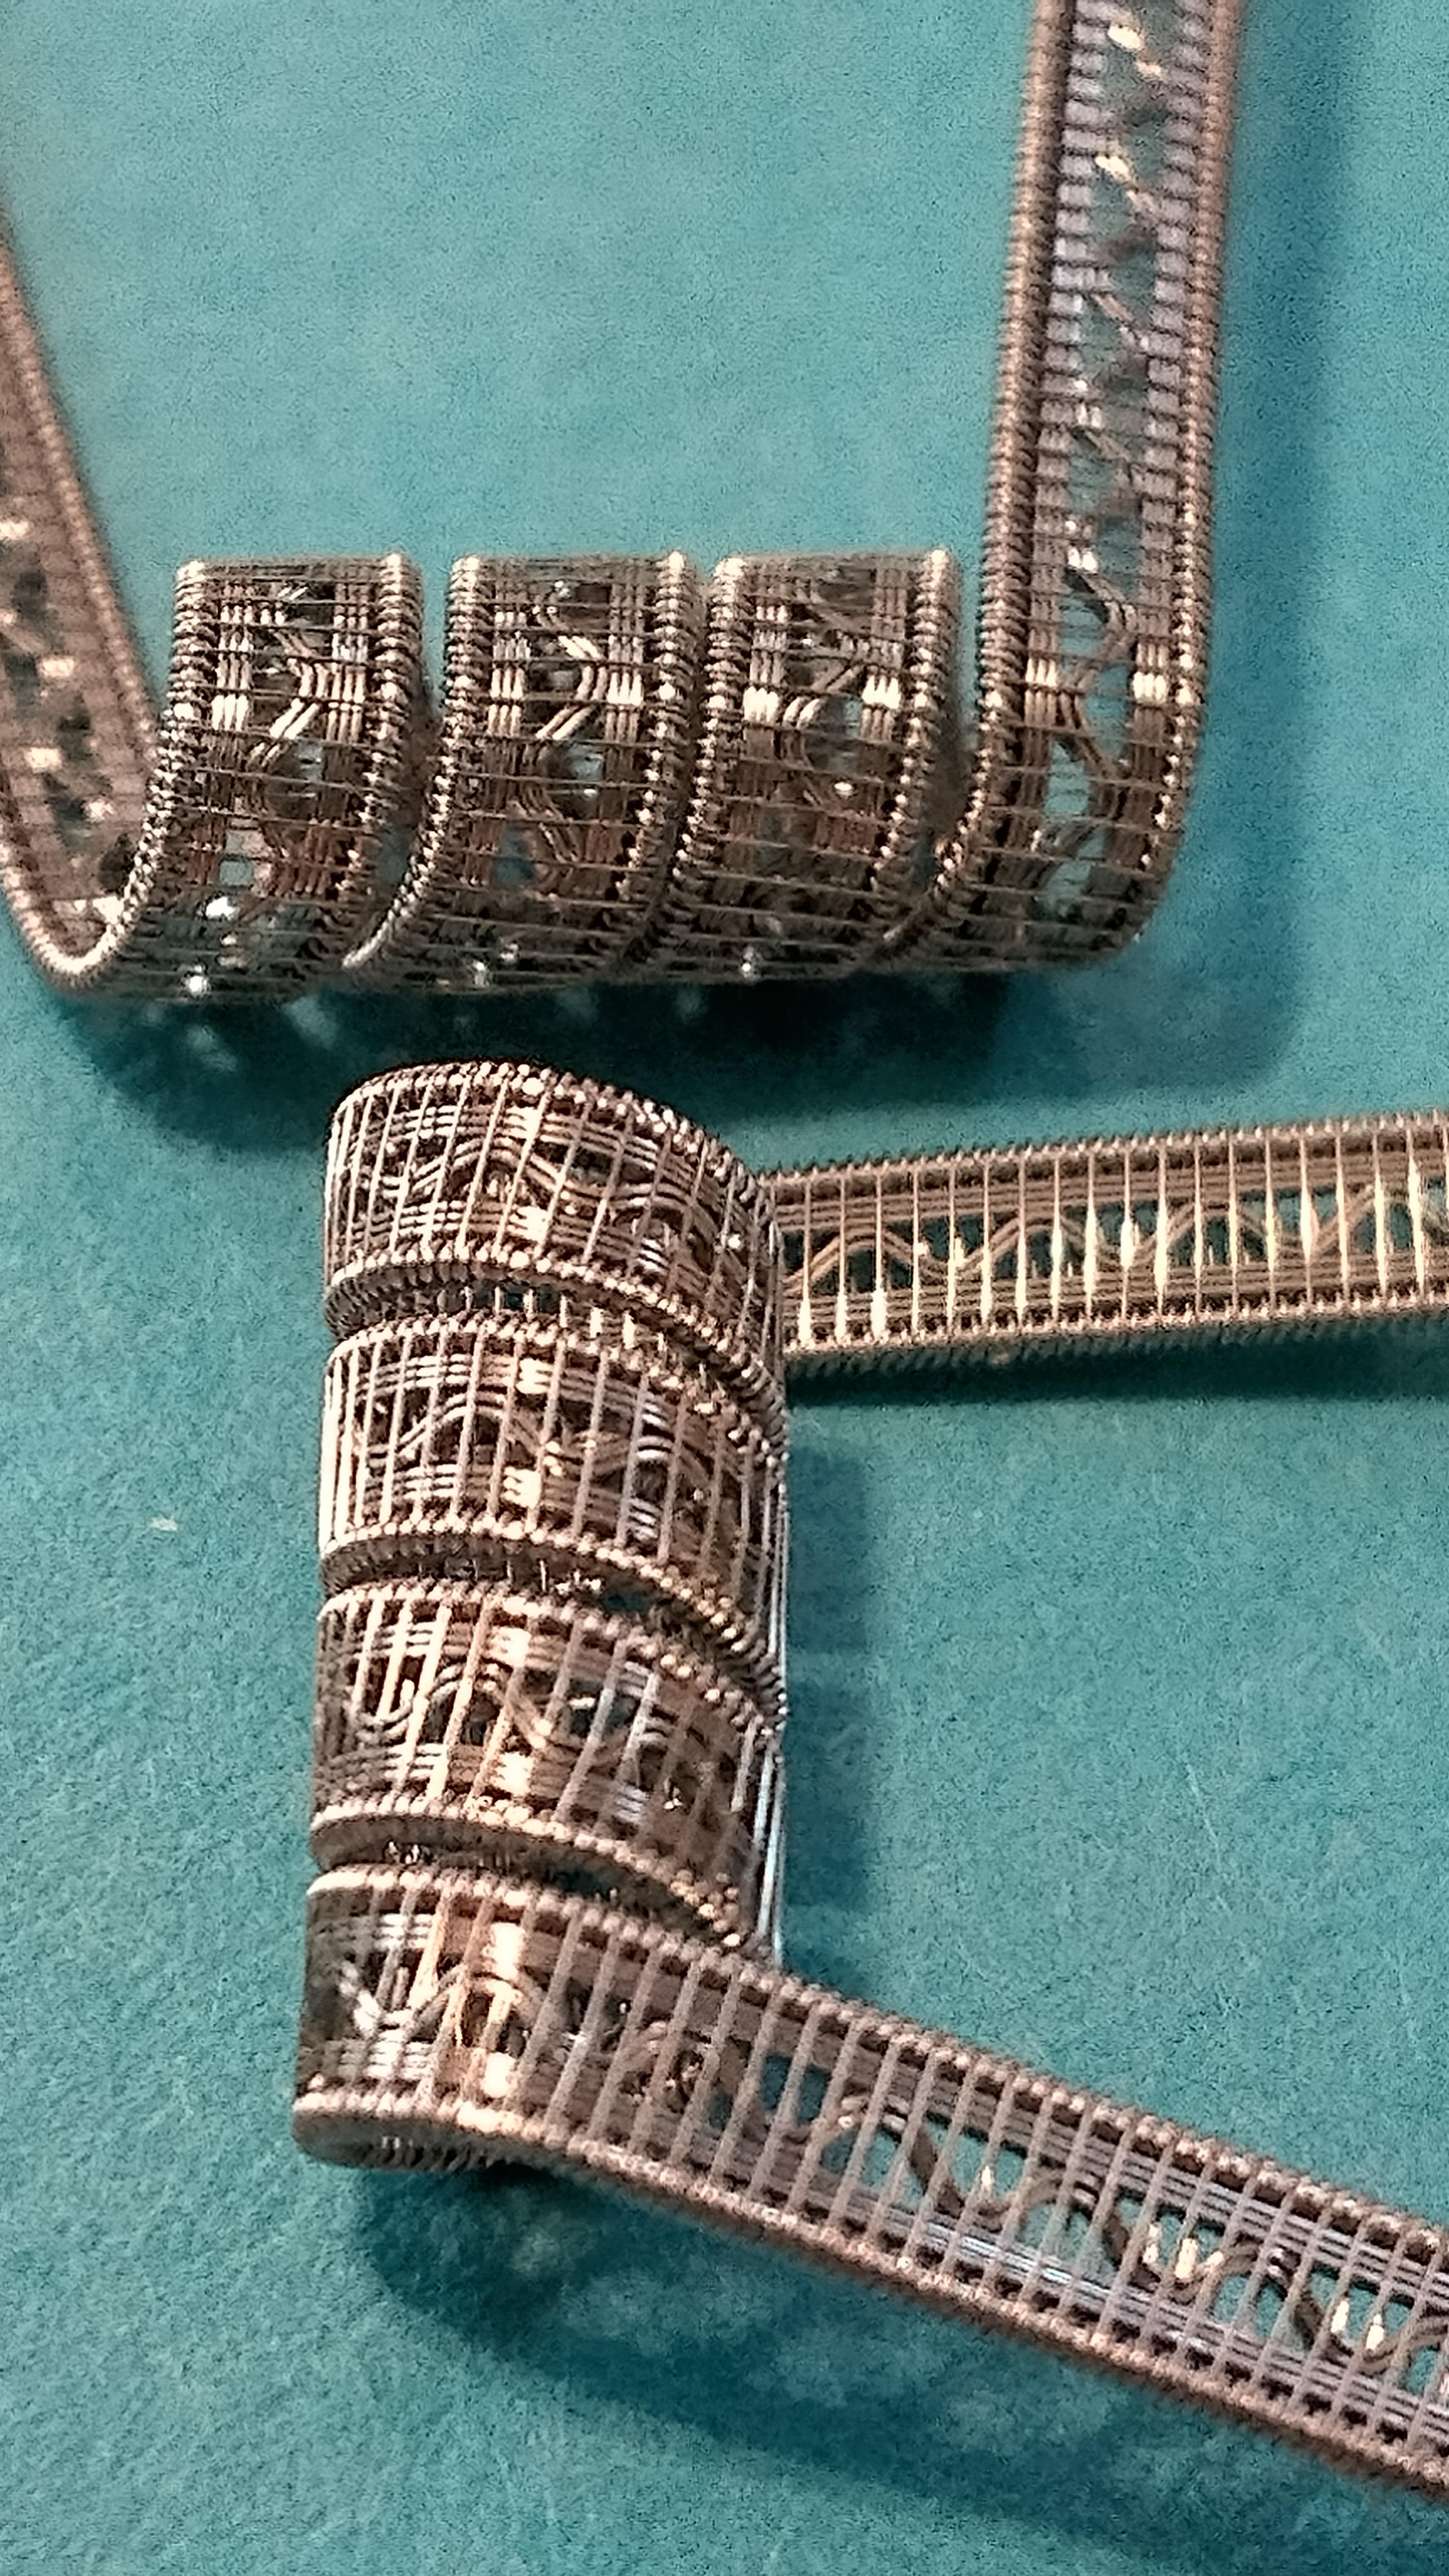
Regular SSFC'S, N80: 2x30+(12x.2)/40ga
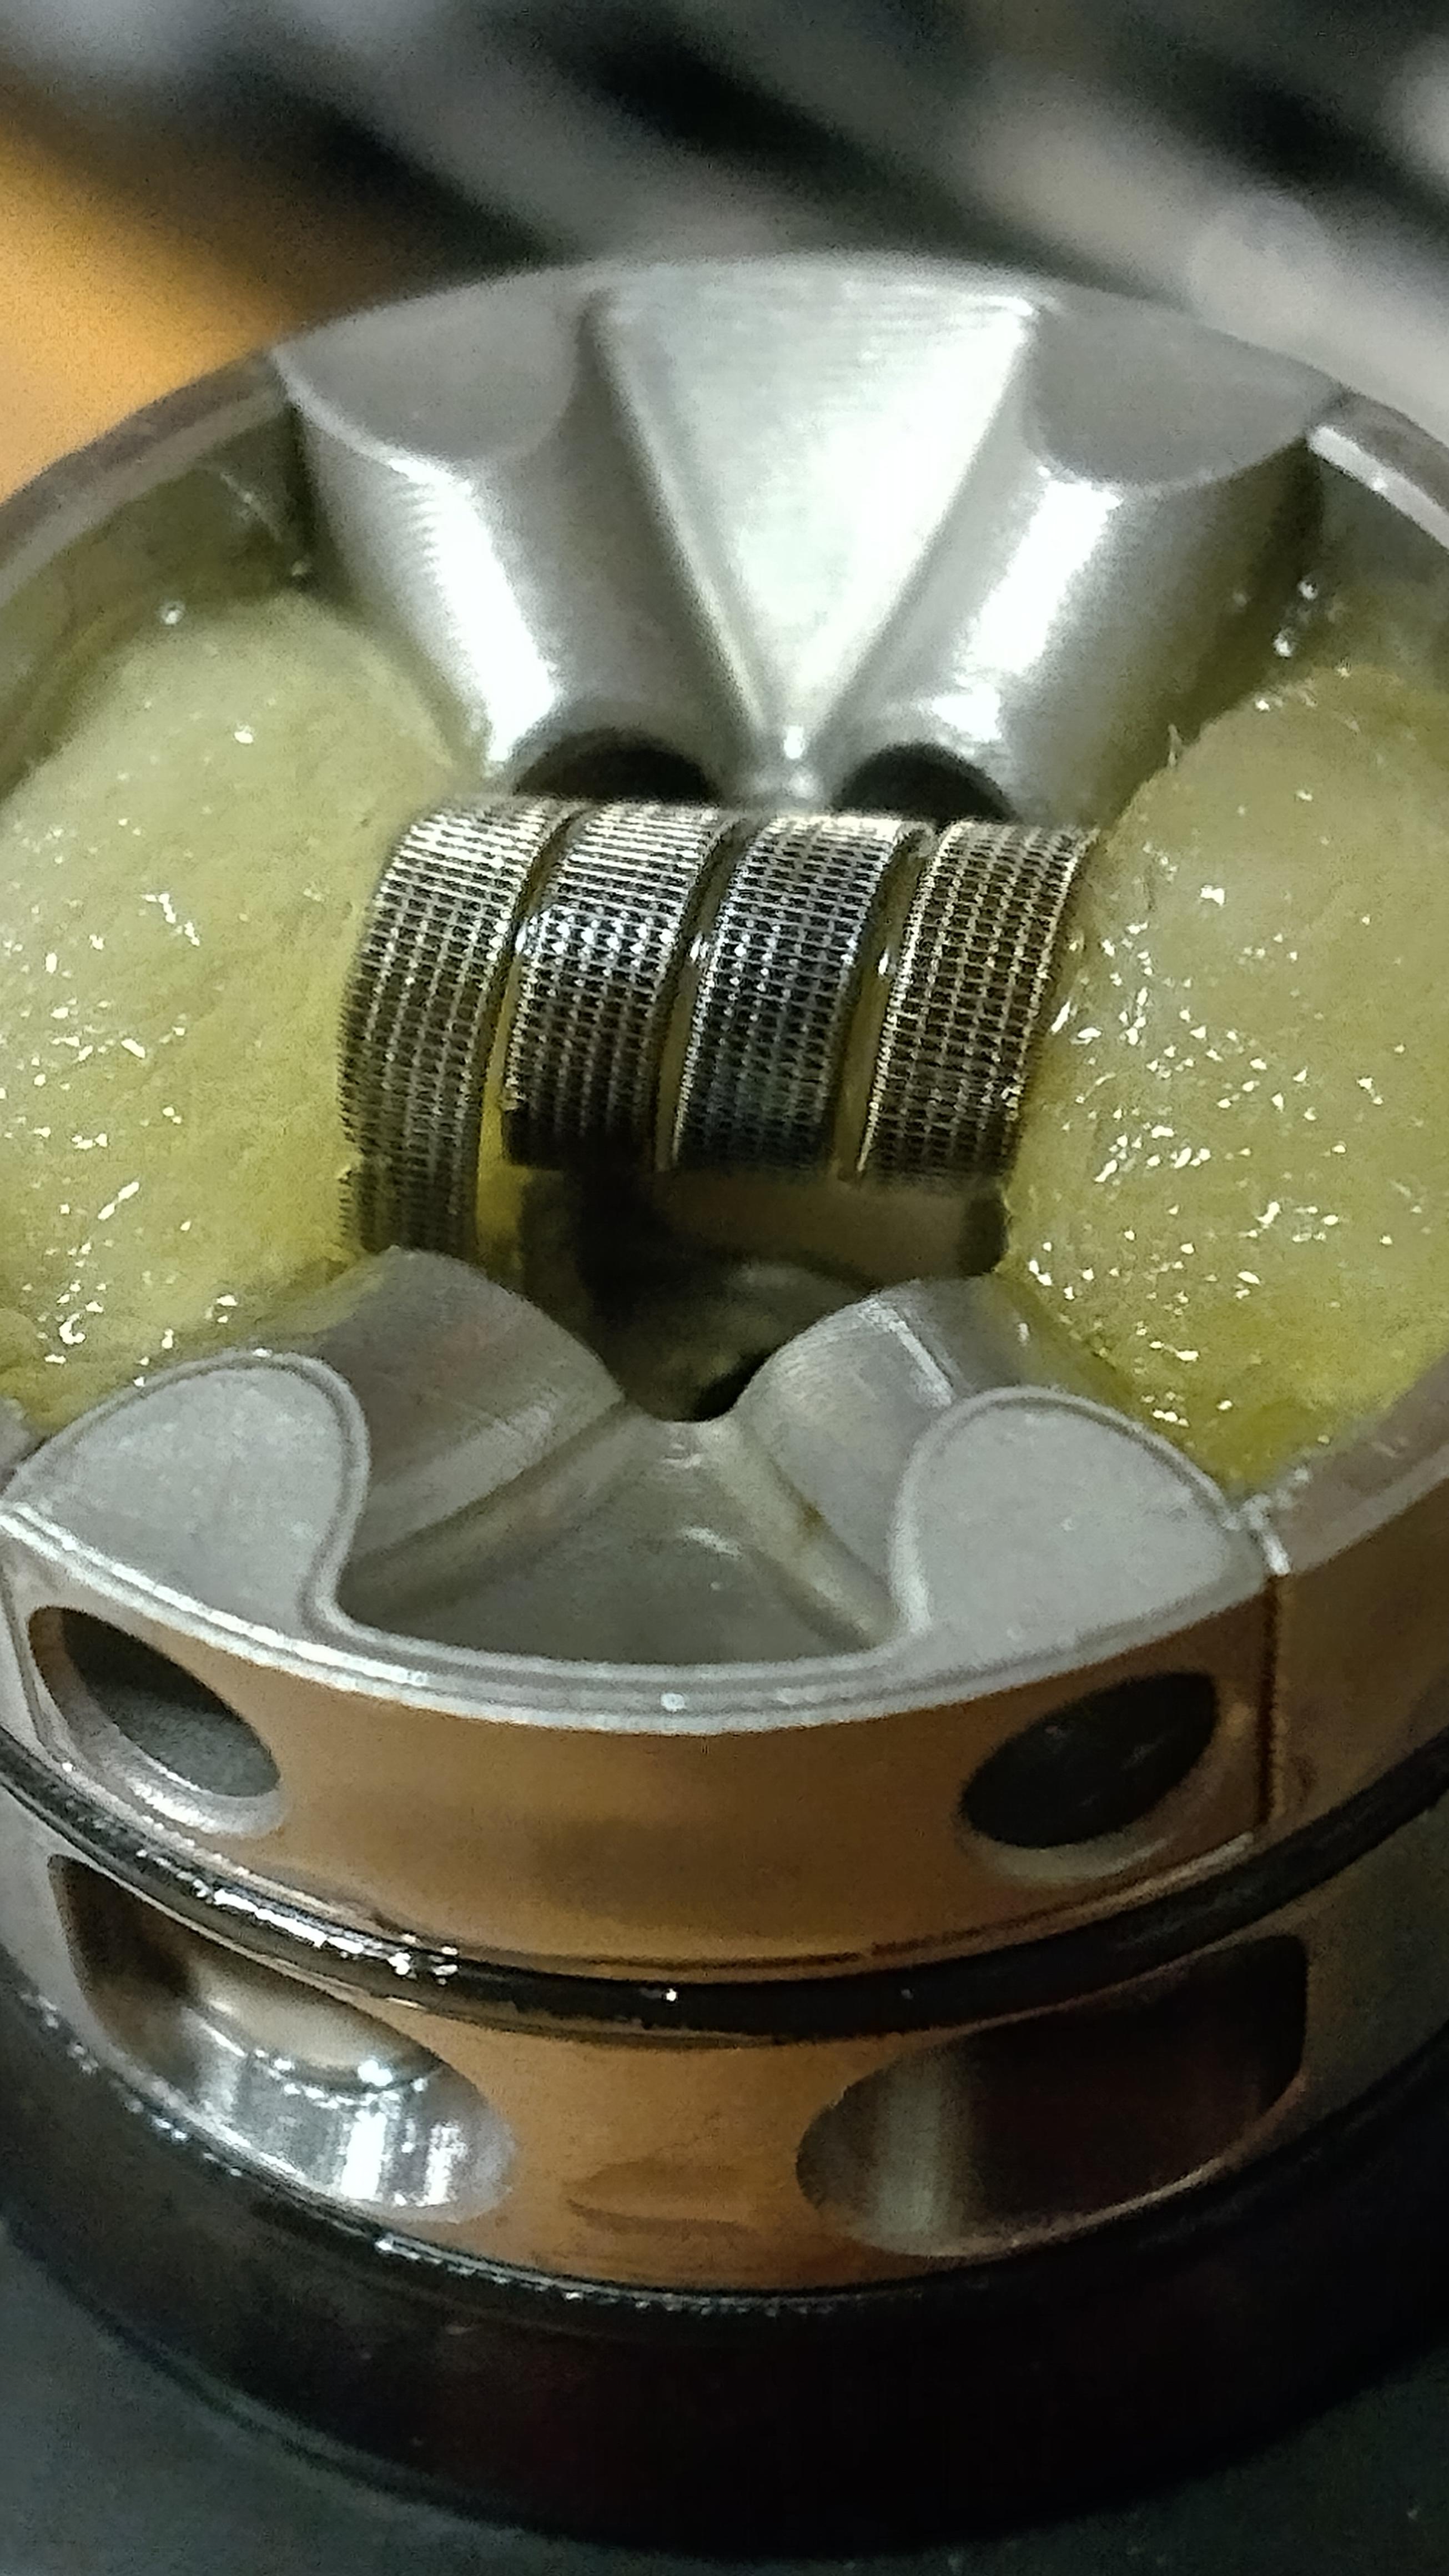
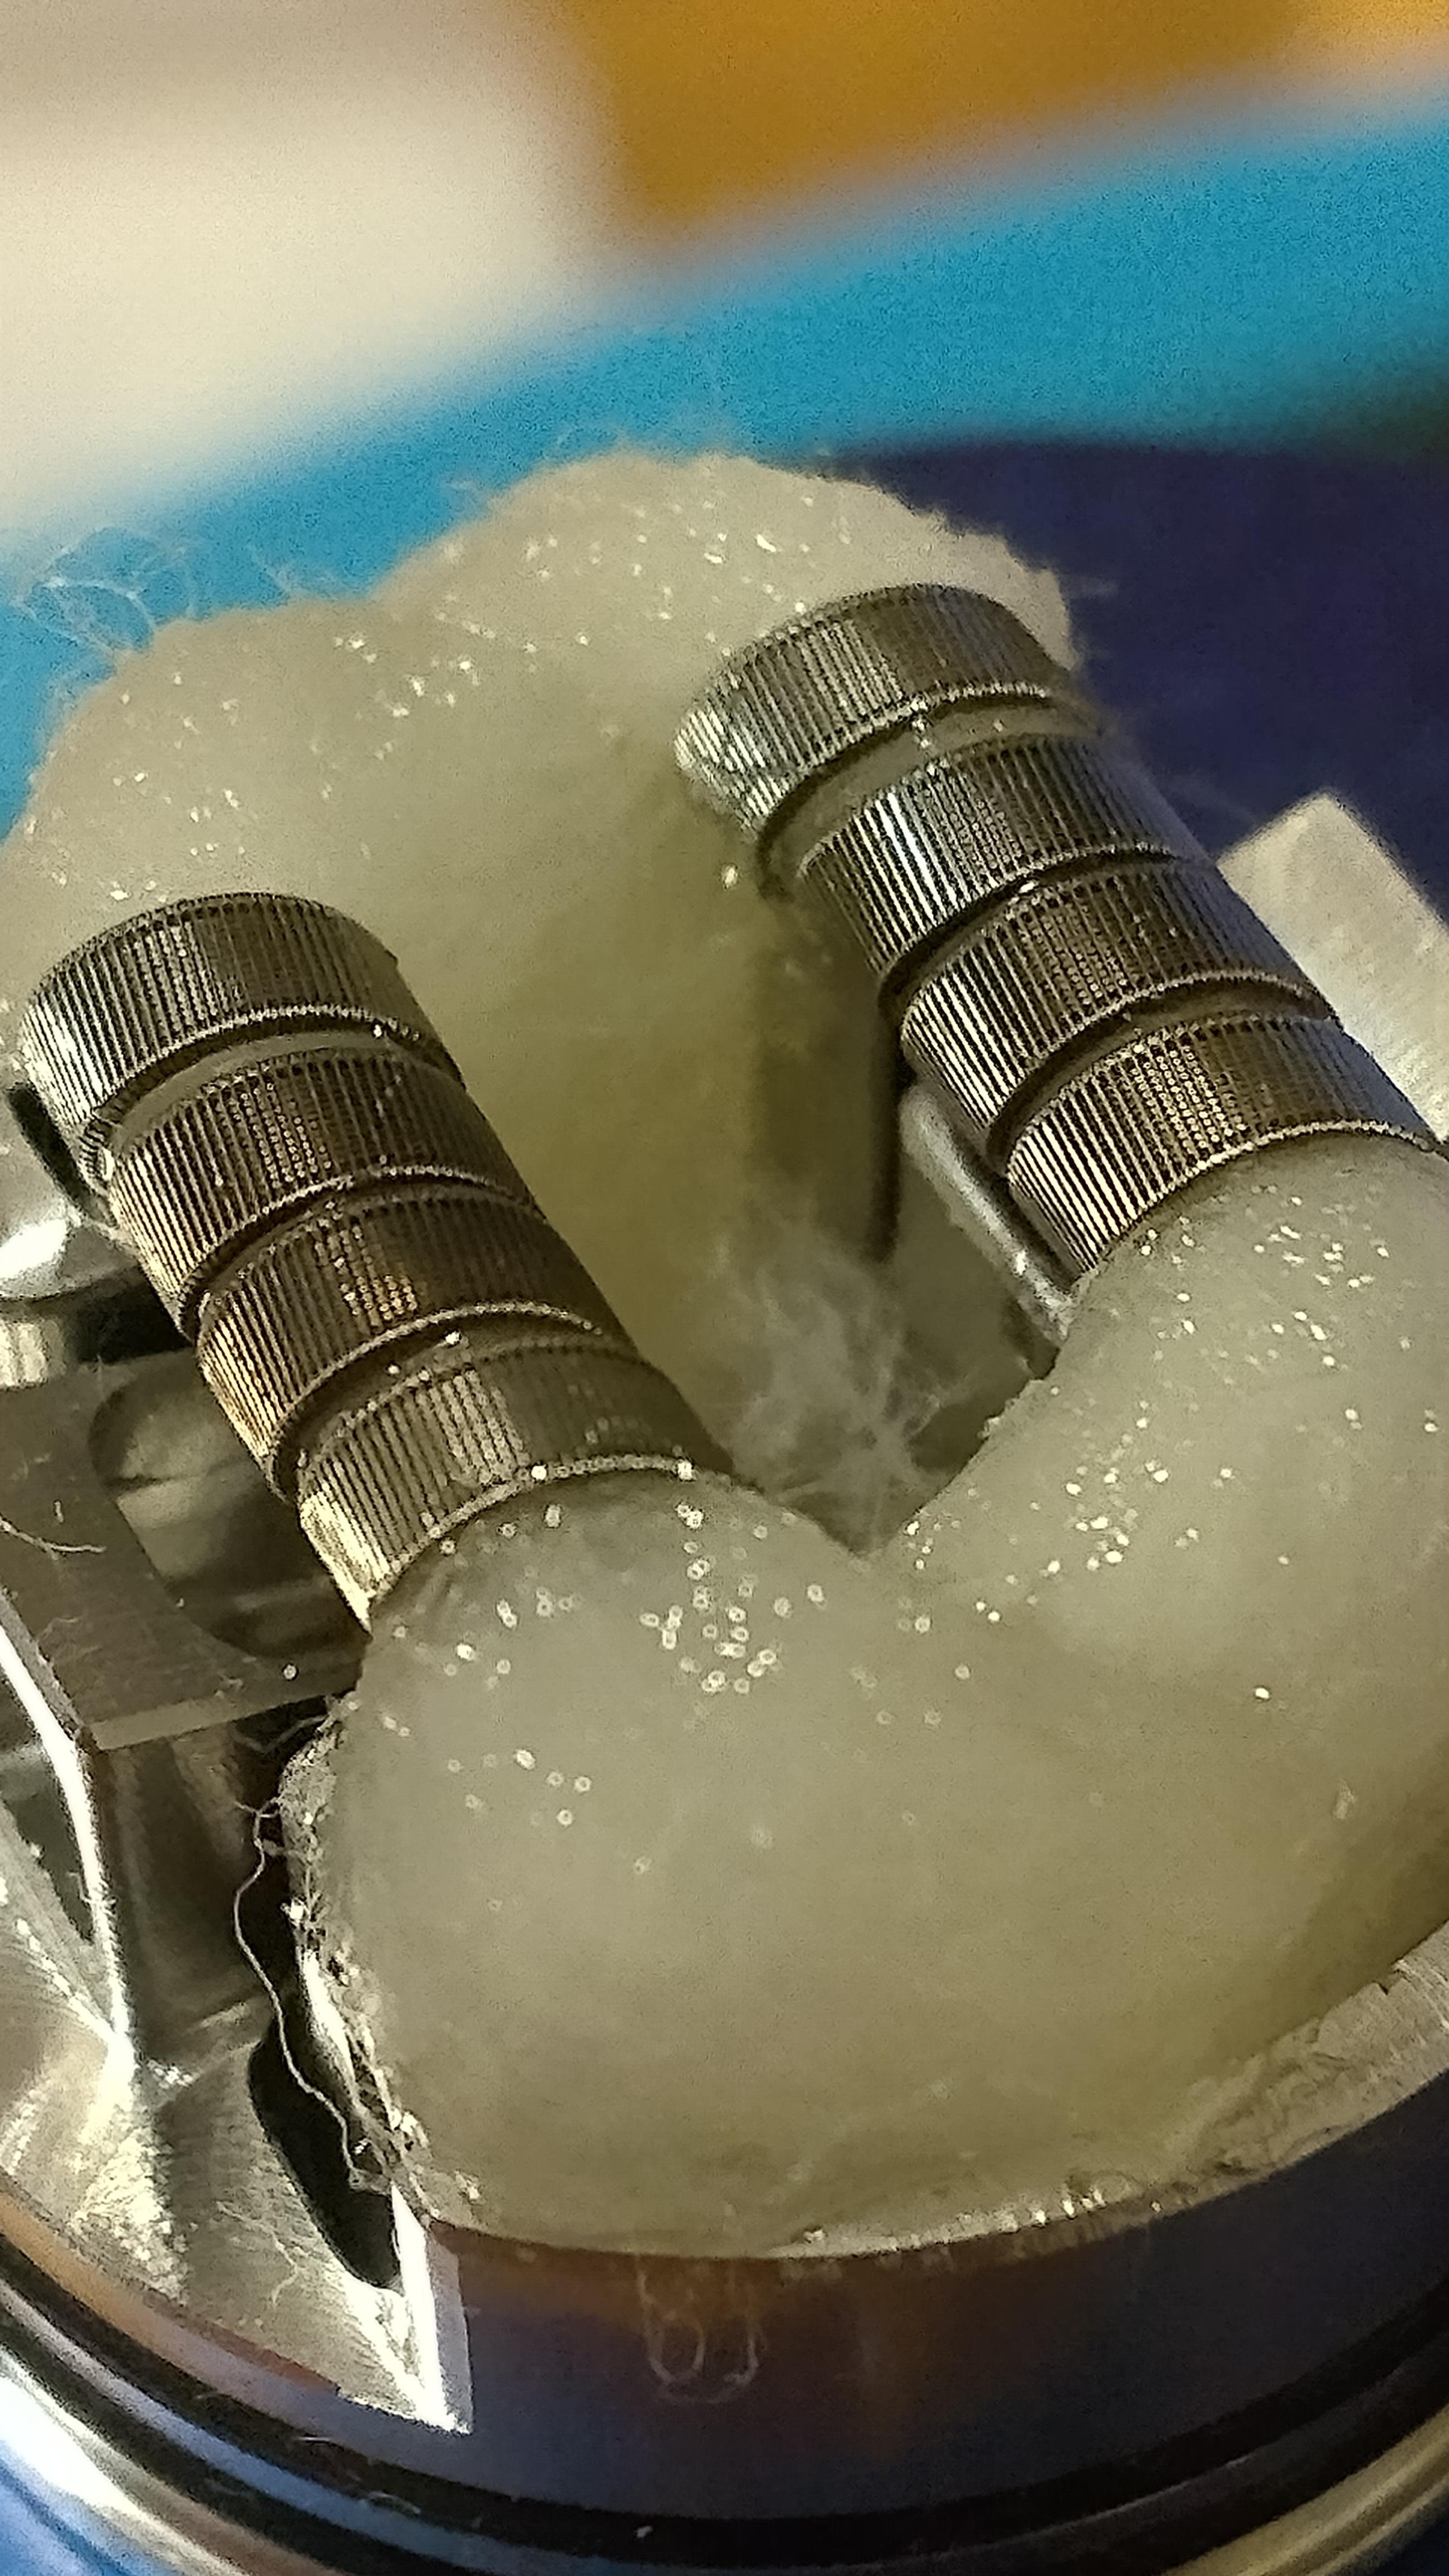
One of em in an Elder Dragon:

Made a couple of adjustments for the next ones. N80 SSFC: 2x31+(12x.2)/42ga
I like using N80 .2 ribbon. I've tried using .2 SS ribbon and it stretches out and gets deformed really easy. I'm still gonna try make SS versions of those last ones soon. I haven't tried staggering 44ga in a while but might give that a shot too.
Regular SSFC'S, N80: 2x30+(12x.2)/40ga
One of em in an Elder Dragon:
Made a couple of adjustments for the next ones. N80 SSFC: 2x31+(12x.2)/42ga
I like using N80 .2 ribbon. I've tried using .2 SS ribbon and it stretches out and gets deformed really easy. I'm still gonna try make SS versions of those last ones soon. I haven't tried staggering 44ga in a while but might give that a shot too.
FlavorOverClouds
Member For 1 Year
I made a bunch of corrugated SSFC coils about a month ago. N80: 2x30+(8x.3)/40ga
I like using N80 .2 ribbon. I've tried using .2 SS ribbon and it stretches out and gets deformed really easy. I'm still gonna try make SS versions of those last ones soon. I haven't tried staggering 44ga in a while but might give that a shot too.
Simply beautiful. I picked up a roll of 42g recently but still feeling pretty intimidated by it. These look amazing


I only want it to taste amazing. Is that too much to ask?
Thank you! Did I ever talk to you about spring clamps? I've tried a lot of spacing methods but have really started to like using clamps. When it goes right, there's nothing better IMO. I saw them in a Nick Dumas video. He says they gotta be a certain kind, and Im leaning towards agreeing with him. They're little, don't weigh much, and have softer pads. They kind of break in, or get "Molded" after a few times. Ill see if I can find the video.Simply beautiful. I picked up a roll of 42g recently but still feeling pretty intimidated by it. These look amazing
I only want it to taste amazing. Is that too much to ask?
SE 2in. Spring Clamps 30ct. assorted colors
He's been staggering a lot longer than me so I look to him as a sensei lol.
FlavorOverClouds
Member For 1 Year
Yes, I have been using spring clamps as my main method for staggering. Over 30/38 they start to become too heavy and I switch to clothespins and go much slower. I've been hosting live builds with other builders and we did staggered builds 2 weeks ago. Last week we did alien variants. This Saturday we are doing ribbon work. http://Instagram.com/ohmspinnerThank you! Did I ever talk to you about spring clamps? I've tried a lot of spacing methods but have really started to like using clamps. When it goes right, there's nothing better IMO. I saw them in a Nick Dumas video. He says they gotta be a certain kind, and Im leaning towards agreeing with him. They're little, don't weigh much, and have softer pads. They kind of break in, or get "Molded" after a few times. Ill see if I can find the video.
These are the clamps:
SE 2in. Spring Clamps 30ct. assorted colors
He's been staggering a lot longer than me so I look to him as a sensei lol.
I only want it to taste amazing. Is that too much to ask?
That's awesome! Looks like you guys have fun.Yes, I have been using spring clamps as my main method for staggering. Over 30/38 they start to become too heavy and I switch to clothespins and go much slower. I've been hosting live builds with other builders and we did staggered builds 2 weeks ago. Last week we did alien variants. This Saturday we are doing ribbon work. http://Instagram.com/ohmspinner
I only want it to taste amazing. Is that too much to ask?
FlavorOverClouds
Member For 1 Year
It's been a long of fun. If you ever feel like joining us I would love thatThat's awesome! Looks like you guys have fun.
I only want it to taste amazing. Is that too much to ask?