Okay, I've highlighted some areas to look at thoroughly
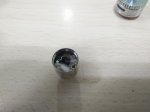
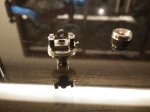
RBA Head
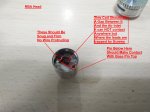
1) The Coil itself, should be suspended above the air inlet and spaced between the two terminal, only contact the coil should have with the rest of the base is at the two terminals under the trap screws.
2) Terminals, the trap screws should be snug down on the wire to hold it in place, excess wire should be cut flush to the outside of the terminals, if any wire touches the outer barrel, will cause a short, thus can cause a 0.0ohm reading, especially if it is the positive wire, only positve contact should be from the pin/air inlet, positve block with an insulator under it, and the positive trap screw, the rest of the coil "Deck" is negative, the outer barrel seats down on the deck itself and makes un-insulated contact, so can make a direct path.
3) The positive pin/air inlet on the bottom, inspect its lower insulator and the insulator of the positive block terminal above this.
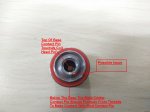
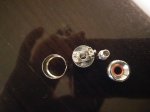
Tank Base
1) The very center contact pin is free floating, held only by friction with the insulator. It should protrude up enough to contact the coil head bottom pinm also it needs to protrude past the bottom connector threads, being brass, it is harder than copper as it contains tin and other elements, but it is still softer than the stainless surrounding it. if you torque things together to tight you could compress it long ways and swell it outward in the same principle of snugging up a rivet.
2) In the boxed lettering, this might be the culprit of the whole thing, that little nub denoted and "Possible Issue". If this protrudes enough it could keep the coil head from seating down fully to make contact with the base pin below. File and sand this down flush to the rest of the top of that threading ring right there.
The last issue will be at the mod itself, the IPV4 and IPV4S are notorious for having issue with the contact pin and the 510 connector in general, if you have another tank/atomizer to test read and fire with the mod, this would rule the mod not entirely out of the picture, if it doesn't fire or read another tank/atomizer the issue is with the mod. However... Kanger Subtanks and many of this latest generation of Kanger tanks have very long 510 threads and base pins, these can force a mod 510 pin down to far it can spring back up properly or needs to be wiggled and pryed back up into normal position.
Troubleshooting a vape over a computer screen is like troubleshooting a computer with someone over the phone, I can guide you to where to look at, but without the devices in hand all I can do is guidance. If you can't fix this on your own, take the tank and mod down to your local vape shop to have them look at it, nothing else I can do for you, sorry, but other than the little nub I've highlighted on the re-attached images, I've repeated where to look several times.
 sigh!
sigh!